
DVD-quality lessons (including tabs/sheet music) available for immediate viewing on any device.
Take your playing to the next level with the help of a local or online banjo teacher.
Weekly newsletter includes free lessons, favorite member content, banjo news and more.
Premier Sponsors


|
Please note this is an archived topic, so it is locked and unable to be replied to. You may, however, start a new topic and refer to this topic with a link: http://www.banjohangout.org/archive/184166/3
Bigwrench - Posted - 08/24/2010: 09:46:49
Phew I got a ton of questions :) In the first picture of you and Tommy getting ready to roll the rim is the piece of wood stuck into something on the mold like a slot to hold it in place while you two roll it ? it appears you have a sheet of thin metal on the underside is this to prevent cracking ? and lastly how long do you leave it in the mold to dry before you remove it. I tried to make a steam chamber out of a 6 inch piece of PCV capped off on one end permanently and the other end I can just remove the cap as needed to insert and remove the wood plies I then inserted a smaller diameter heater hose attached to a yard sale (broken carafe) cappuccino maker , do you think this would work ? I only wonder about the 20+ minutes steam time due to the small amount of water the maker will hold. If I can ever get a roof on my Woodshop I will have to try this out :) But now that I know how you made yours :) I should be ok.Thanks a bunch for your posts they are extremely helpful to the novice woodworker. I would like to talk to you about a Stewart neck I have that has a serious bow in it and get your thoughts on a repair/restore process if you have time someday thanks again
DanKnowles - Posted - 08/24/2010: 18:18:45
Jay,
More is coming...I promise.
Bill,
Didn't you see our rim rollin' mochine? 
Thanks for all the help in this, we couldn't have done it without your very wonderful advice.
Kevin,
When the plans are finalized for the banjo building workshop at Distinctive Building Products I'll post so every one will know.
DanKnowles - Posted - 08/24/2010: 18:45:27
Jon & Rick
My , My. my....boy did I open a can of worms. I'll try to address all of this more fully as we go along...as there are 3 more rims yet.
Still, that piece of metal is screwed to the mold and is called a compression strap. Without this strap holding the wood in compression we would have cracks , splits & shivers in our rim, if it even rolled. It never struck me to use a vice-grip to hold the blank in compression, I think that is a GREAT IDEA!!! Much better and quicker than my small C clamp. BTW Bill Richard taught me about the compression strap. I probably be playing snap, crackle,pop and practicing my French were it not for his generous genius.
I hate to bare bad tidings but the PVC/ cappuccino maker is not a good idea for 3 reasons.
1 sealing steam is very dangerous. You need a relief hole that is at least equal in size to the hose that brings the steam to your chamber.
2 PVC does not hold shape well under heat and here we are dealing with a lot of concentrated heat. The thing will bend and you might get burnt trying to control it.
3 The cappuccino make will not make enough steam. This requires a bunch of steam to work. Initially we tried a 1' pipe to provide steam to our chamber. We seamed for what seamed like hours and got awful results. Now we have it upped to 2' pipe and it works great. You need lots & lots of steam.
jbalch - Posted - 08/24/2010: 18:50:41
Hey Dan: That is close enough for "Old Time" I guess....
Edited by - jbalch on 08/24/2010 18:54:16
DanKnowles - Posted - 08/24/2010: 19:19:16
ROLLING, ROLLING,ROLLING
Continuing with the rolling…We have much better photos of the process this time thanks to the wonderful efforts of my friend Kevin Bailey. He was right in there and got the shots perfect. He did it in ways I never could, moving like a mad dog trying to sneak through the small window of time in which the wood is pliable.
Anyway here we go with another of the four rims that we are making.
Go Tommy go! The race is off, Ogle's pulling another stick from the steambox…
Hurrying we stick the wood skarf end in, into the mold and clamping it to the compression strap.
Quickly we are starting the roll..
Note the gloves, this sucker is boiling hot. It stays very hot throughout this process. This whole thing from the time the wood is removed from the chamber until it is clamped takes maybe two minutes of very concentrated effort.
Feverishly we are rolling.

Rolled! Into the shop now to finish the job!
Quickly tightening the roll and clamping it into place. Not the concentration. That sucker must be serious!!

Whacking like a mad man (he's not???!) I even out the roll.
Complete! You will notice the bit of extra rim hanging out. Most of this will be cut off before I glue the rim. Now it will stay in the mold for about 1/2hour to cool. When it is cool out she comes and is clamped into a round.
Now its time to get a glass of ice tea and go into the A.C. and pick banjos!
DanKnowles - Posted - 08/24/2010: 19:20:53
John
I LOVE IT!!!!!!!!!!!!!!!!!!!!!!!!!!!!!!!!!!!!!!!!!!!!!!!!!!!!
DEmery - Posted - 08/24/2010: 20:07:16
Dan...I got worried when John posted that rim photo. I know you are creative but wondered how you would build a tension hoop with those wrinkles in it. David E.
ogletj - Posted - 08/24/2010: 20:18:39
It was hot that day. When I first saw that picture I thought my face must have melted.
DanKnowles - Posted - 08/24/2010: 20:37:12
David,
There was a crooked man
Who built a crooked house
but when he built a crooked banjo rim
they said he was a louse!
Carl,
Nope not yet....
Tommy,
I forgot how hot it was... has your face recoverd yet? I know the rim hasn't!
Will1717 - Posted - 08/24/2010: 20:44:41
Dan:
Isn't it great when it all comes together! Like I told you, once you get the feel of it all, it just works beautifully. You just can't miss! I love the portable roller that your rolling on. Now I see what works for you I'll get my thoughts together and see what I can come up with that will make the task a little easier. I've got a plant full of corperate mistakes that we've made over the years and have more drives, bearings, rollers etc. etc. in the storage racks just looking for a useful existance. My problem is I just can't throw anything away, and over many years have collected all these great parts just waiting to be put to a good use. If you can think of anything that will work in your process just give me a yell. I'm looking for an excuse to make a visit to your shop!
Something you should try is add some liquid softener (Downey works great) to the water being boiled and let me know what you think. You may be amazed at the results + it will add a nice fresh scent to the new rim! Before I switched over to my brute force roller I never steamed a rim without the addition of some liquid softener to the water. Give it a try!
Watch out this rim rolling can get real addictive!
Bill Rickard

Edited by - Will1717 on 08/24/2010 20:47:03
BNJOMAKR - Posted - 08/25/2010: 04:09:47
Dan, I can hear that rim a sangin' now...
I've been rolled in my sweet baby's arms,
Rolled in my sweet babies arms,
I've been streatched around the rack 'til my other end came back,
And I'm rolled in my sweet baby's arms!
trapdoor2 - Posted - 08/25/2010: 06:41:20
quote:I wrote an article (years ago) for a model-airplane magazine where I detailed my technique for rolling tubular balsa fuselages. Using a surfactant (such as Downey) essentially allows the water molecules to more easily pass into the wood (by lowering surface tension, etc.). It makes the bending easier and quicker...but I never tried it on anything but Balsa (which, @ 0.032" thick, goes limp like a noodle). I was actually able to make 1" dia balsa tubes that were twisted like a paper drinking straw.
Originally posted by Will1717
Something you should try is add some liquid softener (Downey works great) to the water being boiled and let me know what you think. You may be amazed at the results + it will add a nice fresh scent to the new rim! Before I switched over to my brute force roller I never steamed a rim without the addition of some liquid softener to the water. Give it a try!
Edited by - trapdoor2 on 08/25/2010 06:42:38
Jonnycake White - Posted - 08/25/2010: 12:19:03
Forgive my impunity - but instead of using a roller stand, couldn't you just lay it out on a table and roll it up like a sleeping bag?
DanKnowles - Posted - 08/25/2010: 19:17:20
GLUING RIMZ
Now that we have all of the rims rolled, each was clamped in the approximate shape. I carried these home and stuck them in the attic for nearly a week of good old summer heat curing. Here is one being clamped to be taken to my home.
Back at it several days later and prepairing to glue.
Tools of the gluing trade. Hide glue, a mixture of hide and bone glue. This is in granular form. Glue beaker, an old glass bottle. Glue pot, this is a small crock pot I got at Wallie World quite a few years ago at Christmas. Electric tea pot, for boiling water.
Here I’m spooning glue granules into the beaker, about 3 tablespoons full.
Adding boiling water.
Placing in the glue pot.
Cooking. The glue will cook for around two hours before it is ready to use.
Here is how I check the glue for readiness. A small amount is placed between my fingers and allowed to rest for a moment then pulled apart it should feel quite sticky and produce little threads.
Bob Robert - Posted - 08/25/2010: 19:26:26
Who needs school? I can learn so much from the BHO and Dan!
Oh, wait, I'm a teacher . . .
DanKnowles - Posted - 08/25/2010: 19:30:54
Bill
Thank you! I do have a bunch of ideas, you know me. I'll call you tomorrow (Thurs)
Marvin,
I love it !!!!
I also love that wonderful little banjo you're building. Folks if you haven't looked at Marvin's mini banjo post do it now! You will be amazed.
Marc,
Maybe I could make some drinkingstraw sized banjos.... I could start a new post New Mini Banjo 1850 style!!!
Seriously thanks for that information I didn't realize that stuff could help. I know that some of the furniture factories use some type of nitrous ammonia to make their wood into noodles. Next time I'll pore the the wine into the steamer instead of drinking it!
John
I forgot I set you that one!
Jon,
That's not to far from the idea I have. I like it.
DEmery - Posted - 08/26/2010: 07:24:48
Dan a question was asked somewhere back in the thread about the scarf joint on one end of the board. I think the question was "does the joint go to the inside or outside of the rim." I see from the photo the joint is rolled to the inside. Is the process now to feather or scrape the outside end to a smooth, tapered line that rounds out the rim and compliments the scarf joint? David E.
SPLogDog - Posted - 08/26/2010: 07:38:03
Dan, is there any reason why you use an internal mold instead of an external? Are there any advantages to this method?
DanKnowles - Posted - 08/26/2010: 16:53:13
David
Yes the scarf will be cut before it is glued and then slicked up after it has cured. The scarf will show on both sides of the rim.
Will
The main advantage with an outside mold here is that the inside mold allows the scarf lap to be on the outside. Having the scarf on the outside makes for much easier is much easier trimming.
DanKnowles - Posted - 08/26/2010: 19:05:38
THIS IS A STICKY WICKET
Now that our glue has been cooked we are about ready to glue a rim. I’ll be using the same mold that the rim was rolled upon. I have removed the compression strap so it is glue clamp and go.
In this first photo dthe glue pot is ready and the rim is wrapped around the mold. I am using this step to figure the length of the outside scarf. Because the inner scarf is 3’ long, I cut the outer lap to 4’ to give me a bit of waste to work with later.
I reverse the order of the lap placing the outside on the inside,the inside to the outside. This allows me to easily apply glue to the inside of the of the rim.
Next I flip the rim over and apply glue to the other side of the joint.
Now the order is reversed and the first clamp is applied. This oneis placed in the middle helping pull the the rim tightly into shape.
Then the scarf is clamped with one clamp.
Six clamps are to be placed on the joint. Here the fourth clamp is tightened.
Clamped.
Viper - Posted - 08/27/2010: 09:47:03
If you can't find a clamp in your local hardware store, it's because Dan Knowles has bought them all.
DanKnowles - Posted - 08/28/2010: 13:35:13
OH Ya! Tommy Ogle's son Stephen used to be quite amazed at my clamp collection. And was even more amazed when his dad told him that sometimes I ran out of clamps.
Slingerland - Posted - 08/28/2010: 13:43:40
Great thread, thanks for sharing. I've been thinking about building some rims like this. Now I have a better idea of how to go about doing it. Problem is, I still don't have the skills!
DanKnowles - Posted - 08/28/2010: 13:58:54
TRIPIN' ON THE WOOD
or
wood buying trip
Tonight a sabbatical is in order… a small break from the rim task… a vacation from rolling, not rocking, rolling.
One of the things that takes up a great amount of time for a luthier is searching for wood. Wood is the heart beat of my trade. When I am on the road touring I always scout out great wood suppliers, hunting for just the right piece. Many times the wood I buy will sit for years in my shop before being used. The Spanish Cedar for Dvid Emery's Goshen banjo neck had been in my shop for at least 5 years. There are very few arias of this country of ours where I haven't scouted for wood.
Now I am fortunate in the part of the country where I live. There are many mills and dry kilns and wood suppliers within a reasonable distance. Most of the folks who run these places know me and are quite nice enough to allow me to search their stacks. I guess a note about digging through wood stacks is in order here. Whenever I go through someones wood stacks it is my policy to leave them in better shape than when I arrive. I want folks to welcome me back to their businesses. There are several mill owners who call me when something interesting arrives. I love the pretty wood and I appreciate these folks willingness to help me out.
The event which I shall attempt to describe to you happened several weeks ago. After dropping the grand kids off at school I headed north from Paris, on Hwy. 641. I stopped in Murray, Kentucky at Fidalgo Bay and purchased a double cappuccino. Returning to the highway I continued north until I exited onto the Purchase Parkway and continued north. After about 10 miles I got on Interstate 24 going… yes you guessed it, north. Another 20 or so miles I reached Paducah, Kentucky where I headed to my destination, DISTINCTIVE BUILDING PRODUCTS.
I’m here to search for some Spanish Cedar for the 1850’s banjo necks. In north-west Kentucky this is the place I go for hardwoods. I discovered them a few years ago as I was heading to the Paducah river front to get on the Riverexplorer to do a show. When I found that they stocked Spanish cedar I was hooked. Anyway they carry a lot of hardwoods here and have a shop where they do beautiful custom mill work. Just their showroom amazes me.
This is where we are beginning planning on doing a banjo building workshop.
Anyway I’m here today with my son Patrick. Here I’m headed into the treasure trove.
I’m looking through a stack of Spanish cedar, much of it 8 & 10 quarter thick. Some pieces are 16’ wide. This particular stack is good old wood.
After pulling som pieces out that I think are possibilities, I’m sighting down one for straight. That’s my son Patrick standing there watching.
Here I’m sanding the end to check grain orientation. Usually I carry a small block plane to do this, but it was early when I left town and early morning forgetfulness had set in. 
This photo doesn’t show it well because of the circular saw kirfs, but this piece is almost perfectly quartered.

We will see some of this wood soon again when I start sawing it into necks. I can hardly weit to smell the spice of this cedar.
DanKnowles - Posted - 08/28/2010: 14:04:45
Paul,
Do and you will. More is learned by doing than almost any other way. A great way of learning is by attending a banjo building work shop where some one can help you achieve the skills you need to be able to create the banjo that you want.
Carl Ball - Posted - 08/28/2010: 21:05:25
Dan I am unsure what this means " but this piece is almost perfectly quartered."?
jay_m - Posted - 08/28/2010: 23:32:21
"quartered" = quarter sawn, which means a couple of things. first, its a way of cutting a log so that the grain runs perpendicular, or as close as perpendicular as is possible, to the face of all boards. heres what that would look like: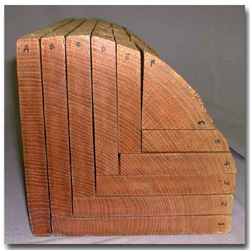
outside of that, boards that happen to have the proper grain orientation are also usually considered quarter-sawn, even if they come from a log that was flat sawn.
either way, these are the types of boards you want to use for instrument making, as the straight grain helps assure structural stability and prevents warping that might otherwise come to pass with wavy or irregular grain.
DEmery - Posted - 08/29/2010: 04:37:13
I have never seen a visual on quarter sawn boards or how it relates to cutting a log to get quarter sawn wood. Nice illustration. David E.
dbrooks - Posted - 08/29/2010: 04:47:02
Slingerland,
There's a banjo building workshop coming up October 10-13 in Appomattox, VA. Registration deadline is September 17. Mike Ramsey has taught these in the past. Don Kawalek is teaching this one. $850 for the class to build your own banjo. Here's a link:
holidaylake4h.com/banjoworkshop.php
David
Carl Ball - Posted - 08/29/2010: 10:14:36
Jay thank you that really gives me the idea. I am a visual learner. I would assume then using the illustration you have that A and the number 1 would be the best pieces off that cut to use in instrument building? And the piece Dan had would have that grain orientation?
DanKnowles - Posted - 08/29/2010: 18:19:57
TODAY'S WOOD HUNTING TRIP
Well folks the question on quartered or quarter sawing couldn't have come at a better time. Today my grandson Chandan Jayne, my student & friend Kevin Bailey and I went out in the backwoods somewhere of western Kentucky chasing some of this precious stuff. But before I head off into telling you about my trip a bit about grain orientation is in order.
Jay your photo was perfect! I've seen drawings illustrating quartering, but that is the first photo of that I've seen.
On this New 1850's banjo I will be using wood that is as perfectly quartered as I can find. I'll be looking for grain that is as straight as possible. This is because these necks will be essentially one piece, excepting the heel graft.
Normally most of my necks are laminated. For this I always use plain or slab sawen wood. This when turned upright creates a virtual quartered neck. Very strong and stable. Here are a couple photo illustrations. These show a set of neck blanks viewed from the heel.


Anyway back to today's trip.
Chandan, Kevin and I saw an bought some of the most beautiful maple I have ever owned. This wood has some of the most beautiful tiny but deep quilting I have ever seen. I ended up purchasing every piece that I could justify. On to the photos...these were taken by Chandan.
Here is Kevin holding one of the timbers.
This board is around 1" thick by 18" wide by 8'. It is totally covered with figure, end to end. There is also a bit of spalting which I like for some special things. Most of what you see in this photo is the shadows from the saw kirfs.
Here I have planed a small aria.
Look at that figure.
Here is one of the stacks we worked through, most of it wonderfully figured.
Our supplier also had a very nice stack of old, very old Honduran Rosewood. He acquired this from a fell who was preparing to use it for firewood not knowing what he had. This had been stored in a barn since at least the 1950's. Of course I had to have some of this too!
Here I'm rapping and listening to this woods wonderful singing tone.
Although the maple that I bought today has been kiln dried, it will be stored and cured for a minimum of one year. I don't use wood unless I know that it has had time to stabilize and cure.
DanKnowles - Posted - 08/30/2010: 08:24:11
Jay,
Not to worry, it was great and perfect!!!
MORE ON THE WOOD
Because of several emails which I recieved about this wood I figured y'all might like a few more photos.
Here are some more photos of the wood. I took these this morning. I've included a ruler so you can get an idea of the tightness of the figure. Also to give an idea of the actual size of the pieces the largest maple board is 16" x 8'. 


The whole stack....Maple is on the left, rosewood is on the right.
jay_m - Posted - 08/30/2010: 08:46:02
i love hunting for lumber. unfortunately, there arent a tremendous number of places in my immediate area that stock the species i usually need. i do have some good sources around, though. one of my best sources comes from an industry that needs the finest, straightest grain maple lumber, but absolutely can not use anything with any figure. of course, figure is hard to discern before a log has been milled, so excess pieces are inevitably cut, and then i buy what amounts to high quality, musical grade, highly figured maple for a fraction of the price. all of the blanks i buy are at least 3" thick.
a second source are small tree removal/mill operations. the ones i use know what i need. this is extra rewarding because of its sustainability--these are logs that would otherwise have been chipped after being removed from vacant lots and such. the places i buy from kiln dry their stock. sometimes the pieces arent good enough to pass muster, but the prices are so good that if half a shipment fails my QC, i still come out ahead.
here are some of my blanks
3jaw - Posted - 08/30/2010: 16:15:57
Dan,
You passed through my neck of the woods on your pilgrimage to Paducah! Good looking lumber you snagged!
I'll see you on Tuesday.
Later,
Greg Gordon
DEmery - Posted - 08/30/2010: 16:20:41
Dan that is an amazing story about the rosewood. It would be sad to know what has ended up in the fireplace over the years. You are correct about the maple. What figure. It will end up as a prize in somebody's banjo neck in time. I hope to see it when one of your french polish finishes is applied. David E,
Will1717 - Posted - 08/30/2010: 20:25:29
Dan:
Here's a good one (but true!) for you. Approx. 10 to 15 years ago Brazil got stuck with what to do with all that Brazilian rosewood due to the embargo placed on rosewood in an attempt to stop the clear cutting in the Brazilian rain forest. Being that it had no value Yamaha (Brazil) started to skid their exported dirt bike on skids built from rough cut rosewood. I forget what model it was but a friend of mine owned a bike shop and had imported a couple of these bikes and said I could help myself to the old skids as they were going to the dump regardless. Unbelievable as it sounds but the skids were rough cut rosewood (filled with nails and screws). Shortly after someone must of got wind of what was happening and Yamaha switched over to a metal skid with plywood side panels. I can only imagine how much rosewood ended up in the fire or dumpster before the policy changed! Definately free entiprise at work. Once they killed the exports of Brazilian rosewood I gues it dropped to skid values!
Bill Rickard
Edited by - Will1717 on 08/30/2010 20:26:07
DanKnowles - Posted - 08/31/2010: 18:58:42
Jay,
It is amazing the wood one can find. We have a mill here in Paris that primarily does hardwood floors and trim. They don't wasn't figured stuff either. I have gotten a lot of great wood this way although it is all 4 quarter thick.
Carl,
There were some chunks he had which were cut to firewood length. There was also some very fine veneer that the fella was using for kindling.
Greg,
I'm certainly glad to see you here on the Hangout. You went through the ice storm and can appreciate our rosewood burner more than most. That was a very tough time.
David,
My step-brother Allen brought back some of the most amazing wood from his years of living in Brazil. All of the wood he had was destined for the waste pile. Perhaps in a year or so I might make another 1850 with some beautiful maple and French polish it.
Bill,
Oh my, Oh my.
DanKnowles - Posted - 09/01/2010: 17:59:12
OFF THE MOLD
Y'all remember back in the good ole days? Back before I got lost hunting wood. Remember rim rollin'? And Rim gluing?
Good.
Class y'all are doin' all-rite.
Cause the next job is gettin' the suckers back off of the mold so they can be worked further upon.
First I've gotta get the clamps off...
There it's coming off the mold.
Here is the first one...
Now another one...


Here are all four rims. The bottom three are maple and the top one is the oak one.
DEmery - Posted - 09/03/2010: 07:37:08
Hey Dan...which one is going on the proto-type? Got that figured out yet? David E.
DanKnowles - Posted - 09/03/2010: 17:49:58
David,
#1 Goes to LBL, # 2 is up for grabs, #3 #4 are the ones I'll choose from.
DEmery - Posted - 09/03/2010: 18:54:44
Dan - now that I look at the graining that makes sense. I know the 1850 had limited grain. I note #2 has grain toward the top. Rims 3 and 4 are very similar visually. Wonder if they tap differently. Look forward to your decision. Let me know which one you select for the prototype. David E.
aj_fuller - Posted - 09/09/2010: 05:20:29
Gadzooks! The thread has slipped to the fourth page... THIS SHALL NOT STAND!
I have been waiting with great anticipation to see what approach will be taken to trim and shape the rim joints, and the suspense is getting to me.
Hope all is well, and that everyone had a wonderful Labor Day!
DanKnowles - Posted - 09/09/2010: 19:26:16
Hay everybody,
Thanks for keeping a lookout here on the Birthing 1850s thread. Much has been happening here which as kept me from posting. None of this has been bad, in fact much is quite good. More banjos arriving from Paul Murphy, my Mother arriving from California and preparations for performing on the Bell of Louisville steamboat this weekend!
But soon I'll be back with more posting like crazy! I often wish that doing banjos for these posts was the only thing I had to do...still...
Anyway thank you for looking in.
David,
The rims as they are shown are about 1/2" oversize in width. This will allow me to correct any inconsistency caused by forming and gluing. Next week I plan to dive in and move these banjos forward on their path to banjo enlightenment. Thus speaks the banjo Buddha.
A. J.
Thanks for bringing this back from banjo oblivion! More posts on progress are forthcoming... I promise!
DanKnowles - Posted - 09/13/2010: 19:11:49
CUTTING ONE OUT
Howdi, I'm back! It has been a busy life for me, Traveling and working on several projects that have kept me away from Birthing this 1850.
Today I'll be hand sawing out 1850's neck. First I grabbed up the billet od Spanish Cedar that I purchased at Distinctive Building Products. This piece is 2 1/2 " thick and it was a bunch of work.
Here we go, I have clamped the billet to my table saw. Back in the back room the light wasn't really good for photo work. This is a really nice colored piece of wood, rather red-orange instead of white.
Next I clamped the patterns to the billet and used a white pencil to lay it out.

After everything is laid out I grabbed up an old Sandvic hand saw and began cutting. Although my saw is sharp, I quickly found that my arm was not!

I've decided to build this as much like the early banjo would have been done. This includes the hand sawing. I found out how wimpy I've gotten lately. It's time to start working out again.
I used a coping saw to work my way around the 5th. string bump.
And a Japanese saw completes the outer neck side.
Back to the Sandvic for the long straight side.

Rough cut out....
Terms of Use | Privacy Policy | Privacy Consent (EU/GDPR Only)
Copyright 2026 Banjo Hangout. All Rights Reserved.


