
DVD-quality lessons (including tabs/sheet music) available for immediate viewing on any device.
Take your playing to the next level with the help of a local or online banjo teacher.
Weekly newsletter includes free lessons, favorite member content, banjo news and more.
Premier Sponsors


|
Please note this is an archived topic, so it is locked and unable to be replied to. You may, however, start a new topic and refer to this topic with a link: http://www.banjohangout.org/archive/163855/8
Page: 1 2 3 4 5 6 7 8 9 10 11 12 13 14 15
DanKnowles - Posted - 01/27/2010: 19:33:00
Tom & Denton'
Thanks...a Tom I never thought of...a...this...in...a...that...a...light.
Well here is a bit more. I spent most of my day in studio working on my new opera, 1934. So I only had time today to engrave three more shoes. Here are all of them so far:
jbalch - Posted - 01/28/2010: 07:21:48
Dan:
I really look forward to hearing more of your new recording project. The samples I've heard so far are truly fantastic! How is the production going?
Also...you might enjoy knowing that Jack Pearson (jackpearson.com)and a few other friends were here yesterday. Jack played the Dobro that you repaired for me. He really likes that guitar. He always asks if it is for sale....
Oh....so I don't totally hi-jack the discussion...the new metal work is cool!.
JB
eugene1978 - Posted - 01/28/2010: 13:37:42
My first time weighing in on this thread - mostly because I have been speechless since page 1. Dan, this banjo is so incredible and I am having a fantastic time following along. Every time I think you can't get any more impressive...there you go. This metal work is so cool - and I love watching the steps. Every other page or so I have to call my wife to my computer to check out the next amazing thing - she has stopped gushing and now just shakes her head and says - "that needs to be in a museum."
Anyway, keep up the stupendous work. Another big fan here on the hangout - definitely the best thread ever!
Banjolution - Posted - 01/28/2010: 14:20:57
Dan,
I've been quietly watching since the beginning of this thread also. . This is so amazing! Your a true artist,and I feel very blessed to be able to see this step by step process you are treating us to here! Awesome work. The anticipation of seeing the finished product is killing me.It sure is an exciting journey though!
Thanks so much for taking the time to share with us Dan.I very much appreciate it! 
maryzcox - Posted - 01/28/2010: 14:24:07
Dan--it is so beautiful and great of you to let everyone watch your masterpiece as it is built. I just love beautiful banjos like this.
Best wishes always,
Mary Z. Cox
DanKnowles - Posted - 01/28/2010: 18:19:35
John,
I'm almost finished. There is one bass part yet to be rerecorded and a bit o mixing still yet to go. I'd have been done a long time ago if it wasn't for being so dog gone anal! As I' writing this I'm listening to the recordings of Jack...my, my, my. That man is GOOD!
Robert, Moss and Mary,
Thank you for your kindness, You (and all the rest of you reading this) are the folks that make this fun and worthwhile. Thank you all for being here.
DanKnowles - Posted - 01/28/2010: 18:30:24
THE TRUTH REVEALED
THE REAL BUILDER
These photos were recently made at KNOWLES STRING INSTRUMENTS. Now we know who the real master is...
Braden Jayne Dan's grandson sanding.
Now he's got him turning a ebony dowel stick!
Now he's buffing a fetless banjo neck...the truth is out! 
DanKnowles - Posted - 01/28/2010: 19:07:07
The New Dowel Stick
Today I made a new dowel stick for the NEB. I started with a nice 1"x1" piece of ebony, I like this piece because it has some nice grain in it, not T totally black. Here I've laid it out.

Here using a Japanese hand saw I'm cutting the stick to length. If you've been reading along you know how much I like Japanese chisels, well the same applies to these saws. The thought process is just intelligent. These saws cut on the pull stroke (unlike European saws which cut on the push) enabling the use of thinner metal in the blades. Also we have more control pulling than pushing. 
Here I'm marking the end of the stick for turning.
Here I'm turning the tenon. Lord what a mess!!!!  I guess I better clean it up in the AM.
Well the camera's battery went dead at about this point. I was in a mood to keep working so I did. I wasn't able to make any photos until the very end.
So what I did was this. I cut the neck brace slots, tapered the stick, planed and sanded it into shape, routed for the binding, glued some figured maple in place and sanded it flush. I like these clean lines. I'm not sure what I'll do to decorate this stick, but I'll do something.
jbalch - Posted - 01/29/2010: 06:14:04
Is he the one really doing all that hot playing on your records too?
Edited by - jbalch on 01/29/2010 06:15:38
DanKnowles - Posted - 01/29/2010: 15:37:28
No John it wasn't that one...It's this one who plays all those "HOT LICKS". His name is Keaton and like the other one is 4 years old. When he saw his brother on here, he requested that this truth be out too!
Keaton requested these... 


dubtom - Posted - 01/29/2010: 15:42:30
Good man Dan,start em early,sit back and watch the cash role in.
DEmery - Posted - 01/30/2010: 06:40:38
Dan, I like the new dowel profile. I cannot tell for sure but it looks very sleek and is tappered like the one you cut and carved for the Sherry Lynne. The maple binding frames it well. When you did mine in that design along with the inner pot bindings...the visual impact was inspired from some of the Lincoln burial photos you were viewing at the time. I don't recall what you saw exactly but you mentioned the black and white tones in the images. Regardless, it is much more elegant and will allow you to lay in art for contrast with your neck and pot work very well. Like it - David
DanKnowles - Posted - 01/31/2010: 15:26:18
Tommy,
D'ya think that'll work?
David,
Thanks. This one was inspired by yours, I always like its understated elegance. So sence this was inspired by yours and yours was inspired by Lincoln, then...
Sort of like pie.
DEmery - Posted - 01/31/2010: 15:36:59
It is like pie...I suppose.Thought there would be a weekend installment but even luthiers in Paris, Tennessee get the Lords Day off from banjo building. David
Edited by - DEmery on 01/31/2010 15:39:23
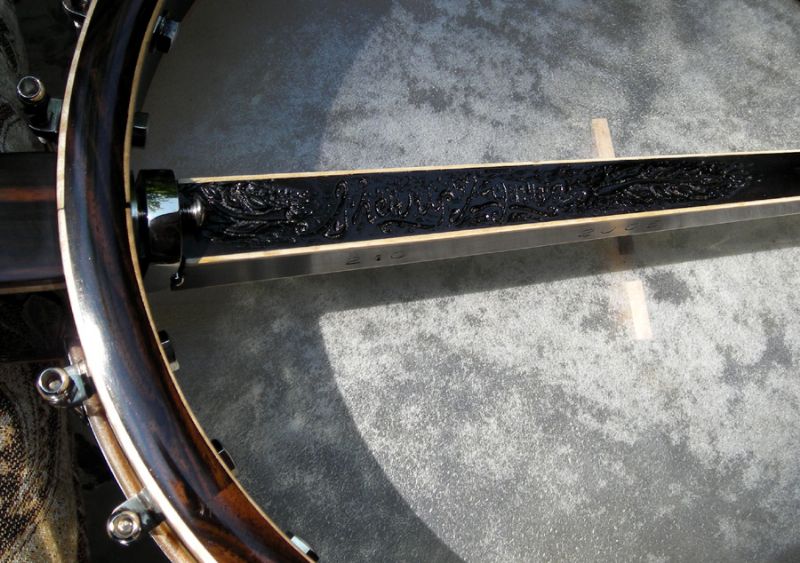 Dowel Stick Carving |
DanKnowles - Posted - 01/31/2010: 15:55:34
HEEL CAP INLAY
Here is another way I like to create designs that are symmetrical.
First I cut out a piece of paper in a rectangle about the size of the proposed inlay. Then I fold the paper in half and start cutting.
Here I've cut one out, I didn't like it much so I cut again. In fact I cut about twenty of these out, gradually working towards my final design. 
Here is the winning design glued to a Abalone blank. I like this piece because it has a lot of subtle opal like colors. 
Here it is glued in place ready for me to scribe.
This time I scribe the shape with a scalpel. I like these sharp pointy knives. They arn't very strong but they work well for so many things.
After scribing, the abalone is removed and the cut filled with caulk.
Then the cavity is routed and the Abalone is glued in place.
After the glue has hardned all is leveled by sanding. It is then polished to 800 grit.
Then I lay out the engraving lines. This is somthing that I enjoy I'm not haveing to follow someone elses design. Here I can make it go any way I wish. Here I have began engraving.
More engraving.
Finally the engraving is complete the lines are filled and wiped. 
DanKnowles - Posted - 01/31/2010: 18:13:35
David,
Snow started here Friday afternoon and by Saturday late morning we had close to a foot of the cold white stuff. Needless to say not many folks were doing much driving here. I realize that for you folks in snow country this wouldn't hardly slow you down. But here... So I have spent two days hanging out with my wife and grand kids. Shoveling snow and riding almost anything we could use down the hills which have us iced in. Actually this post was from work on Friday. I'm only hoping to be at the shop tomorrow. Neck carving is calling me.
ogletj - Posted - 01/31/2010: 21:29:03
No it probably wouldn’t work at all, but it did on “The Root Of The Thing”.
DanKnowles - Posted - 02/01/2010: 19:15:17
MORE BRACKET SHOES
Today many chores related to making a living kept me from spending as much time on the New Ebony as I would have liked. Still I had the chance to engrave a few more bracket shoes and I thought you might enjoy the process.
First the shoe is loaded up in the jig and the jig is fastened in the engraving vice. Next using a diamond bit in my dremel, the radiating lines were made.
Next using a tiny nail set, the space between the lines is textured.
Then using a home made chisel a line is engraved at the top of the textured aria.
Here is the shoe finished to this point.
Next the bolt head is textured.

Here is todays progress.
DanKnowles - Posted - 02/02/2010: 19:45:47
NECK CARVING
Before I start showing today's progress I have news, THE NEW EBONY IS NAMED!!!
The name was suggested by my friend Tom Berghan ( who is a fine Banjo picker and Lute Maestro)... drum roll please... open the envelope...
Othello
Names we give often express our hopes and dreams. Othello was a handsome black Venetian General and was the central character of one of Shakespeare's most loved plays "Othello, the Moor of Venice". My hope is for a strong, powerful, handsome musical instrument. Mostly musical.
Today I started carving the neck. Again like I stated in an earlier post, this is the way I work and I am not necessarily recommending these techniques to anyone else. Firat I started with the band saw and removed a large amount of excess wood.

After removing as much extra material with the band saw I mounted the neck on this carving fixture.

Here are the tools I use to carve. From left to right: Horse hoof rasp, Pocket plane, Spoke shave and half round rasp. I'll also use a half round file and several chisels.
First using this 100 year old spoke shave, that I found in Vineland, Ontario, I do the basic rounding and of the neck. This old shave will really remove the wood, accurately and fast.
Next the horse hoof rasp begins to true the long running lines of the neck, flattening hollows and bumps left by the shave.
Then using a half round rasp and half round file, the curves are further refined.
The corners of the heel are removed using a small Japanese saw.
And are carved to basic shape with this round bottom Japanese chisel. Then are rasped and filed into shape.

Next I started doing the decrative carving around the 5th. fret. This is going to be a small floral like piece and its design will help solidify the design for the heel carving. Here I am using a small Japanese (1/8") chisel.
Well this is where I got to before I had to change into my teaching hat.

As a side note, today my new ebony knobb Pegheads tuning machines arrived this afternoon. I really like the way they look, solid, well made, small and black. Perfect for Othello!
devoall - Posted - 02/02/2010: 20:26:02
This thread is so valuable, ESPECIALLY the neck carving part. great work Dan.
Plinkerton - Posted - 02/02/2010: 20:35:45
I would be so scared to screw up the neck... :)
Well, I know I would screw it up, but I mean, even if I knew what I was doing...
Bagpussfrog - Posted - 02/03/2010: 01:18:46
quote:
Originally posted by Plinkerton
I would be so scared to screw up the neck... :)
Well, I know I would screw it up, but I mean, even if I knew what I was doing...
DEmery - Posted - 02/03/2010: 06:44:24
Glad to see the wood fall away from those blocks that were glued up and decorated. That neck was always there and all you have to do is chip away the stuff that gets in the way of pick'en the thing. Right. I know first hand how smooth and perfect your necks are Dan. While the three necks you carved in projects for me are different...they clearly share the same accuracy, comfort, and musical characteristics typical from your bench. I will keep watching. Before I head off to work it seems appropriate to grab my ebony banjo and kick out a few notes. David
frihauf - Posted - 02/03/2010: 09:58:46
quote:
Originally posted by Plinkerton
I would be so scared to screw up the neck... :)
Well, I know I would screw it up, but I mean, even if I knew what I was doing...
jbalch - Posted - 02/03/2010: 10:26:12
For those following this thread...who might not have ever played a Dan Knowles banjo...I think the shaping of a neck is where he really excels!
Sure the design ideas are inspired, the inlay is amazing...and the materials are well chosen...but IMHO the shape and feel of the Knowles-made neck is the pièce de résistance
Dan has a very special gift for finding the perfect shape in each piece of wood. They are a joy to play.
Viper - Posted - 02/03/2010: 11:02:00
Dan, you make the neck carving look so easy. It's tempting to give it a try.
Great work!
Quickstep192 - Posted - 02/03/2010: 11:55:43
"Dan, you make the neck carving look so easy"
He makes it look easy and that neck is EBONY.
He's unbelievable; this just isn't fair.........
ogletj - Posted - 02/03/2010: 15:19:01
I’ve known Dan a long time. He likes to build instruments that look good. More important is the way they feel/play. But sound is always first priority!
DanKnowles - Posted - 02/03/2010: 19:14:35
OH MY...
I thank every one of you for your comments.
For those of you who are afraid of carving ebony, it is one of my favorite woods to carve. Tools must be exceptionally sharp and they must be touched up often. Other than that ebony doesn't have any of the weirdness that maple and though it carves slower than softer wood, its cuts are sure and true. I love the stuff.
DanKnowles - Posted - 02/03/2010: 19:48:11
FIFTH FRET CARVING
Today I concentrated on the carving that decorates the side of the neck starting at about the 5th. fret and going up to about fret 8 or so. When I am planning on carving both this spot and the heel I often start here, especially when I am doing the design work. It seams to help set my work and creative flow. Here I am using a vine design. I don't know the name of this one vine, but something like this is found growing in boggy arias around my part of Tennessee. This will match up with the Paw Paw leaves which I plan on carving on the heel. Paw Paw's are often mentioned in Victorian songs about the Mississippi river, which of course is our tie to the race. Besides I was talking to Othello and Paw Paw's were requested!
'Nuf of that verbiage.
I first used a white pencil and sketched my basic shapes. The early pictures in this process didn't come out... sorry. Then I used my trusty knife to cut the lines in. Then I used a chisel to start removing background material. Most of the chisels I use in this are quite tiny like this one.

Here is the carving after a couple of hours of fooling with it. Looking at it here I notice that I need another leaf on the upper curve. It's been interesting the things I notice later in these much larger than life photos that I go back and work on the next day. See there is a reason for this posting!
Here I'm begining to detail a leaf that's just peaking out from behind the stem.
More background cleaning. Most of the work in this low relief carving seams to be on the background. Here (at least for now) I'm planning on making the background smooth. So the background has to be flat. Tomorrow I'll continue refining and detailing.

Folks, I don't know about you, but I love the look of the black and white lines as they come together at the back strap. So here is a photo of that. 
GSCarson - Posted - 02/03/2010: 20:48:11
Looks great Dan, can't wait to see how the carvings progress!
BNJOMAKR - Posted - 02/04/2010: 03:39:39
Go ahead with your bad self... you the man, Dan!
GREAT WORK!
DanKnowles - Posted - 02/04/2010: 18:04:36
Glenn,
Thanks, I only wish you'd do something like this, I'd love to see how you achieve such perfection and.......ah......I'd......ah......like to steal some of your licks!!!!!!!!
Marvin,
The above comment goes for your work to. Both of you do beautiful work.
Steve,
Your work looks real nice too, we all ought to get together and form a luthiers union...er somthing.
Ron,
Its good to see you here, I miss our banjo pickin' times.
Don,
Thanks so much. It's always great to hear from Ontario friends. I have some family around the St. Catherines , Niagara aria and many friends up there.
DanKnowles - Posted - 02/04/2010: 18:28:56
MORE CARVING
Today I continued working on the fret 5 carving. Mostly it was background smoothing.
Most of the work was achieved with these small tools. Here a small riflers file is used to smooth the edges of the carving.
Here a knife smooths an aria soon to receive a leaf.
Here I am sanding the aria between the stem and the binding.
Here using a small diamond file, I'm sharpening the detail between the leaf and the stem. As a little by the way I got this pack of diamond files a while back from Harbor Freight for around $7, these are great little files at a great price.
After I was purty happy with the stem shape, I started carving small ropey shaped lines over the surface of the stem. Most of these were cut with a small graver.
Here is where I gave up the ghost today. The photo doesn't quite show how these new stem lines go over the whole stem shape.
DanKnowles - Posted - 02/05/2010: 17:26:54
Bob,
Thank you.
To everybody,
Today I spent a great deal of the day carving. I finished the 5th. fret carving and got a good way along on the heel. Unfortunately I left my jump drive with today's photos at the shop. So I am unable to make a decent post.
Y'all watching this has become something quite special to me and I am sorry for my oversight. Please look back tomorrow evening and I'll Make it up with (hopefully) a good 'un.
Dan
DEmery - Posted - 02/06/2010: 07:54:19
Dan, the detail at the 5th fret is always a nice touch. I have several with a notch and you went an extra step by putting the leaf design on Goshen. The detail in this one will pop out nicely when you apply the varnish. The ebony is a great medium for detail when finish is applied. Look forward to the download later today. David
DanKnowles - Posted - 02/06/2010: 19:03:51
Elizabeth,
Thank you so much! It's always good to hear from the UK.
David,
Well I got the 5th done and I hope you like it. When you see the design on the heel though you'll know from where I'm quoting.
DanKnowles - Posted - 02/06/2010: 20:08:50
FRET 5 CARVING COMPLETE
I just had to use big letters there because it really feels great to have made my last cuts in this part of the carving. There will be a bit of sanding and smoothing around the carving, but for me that is always expected.
THE SAGA CONTINUES
As brother Bob Robert has said on many occasions on this post, "It all comes down to drawing." So here it is , I'm a drawing and drawing and drawing!
When I started this part of the carving,I was thinking of another ebony banjo, the one that my friend David Emery possesses. But David as much as I like yours (and I do), I wanted to do a new twist on it. So I brought the leaves around and intertwined them.
After I had begun carving on this a bit, another pal of mine, biologist Barry Hart stopped by to check on things. He took one look at the carving and said, "Ya know what kind of leaves you got there?"
"Nope," I said, "I just hope they ain't dope leaves."
"Don't worry its just ebony."
"Ya mean they're ebony leaves?" I asked.
"No" he said "they're Paw Paw leaves, on an ebony banjo." That settled it. I knew I could go back to work now.
So here is where I started out drawing. First it was the long leaf and then on to the others.


Eradicating bum lines. I shudda known that a rainbow wouldn't fit with Paw Paw leaves. Or even tobacco leaves as Gary Jinkins called them.

When I carve, I usually start by cutting in the major lines. Here I'm cutting with a favorite knife of mine. It is the remains of a professional butchers boneing knife that I have shortened and sharpened on one side. It has great steel that holds a wonderful edge. I guess I from the old school of use and create and recreate. Most of the specialized tools and jigs I use, are ones I have made. Or re-made as this case may be.
Next I begin to remove background material. But being quite undisciplined and wanting to know what the foreground is going to be like, I seldom finish the background before moving forwards. A very fine carver you should all check out on the Hangout is GSCarson. From the appearance of his photos it looks as though he removes all of his background material first. I wish I could make myself do that.
Here I am working on the background, although if you look closely you can see the details peaking out.
Anyway after quite a bit of carving this is what it looks like.
And after more time and carving... this.
Once I get the basic shapes carved, I begin detailing. Here I am using a graver to incise the vane lines on the leaf. I like to use gravers for detail work. They take little wood and are quite easy for me to control.

As I said before, I go back and forth between back and foreground. Here I'm working the background again. I'm going at it with one of my favorite Japanese chisels. When removing background wood I usually use this chisel or a miniature bent carving gouge.
Finally today I worked some of the major vane lines and the leaf separation lines with my checkering file. Carefully used this makes quick work on straight lines. Here I'm moving along, using it almost like a saw.
Tomorrow I will try to get this part of the work real close to completion.
DEmery - Posted - 02/06/2010: 20:40:15
Beautiful. I have attached a photo of the carving at the 5th on Goshen you did to add another example of how delicate this creative touch adds to the neck design. Your detail on the vine is a super feature. It gives a simple frailing notch class. David
Edited by - DEmery on 02/07/2010 05:39:37
 Goshen |
DanKnowles - Posted - 02/07/2010: 18:11:50
David,
Thanks for posting Goshen again. See if this doesn't remind you of Sherry Lynn.
MORE CARVING
Today I finished the basic carving. Now all that remains of the carving is to sand and do some final shaping and other detail work.
I worked on the top line ( or bottom line depending on how you look at it). I'm trying to true it up so it maintains the distance from the heel cap in a nice smooth straight line.

Here using my handy dandy knife I'm smoothing some of the marks left by the gouge.
Then using a riflers file, I'm cleaning out between the points.
I kinda got tired, so here is where I stopped. This is the bass side of the heel. There is a little spot of white wood which didn't show up until I started carving. Later on I will dye it black and make it disappear. 
Another view of the 5th fret carving.
And now the treble side...
And now the center.
Quickstep192 - Posted - 02/07/2010: 18:31:13
Thanks Dan. We're snowed in here and this is just the ticket to break the monotony. Beautiful, beautiful work.
Terms of Use | Privacy Policy | Privacy Consent (EU/GDPR Only)
Copyright 2026 Banjo Hangout. All Rights Reserved.


