
DVD-quality lessons (including tabs/sheet music) available for immediate viewing on any device.
Take your playing to the next level with the help of a local or online banjo teacher.
Weekly newsletter includes free lessons, favorite member content, banjo news and more.
Premier Sponsors


|
Please note this is an archived topic, so it is locked and unable to be replied to. You may, however, start a new topic and refer to this topic with a link: http://www.banjohangout.org/archive/163855/2
Page: 1 2 3 4 5 6 7 8 9 10 11 12 13 14 15
DanKnowles - Posted - 12/05/2009: 15:21:08
John,
I realize that your opinion and a 2 dollar bill can get you a cup of coffee at McDonalds but it gets you another photo of EB2's im on the hangout.

DanKnowles - Posted - 12/05/2009: 15:44:21
Where do design ideas come from? The wind? The inlay gods? Who knows? All I know is that this inlay idea originated from my love of the rivers, Huck Finn, Mark Twain (who I named my son Sam for), The river barge River Explorer, 12 years of performing on the Mississippi river system, Eddie Conrad, the Delta Queen & King and (as a child) swimming in au natural in the clear waters of the American river.
To date I am calling this inlay The Great Riverboat Race. This commemorates the famous 1870 race between the steamboats R. E. Lee and the Natchez. The race was from New Orleans to St. Lewis and although the Lee won the race but there is still a controversy (in the steam boating community) as to the fairness of the outcome. Many believe that the Lee cheated by not making regular stops and carrying no passengers. There was for many years a race between the Delta Queen and the Bell of Louisville celebrating that race.
OK on to the design. This idea has peculated for several years inside my noggin. I realized that I would need to picture the steamboats. Several approaches seamed to step forward. First non pictorial, using images and design features which seam to indicate steamboats but do not illustrate them. Secund, illustrating the boats underway. Thirdly showing the boats and how the people watching might respond. I choose the last because I am more interested in the way people behave than just expressing 'steamboat'.
First I draw out a very basic sketch. Nothing is set in stone until it is set in wood. Both the inlay and the design are a improvisation, always changing and developing until they are complete and the last graver mark made...then...
Once I have made this drawing the research is begun in earnest. Pictures of the boats are collected, scanned and pre paired for inlay patterning. Corel Photo Paint and Corel Draw are the image manipulation programs which I use. In the bad old days I would have drawn and redrawn using tracing paper and a Xerox machine. Now I can work create my images and designs more quickly and with a bit less effort. Still I believe that the earlier work did help develop my eye.
There are several friends who I will use as models for this project. I ask them to help and I shoot several hundred photos to get just the right light and the right pose. These are manipulated in the computer and a small working pattern is created. After the work is made in the computer it is printed, cut out and laid on a neck to check progress.
The various colors are for different inlay materials, the orange will be gold lip pearl, the white white pearl, the black black pearl, the background will be the black of the ebony & so forth. As a side note this design work consumed the greater part of 2 days.


Edited by - DanKnowles on 12/05/2009 17:18:10
jbalch - Posted - 12/05/2009: 21:30:16
Wow...Cool...that is some mighty fine noggin perculatin.' I cant wait to see (and play) it.
Ol Lefty - Posted - 12/06/2009: 14:48:36
Dan-I want to rip ebony tomorrow for an 11" rim-and, is 5/8th" the most common thickness? Should I rip width 2 1/2" to be safe that I will get complete arc segments?. I note that you are using 8 segments. What do you feel are the advantages of this segment number? Since I am using rare wood, I see obvious savings of waste for saw kerfs. I can also anticipate that more segments use substantially more glue.
I am prepared to cut segments as you advise. I don't have much wood to waste. I think I can get one rim and maybe two tonering blanks. I see you use Titebond 3. Why? I am making a circle jig for my main router table-I actually feel safer than with huge interrupted cuts on a lathe since I can control feed speed absolutely. Thanks, Ol'Lefty aka Mike T.
Edited by - Ol Lefty on 12/06/2009 14:52:36
Quickstep192 - Posted - 12/06/2009: 15:12:02
Dan, I'm fascinated by your photos of the rim being turned. How did you hold the rim to the lathe for turning?
DanKnowles - Posted - 12/06/2009: 19:47:54
Mike,
I don't believe that there is a hard and fast rule for rim thickness, I like the movement of a thinner rim, it seams just more musical. I would never take a block rim down to 1/2" as I think the rim would be unstable. I have built several that I have tried down at 1/2" and they have all failed. Along that line though I have used several 1/2" rolled rims from Chris over at Melrose Music and I have never had a lick of trouble with them.
As to width 2 1/2" seams a bit wide, but I could be wrong there. We settled on 8 segments several years ago, It works for us and it cuts down on the amount of glue which is advantageous tonally. I'm not sure that it is any stronger than a rim built with say 16 segments, but I would suspect so.
Recently I read a glue review in Fine Woodworking and Tightbond showed as being one of the strongest, so I thought I'd see what it does here. Most of the rims I have glued with epoxy.
The router thing scares me! That is a lot of extremely heavy and hard wood just wanting to get away and cause a great deal of damage. Now that I look at that last statement I almost have to laugh at myself, the most expensive damage I have ever done to myself was because of a lathe. Yet I have seen some terrible things happen due to a router getting away. The router is a useful tool but it scares me, still I use one...go figure.
Quickstep,
The rim is held to the lathe by a 10" four jaw chuck.
Edited by - DanKnowles on 12/06/2009 20:06:36
trapdoor2 - Posted - 12/06/2009: 20:39:09
Hi Dan,
Glad to see you working on yet another project...and a great subject too. There are an awful lot of us hiding out here watching and learning. Thanks for letting us all in on the process!
I fondly remember when the Delta Queen visited Huntsville (Tennessee River) back in the 1970's. My parents owned a little Piper Cub and flew it out to greet the 'Queen' as she plowed her way along the Tennessee towards Huntsville. As Dad was a WWII Navy pilot, many of the pictures my mother made of the 'Queen' are looking up at the upper decks...Dad loved to fly low to the water!
===Marc
grizzly1 - Posted - 12/07/2009: 17:56:09
I am new to the forum, and hope this is appropriate, but would anyone in this discussion be willing to comment on an ebony air drying disaster. I was inspired by this and other threads to obtain some ebony to add to the drying pile. It didn't go so well. I will try and insert a link to the full question.
Thanks!
Mark
[banjohangout.org/topic/164858
DanKnowles - Posted - 12/07/2009: 19:24:08
Marc,
Thanks for your D Q memories and thanks for watching, I worked her a whole lot and I miss her beautiful wheel wash. Perhaps someday she'll return
Mary,
I'm glad you enjoy this. By the way I spent a good deal of today working on the fingerboad design. It is amazing how much time I can spend trying to get things just right.
Mark,
Usually a rule of thumb for timber drying is one year per inch of thickness. The way I cure/ dry wood is like this: if I have a specific use for the wood (ie. fingerboards & etc.) I mill it a bit oversize, wax the ends, then stack the wood with stickers in between each layer, keeping the sides of the wood apart and stickered often enough to keep the wood straight and even. The stickers should be of a similar thickness as the timbers being dried, with a minimum thickness of 1/4". After the stack is built I tie my stickers together so I now have a tight movable mass. Then I place the stack out of the sunlight but somewhere it can receive good airflow. Then wait, eventually it will reach around 6% moisture content and be usable. Good luck!
Dan
Bob Robert - Posted - 12/08/2009: 00:15:36
Man, you hang around here and you're likely to learn something!
Since I'm an art teacher, I wonder if I can count this as professional development time? 
Bagpussfrog - Posted - 12/08/2009: 03:09:14
Hi Dan
Can I just say, that not only is this banjo beginning to look great (the ebony looks gorgeous!) but as someone who doesn't know an awful lot about banjo craftsmanship, I find it a real privilege to share in this process - thanks for sharing these updates, I wish I had the skill to work with wood the way you do, and I cannot wait to see the final banjo!
Best
Shaun from the UK
DanKnowles - Posted - 12/08/2009: 18:37:06
Bob
I think you should collect some of that development dough... If you ask nicely I'll send you a certificate.
Shaun,
I'm glad you are watchin'. I never thought I do something quite like this tell all forum, but I'm enjoying writing this a lot.
Dan
Gomer - Posted - 12/08/2009: 18:46:27
I think that this Ebony project may well set a new high water mark for builders. I likey.
DanKnowles - Posted - 12/08/2009: 18:48:46
Perhaps the most important issue a builder must address in neck building is grain and grain orientation. The small non-production builder has a opportunity to increase quality here. Most production shops use one piece necks, which should there be a grain anomaly can twist or bend in unacceptable ways. The necks which come from my shop usually have a minimum of three pieces. The individual pieces are drawn out on a board, nested to increase wood usage. All of my necks use plain or flat sawn wood which when cut out and glued together give a quarter sawn face on the fingerboard side.
All of the pieces are thicknessed, jointed and glued in a solid block, here ebony-maple-rosewood- maple-ebony. The ebony is laid up with their grain opposing. This gives the neck inherent strength and stability.
jbalch - Posted - 12/08/2009: 19:45:49
Dan:
Did you glue-up this neck stock back when you made David's banjo? Or is this a new blank?
Also...how long do you usually let the glue cure before carving a neck?
JB
Bob Robert - Posted - 12/09/2009: 04:15:34
I'll echo Shaun and say that I'm really enjoying watching the development here. I'm working on a banjo, but it's nothing like this, so it's cool to see how a "real" banjo gets made.
I don't think my principal would go for this being professional development, or I'd take you up on that certificate! I have been working on my banjo a little at school, though (shh!) I never have time to do it at home, plus it's easier to clean up at school.
Edited by - Bob Robert on 12/09/2009 04:16:47
country frank - Posted - 12/09/2009: 04:29:35
Dan, i have only just seen this thread and i must thank you for sharing what is clearly going to be the birth of an incredible instrument. Many thanks from old London and look forward to following this baby through to completion. Once again, magnificent work.
DanKnowles - Posted - 12/09/2009: 05:08:17
Tom,
Thanks for looking in. It will be interesting to see how this one turns out.
John,
What you are seeing is one of the few photos that I made of this blank early on. I didn't take a lot of photos of this as I did of Davids so I'll probably substitute a few photos of his in these early stages. I like to let necks cure for a good bit of time after gluing (many times several months) although since I only use epoxy on necks, I suppose that I could begin carving the next day after all the gluing is done.
Bob,
I'd be careful with that real banjo thing. These are only my methods.
Interestingly my step-brother is a art/ music teacher in Canada and he builds instruments with his students, pehaps you already are doing the same thing.
Frank,
I'm glad you are watching...what's that they say the more the mirier.
Edited by - DanKnowles on 12/09/2009 05:48:03
bordertownbrown - Posted - 12/09/2009: 07:43:57
Dan, What scale length will you be using on this banjo? Looking good!
Richard
DEmery - Posted - 12/09/2009: 17:24:17
Dan the rim is looking great. Is the Macassar rim (spelling?) expected to have the tonal response of Gabon? Similar density? I recall my luthier in Paris, Tennessee telling me "everything matters" when I asked about the thickness of the headstock veneer on a Tubaphone. I guess we will know when it gets wired up after a dry fit. I called you a few minutes after the first set up on Sherry Lynne and recall you laughing about the unexpected result. You owe me a call minutes after the first test drive of this banjo. I predict another great and unexpected result. David
DanKnowles - Posted - 12/09/2009: 17:45:47
David,
Your Parisite luthier friend must be right!!!
The Maccassar isn't quite as dense as the Gabon in your rim, but it is very, very dense and hard. It took me nearly as long turning this rim as it took that Paris feller who did yours (I know, I watched him do it through his glasses!). This rim has a very smooth, loud and clear tap tone, it is very reminiscent of yours.
You can count on a call.
Dan
Gomer - Posted - 12/09/2009: 18:27:50
Watching this thread is more riveting that looking out for Tiger Woods updates
jbalch - Posted - 12/09/2009: 19:09:11
quote:
Originally posted by Gomer
Watching this thread is more riveting that looking out for Tiger Woods updates
DanKnowles - Posted - 12/10/2009: 21:13:00
I realized following my posting about neck lay up that I had no photos of grain orientation. So here are a couple showing both the correct and incorrect orientation. I am showing this using some maple boards because the ebony just doesnt photograph grain well.


After the neck is removed from the clamps the glueing surfaces (ie. fingerboard, peghead) are all jointed true and squire. a maple veneer 1/8" thick or so is glued to the fingerboard.
After removing clamps the neck block is squared. Then using the table-saw, a1/4" x 7/16" slot is cut for the truss rod. I use a double acting rod and it requires a bit of hand work to make the end blocks and nut fit. The rod may be fitted so that it may be adjusted from either neck end. In this case it will adjust from the peghead. Two ebony blocks about 3/4"x3/4"x6 1/2" are cut for peghead 'ears'. these are glued and clamped.

DanKnowles - Posted - 12/10/2009: 21:17:33
Yep John the I thought I saw some Paparazzi were outside my shop today, but when I went out to pose, I realized that they were only there to deliver pizza!
Will1717 - Posted - 12/10/2009: 22:22:35
Dan:
I'll try to call tomorrow. Things were a bit crazy today and it got too late to call.
Bill
dbrooks - Posted - 12/11/2009: 09:20:17
Dan, what a fine banjo this will be and what a great narrative it is that you are spinning. We see not only the birth of this instrument; we get a glimpse into the soul that will fill it as well.
Thanks for sharing this with all of us.
David
Viper - Posted - 12/11/2009: 11:25:11
Interesting stuff. Thanks for sharing this process with us, Dan. Curious to see more. Cheers!
Gomer - Posted - 12/11/2009: 20:33:40
I have been salivating profusely. If it getting to be a problem and quite an embarrasment to the rest of my family.
devoall - Posted - 12/11/2009: 20:47:28
Dan!...GREAT thread.
When gluing up a neck, do people usually glue the ears on to make the headstock?? or is that just out of necessity, because it's too hard to find a piece of stock big enough to cut it out of a solid piece?
Thanks
Jim.
DanKnowles - Posted - 12/12/2009: 07:08:00
I performed in Murray, Kentucky last night and so I'm a bit late in getting to this...
Brad, Bill & Tom thanks for your kind comments.
Jim, Most folks I know do glue "ears" on their pegheads. I usually use 4/4 stock for each side of neck blanks which then requires the addition of ears. One could use large stock but there is a tremendous waste of wood when the neck is cut to shape.
DanKnowles - Posted - 12/12/2009: 07:19:12
Once the glue is set and the clamps are removed the peghead face is again jointed true and flat. A 1/8" maple veneer is then glued to the peghead face. Next the joint between the fingerboard and the peghead face are cleaned up and trued. A ebony veneer 1/8" thick is prepared and glued to the peghead face.
Gomer - Posted - 12/12/2009: 08:27:51
Dan , I think it might be time for you name this project. The government does it with all of thiers. It's only a thought.
p.s. You know, I just realized that I opened up this thread before reading the news. Now that's a sick puppy!!
Edited by - Gomer on 12/12/2009 08:29:18
DanKnowles - Posted - 12/12/2009: 20:21:07
Mark,
You might be right about this name thing. I think it should be named "The Great Race" but I think as long as it sounds cool it should be in Latin. Does anybody know how to translate this?
DanKnowles - Posted - 12/12/2009: 20:29:11
Tonight I thought I'd dig into something which I enjoy greatly, inlay. My school (collage &etc.) training was in commercial art. I went for three years dropped out to play music on the road thinking I'd never do another visually creative thing...boy was I wrong. Instrument design and building ties two of my great loves together.
As I'm sure you know from earlier posts the theme of this ebony banjo is to be the great steamboat race of 1870 between the Natchez and the Robert E. Lee. The inlay design to date pictures 8 human figures (all watching the race), the steamboats (running the race, although in fact, other than at the beginning of the race they would not have been seen together) and various other landscape features (river, trees & etc.). These are cut from many materials which include: white, gold & black mother of pearl, elephant ear muscle shell, red, green, black & pink abalone, osage orange persimmon & black walnut woods, silver, brass, turquoise, marble, red spinney red coral and various man made materials.
The design was worked up in Corral Photo Paint using my computer and so I was able to make many prints of my patterns. Multiple prints are needed to be able to cut out individual pearl cutting patterns. The more small pieces the more pattern prints needed. For this project I would figure that there will be around 100 pieces. The pattern pieces were cut out and I spent many hours (of pleasure) looking through my stash to find just the exact material that each piece needs. Color, the direction of 'flash' and grain of all the materials is the prime decider (not George Bush in this case!). Once the pieces and the placement are settled on, I glue, using cyno all of the patterns to their respective pieces. the paper will be sanded off later. I am working several large inlay projects together and so I will try to start cutting all of them in a few days. 

ogletj - Posted - 12/12/2009: 20:43:34
When we built my banjo, inlaying the finger board was the most fun, and the most frustrating.
DanKnowles - Posted - 12/12/2009: 20:45:49
As a little side note to the last post, I thought some folks might be interested in a pearl preparation technique of mine. During the summer months I saw out a large amount (for me) of abalone and Tennessee River muscle shell. Many times in cutting, mostly abalone, there are areas where the shell has been infested with worms. These worms bore holes through the shell making it unusable for most folks. I find that these blanks are quite good for highly textured arias like trees and rocks. When I saw out a wormy shell I don't pitch it, instead I save the blanks for this special treatment.
First I decide how I want to use this highly textured shell. This decides my color scheme. If I want a base color, I first stain the worm holes with marker or aniline dye, this is washed liberally with alcohol. The blank is then placed on a piece of wax paper. All of the holes are filled with cyno. I use blood transfer pipettes to apply the cyno (they are just the right size). I buy them at a local medical supply store. Then finely ground metal, stone or sawdust are shoved into the holes, followed by a liberal dose of cyno. Keep your fingers out of the cyno, it's not fun getting your fingers apart and the glue off of them.
After allowing the cyno to setup for at least one hour the blank is flipped over and the back side has cyno applied. This too is allowed to dry. Once the glue is set good and hard, sanding begins. This starts with 220, goes to 400 and then usually finishing with 800. Sometimes when the spirit is upon me I'll take it all the way to 2000. Now the piece is a ready to use blank.


Bagpussfrog - Posted - 12/13/2009: 06:00:24
can't wait to see how the inlay works out - thanks Dan, this is great stuff.
DanKnowles - Posted - 12/13/2009: 19:30:49

Here a fingerboard is prepared.
First I mill out a ebony board to about 2 1/2' X 20" X 5/16 using the band saw. The board is run through the planer and thicknessed to 3/16 if flat and 1/4 if it is to be radiused. 
Next using carpet tape, it is taped to a fretting template. This template came from a well known supplier of instrument building items. I built the fret slotting jig which is just a table saw cutting sled which has a indexing pin which mates with the jig allowing an accurate cut. 

The fingerboard is run across the saw 23 time which gives slots for each fret and one slot for the nut.
Walla we got a fingerboard ready to go!
DanKnowles - Posted - 12/13/2009: 19:36:39
Don and Shaun,
thanks for looking in and your kind comments!
Dan
DanKnowles - Posted - 12/14/2009: 05:55:42
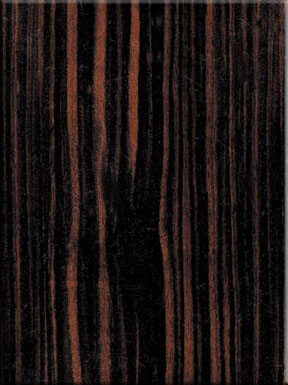
Early on in this forum I talked a little about two different common forms of ebony, Macassar and Gabon. After all this time I thought that a bit more detailed information was due. In this post I'll deal with Macassar and the next post I'll attempt to address Gabon.
The wood commonly known as Macassar Ebony is botanically known as Diospyros ( all true ebony are Diospyros) Celebica, they grow in India, Indonesia, Phillippines and Seri Lanka. Other names for Macassar are: Coromandel, Calamander wood, Indian Ebony, Camogon, Tendu, Timbruni and Tunki. The trees can typically reach a height of 50' and the trunk a diameter of 1 1/2'.
The heartwood of Macassar is black with reddish and brown streaks these can sometimes be grey tinged and even be a bit yellowish at times. The grain is usually quite straight although I have seen (and you can see on the bottom of the rim) curly figured wood. Its texture is quite fine and hard. Most Macassar I have seen is a bit (and this is a small bit) more open than Gabon. This wood is quite dense, hard and heavy. The heart wood can be quite brittle and the white wood tends to be smooth and softer. Macassar is very hard and difficult to work with dulling tools quickly. I have been told that gluing this wood is problematic but I have had no problems with it.
Typical dry weight: 68 lbs. per foot
Specific gravity: 1.09 (which means it will not float in water)
Much of this information comes from WOOD IDENTIFICATION AND USE by Terry Porter 2006
DanKnowles - Posted - 12/14/2009: 05:59:40

In this post I deal with Gabon Ebony. This wood is also called Cameroon, Madagascar and Nigerian Ebony. Its botanical name is Diospyos Crassiflora and is found growing in Cameroon, Ghana, Nigeria and Congo. A typical tree height could be 50-60' with a trunk diameter of 2'.
This fine grained and very dense wood is usually quite black although most does exhibit grey streaks. The commonly found solid black ebony is I'm afraid a thing of yesterday. Occasionally Gabon will also have brown streaks. This wood is difficult to work with and dulls tools quickly. Although at least in rim turning it didn't seem to dull tools as often as the Macassar. This wood seams a bit less brittle than its Indian cousin. If tools are kept sharp both of these woods are a joy to work with.
Dry weight: 64 lbs. per. foot
Specific gravity: 1.03 (will not float in water)
Much of this information comes from WOOD IDENTIFICATION AND USE by Terry Porter 2006
dbrooks - Posted - 12/14/2009: 09:56:30
Dan, it's been a long time since my high-school Latin classes, so I consulted Google.
There are several options for a Latin phrase for Great Race:
Cursus magnus
Cursus maior
Cursus maximus
Some flowery phrase from 1800s news accounts describing a race between steamships or boats might work as well.
Or the name of ship's captain. Horace Bixby gave Mark Twain his first apprenticeship. Blanche Leathers was the first female steamboat captain. Or who were the captains of the ships in the race you will depict? Maybe a hyphenated name would work.
I'm sure the right name will arise from the ebony shavings and dust.
David
jbalch - Posted - 12/14/2009: 14:43:22
Dan
It is very interesting to see you lay out and slot that fingerboard. Your necks are as true as any I've ever played. Frankly, the intonation on the neck you made for me (on the Vega I traded to Rebekah Weiler) and the one's on David Emery's banjos are all a far cry better than most. I always wondered how you so it...
Terms of Use | Privacy Policy | Privacy Consent (EU/GDPR Only)
Copyright 2026 Banjo Hangout. All Rights Reserved.


