DVD-quality lessons (including tabs/sheet music) available for immediate viewing on any device.
Take your playing to the next level with the help of a local or online banjo teacher.
Weekly newsletter includes free lessons, favorite member content, banjo news and more.
Premier Sponsors


|
Please note this is an archived topic, so it is locked and unable to be replied to. You may, however, start a new topic and refer to this topic with a link: http://www.banjohangout.org/archive/343500/2
rudy - Posted - 07/05/2018: 05:39:40
quote:
Originally posted by rubiconThe jigs are really something difficult to make ??
In the majority of cases, no. Go back and look at photo #71 and text for a simple example. You'd be surprised by the number of folks that look at something as simple as drilling a couple of holes and figure "I don't need a jig or fancy setup for that". The truth is a jig can mean the difference between a professionally executed procedure and a sloppy job that can in extreme cases ruin all the work you've done up to that point.
Jigs such as rim forms, routing guides, or even the drill guide shown in #71 end up saving a bunch of time and valuable materials, so I don't understand anyone's resistance to making them.
I CAN tell you that taking all these *#@% photos and keeping track of the steps and what I want to convey in this topic most definitely adds a lot of time to doing a build! 
I'll be using another simple "can't live without..." jig in the next post....
Edited by - rudy on 07/05/2018 05:44:30
rudy - Posted - 07/05/2018: 05:42:39
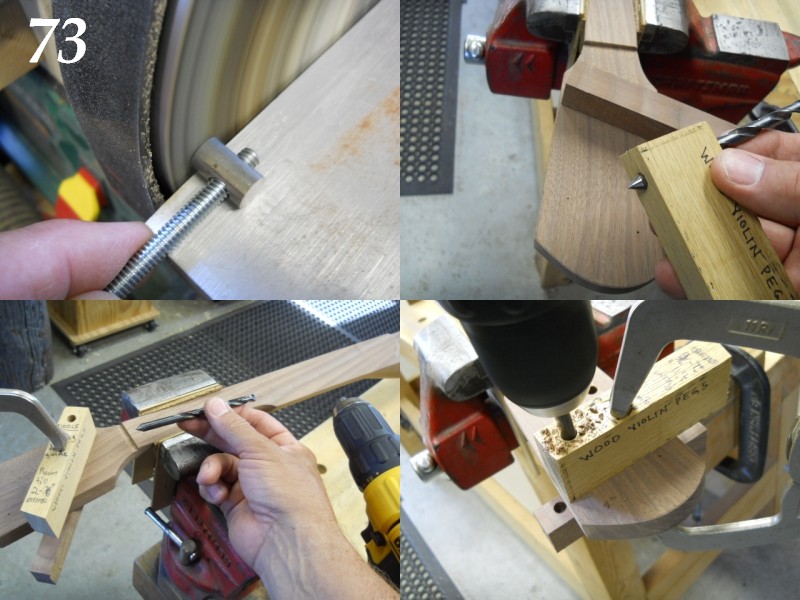
73. The ends of the cross dowel are trimmed in length so the tapped hole will line up with the hole that's drilled in the neck extension for the short section of 1/4"-20 all thread rod that will lock the neck adjustment. I've cut the cross dowel nut with a hack saw, not the prettiest of cuts, so I use the short section of all thread as a convenient way to hold it while the rough cut ends are sanded flat and smooth.
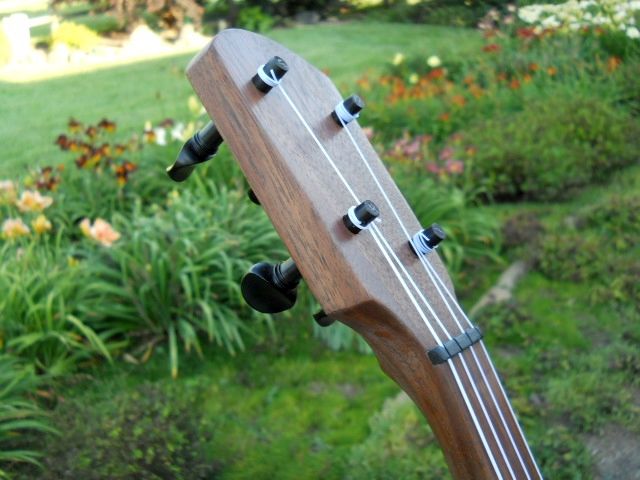
74. It's time to install the wood violin pegs. The peg locations were transferred from the peghead pattern using a sharp awl point and the drill bit has been "pointed" to help locate the hole over the marked peg location. The peg holes are first drilled with a 9/32" bit by using a guide block with scrap clamped to the back side of the peghead. In use the pointed end of the drill bit is held against the divot mark on the peghead, the block slid down against the peghead face and clamped in position using a backing block against the rear of the peghead to prevent tear out where the drill will exit.
75. Once the guide and backing wood have been clamped in place the drill bit is removed from the guide block. I always use a small flashlight to look down the guide hole and verify the guide hole is correctly centered over the marked peg location just in case anything shifts while clamping the guide block, peg head, and rear backing block together. I find a "quick clamp" to be much easier to use than attempting to do this with a C clamp.
76. The drill bit is now used to complete the hole. I've been using this method a very long time and I've drilled literally hundreds of holes for several different types of tuners without a single case of splintering or tear out at the edge of the hole.
rubicon - Posted - 07/05/2018: 06:35:22
quote: The photos and wonderful things you do are much appreciated I look forward to your posts best part of my day !
Originally posted by rudyquote:
Originally posted by rubiconThe jigs are really something difficult to make ??
In the majority of cases, no. Go back and look at photo #71 and text for a simple example. You'd be surprised by the number of folks that look at something as simple as drilling a couple of holes and figure "I don't need a jig or fancy setup for that". The truth is a jig can mean the difference between a professionally executed procedure and a sloppy job that can in extreme cases ruin all the work you've done up to that point.
Jigs such as rim forms, routing guides, or even the drill guide shown in #71 end up saving a bunch of time and valuable materials, so I don't understand anyone's resistance to making them.
I CAN tell you that taking all these *#@% photos and keeping track of the steps and what I want to convey in this topic most definitely adds a lot of time to doing a build!
I'll be using another simple "can't live without..." jig in the next post....
rudy - Posted - 07/05/2018: 07:21:28
quote:
Originally posted by rubiconquote: The photos and wonderful things you do are much appreciated I look forward to your posts best part of my day !
Originally posted by rudyquote:
Originally posted by rubiconThe jigs are really something difficult to make ??
In the majority of cases, no. Go back and look at photo #71 and text for a simple example. You'd be surprised by the number of folks that look at something as simple as drilling a couple of holes and figure "I don't need a jig or fancy setup for that". The truth is a jig can mean the difference between a professionally executed procedure and a sloppy job that can in extreme cases ruin all the work you've done up to that point.
Jigs such as rim forms, routing guides, or even the drill guide shown in #71 end up saving a bunch of time and valuable materials, so I don't understand anyone's resistance to making them.
I CAN tell you that taking all these *#@% photos and keeping track of the steps and what I want to convey in this topic most definitely adds a lot of time to doing a build!
I'll be using another simple "can't live without..." jig in the next post....
Thanks, Rubicon.
These topics are an "abbreviated" version of the construction guides that I used to have available from my website. Those often had around 1000 full size photos and there's just no way to squeeze that much info into a topic here on the Hangout. At least the "quad photos" are manageable for me and convey enough of an idea of the process involved in doing a particular banjo design.
I'm trying diligently to hold this topic to 25 quad photos (100 "steps") and it's looking like that will be fairly close to what's actually posted.
Edited by - rudy on 07/05/2018 07:23:02
rudy - Posted - 07/06/2018: 05:19:24
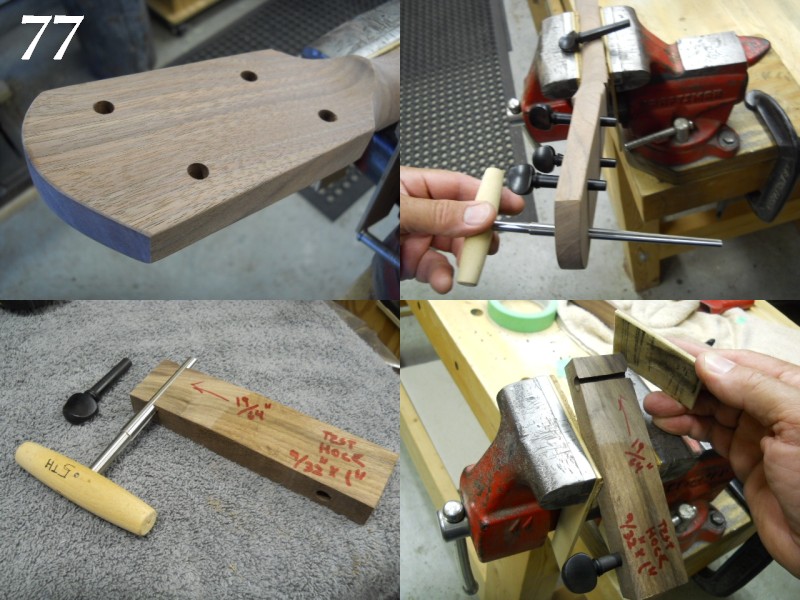
77. The holes are completely clean and free of tear-out by using this method of drilling them. This is a good photo example to point out the taper of the peghead from 3/4" at the volute (hand stop) to 5/8" at the end. It's certainly not necessary to do this, but it does make the peg head more attractive in my opinion.
78. Reaming the holes. Each peg is fit individually, so each hole is reamed until the mating peg inserts with the correct projection above the peghead face. It's wise to mark the top of the peg shaft with a 1 through 4 with a pencil so they can always be re-inserted in the correct locations. The projection of the string post portion of the peg is 1/2" above the peg head face with a 1/16" hole drilled 1/4" down from the peg shaft end for string attachment.
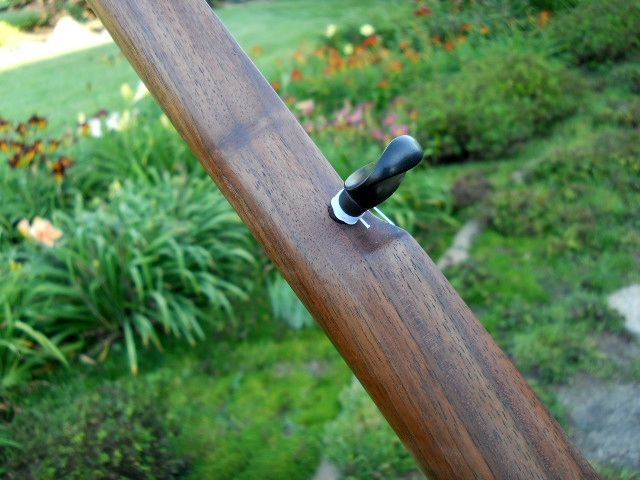
79. The 5th string peg is going to get special treatment. The hole at the right end of this simple jig will simulate the hole drilled in the neck, and allows testing of the fit to make sure everything is perfect when the 5th string peg is fitted to the actual neck. Drill it 9/32" by 1" deep and ream to full depth with the cut off reamer shown in photo #79. The reamer was cut from a full length standard reamer so it would create a "blind taper" in the neck that is approximately the same size as a standard wood peg which has been shortened a bit. The 5th string peg is shortened so it won't project too far out of the side of the neck after it is mated with its tapered blind hole.
The hole on the left side of the board was purposefully drilled to a larger 19/64" size and then cut on the band saw and sanded to create a small area where the peg shaft will be just slightly above the surface. This makes a convenient way to sand the peg taper for final fitting in the neck while maintaining the proper taper of the peg. If you do a lot of this type of peg fitting then it would be nice to purchase an actual "peg shaver", usually operating much like a giant pencil sharpener.
80. The shortened peg is inserted in the top hole and rotated to sand the shaft until it mates perfectly with the lower hole, which has been sized and tapered to simulate the hole that will be added to the neck.
I like to sand the peg shaft, taking care to keep the taper true, until the peg snugs into the hole with 3/4" to 7/8" of the shaft seated in the 1" deep blind tapered hole. The last bit of fitting should be done using the actual blind tapered neck hole. You want the fifth peg to be as ideally fitted as possible.
rubicon - Posted - 07/06/2018: 05:47:16
Very nice ! Alot of important measurements involved in fitting the tuners that could only come from expierience or in our case reading this ,very interesting !
Edited by - rubicon on 07/06/2018 06:00:41
rubicon - Posted - 07/06/2018: 06:10:36
After rereading this I have a question you said you fit each peg individually do the pegs themselves vary slightly ?
?
frisco slim - Posted - 07/06/2018: 14:30:38
Since you are the chief architect and popularizer of the "Rudy Rod" method of neck attachment, I'm curious as to why you have gone back -- at least in this case -- to something closer to a conventional dowel stick arrangement, with a neck extension as an integral part of the neck. Can you elaborate?
rudy - Posted - 07/07/2018: 04:59:28
quote:
Originally posted by rubiconAfter rereading this I have a question you said you fit each peg individually do the pegs themselves vary slightly ?
?
They do indeed often vary a bit. The pegs I'm using I purchased in bulk from International Violin and are very good quality. When pegs are factory turned they aren't sized precisely because part of what any violin maker will do when fitting new pegs is to use a peg shaver (as I referenced earlier). There are two specific reasons to do that; one being to size the peg accurately and also because the peg shaft actually will be very slightly oval in shape as a result of the continued drying of the peg after it is shaped and turned,
In this case since we're doing an instrument that is a bit less refined than what would come out of a violin shop a small bit of inaccuracy is normally not a problem. The majority of purchased pegs will work fine without need to shape them. There is an example of a easy to make peg shaver in my photos here on the Hangout if anyone has need to make their own. I'll post it if anyone has difficulty finding the photo. I posted a topic on its use at one time a few years back.
Fitting the pegs individually assures that all the pegs will be uniformly installed with the same amount of post protruding beyond the peg head face.
rudy - Posted - 07/07/2018: 05:19:07
quote:
Originally posted by frisco slimSince you are the chief architect and popularizer of the "Rudy Rod" method of neck attachment, I'm curious as to why you have gone back -- at least in this case -- to something closer to a conventional dowel stick arrangement, with a neck extension as an integral part of the neck. Can you elaborate?
Sure.
The huge difference between the neck attachment shown here and a conventional dowel stick arrangement is the lack of any heel that locks against the rim. When the neck is joined to the rim I'll demonstrate the huge advantage this is for the use in a tackhead banjo. Because the head isn't adjustable for tension on a tackhead design most folks will change bridge height to correct for a head that might not be ideal due to atmospheric humidity. This neck through design permits the neck angle to be instantly adjustable to change the string height over the upper neck by simply loosening a single acorn nut, repositioning the neck extension end, and tightening the acorn nut.
I use this design exclusively in anything I build now and you can find the details of that in the "Backstep Banjo Design" archived topic. I now use an odd number of hooks with a single hook passing through the heel center, but that was done so the hooks will be uniformly spaced for any number that I wish to use.
The details of the "Rudy Rod" can be found at the Internet Archive Project pages for my old website, but I do point out there that the system can be found on Lyon and Healy Star banjos, both as "rodless" attached necks and rods that run trough the rim to the tailpiece end. I found the details of the L&H Star neck attachment system long after I started using the "Rudy Rod", so I still give a vote of thanks the L&H.
Edited by - rudy on 07/07/2018 05:30:06
rudy - Posted - 07/07/2018: 05:27:17
quote:
Originally posted by rubiconThat makes sense thank you .
No problem, always aim to help!
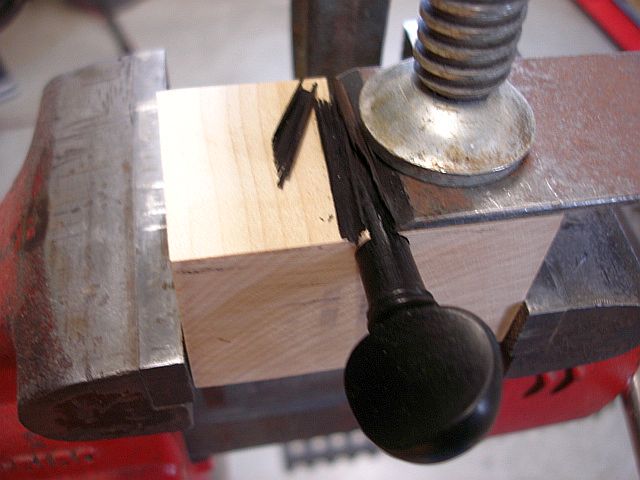
Here's the peg shaver and text:
***********************************************
One of several steps in creating a temporary peg shaver located in my Boucher building guide, you can probably figure this one out for yourself. If you duplicate this one, do note that the top is cut and sanded to a slight angle so the "slot" that opens up for the plane iron is a uniform width. If you screw it up just drill a new hole, ream, and start over. The uniform width slot will ensure the plane iron will cut perfectly to the desired taper. Adjust for a very light cut by bringing the blade edge closer or farther toward the centerline of the exposed slot.
darlo - Posted - 07/07/2018: 09:00:58
sir
many many thanks for posting this project , i have learned a great deal as regards to how banjos can be built ,whilst my knowledge grows unfortunately at the moment my skill set re woodworking is nowhere near adequate to take on something of this magnitude, so i can live with being called an armchair builder ,once again thank you
rudy - Posted - 07/07/2018: 10:42:16
quote:
Originally posted by darlosir
many many thanks for posting this project , i have learned a great deal as regards to how banjos can be built ,whilst my knowledge grows unfortunately at the moment my skill set re woodworking is nowhere near adequate to take on something of this magnitude, so i can live with being called an armchair builder ,once again thank you
Hi Mark, not problem with being an armchair builder; it is in fact how the majority of us started!
You can go for simpler fare, such as the Banjo Building 101 topic, or the even simpler "Wine Box Banjo" topic to dip a toe at a time into the creek of banjo building.
bluestemstrings.com/pageWineboxBanjo1.html">web.archive.org/web/20160328211341/bluestemstrings.com/pageWineboxBanjo1.html
Edited by - rudy on 07/07/2018 10:54:07
rudy - Posted - 07/09/2018: 05:58:30
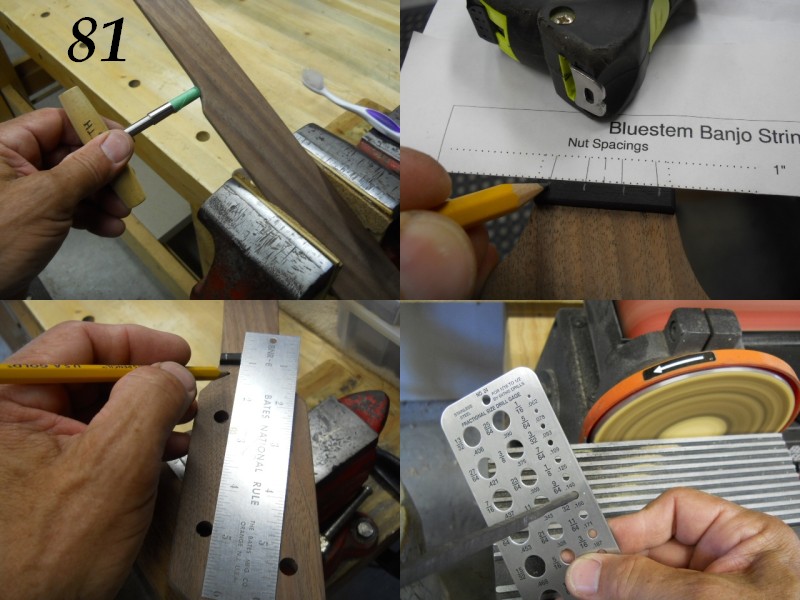
81. Here is a photo showing the shortened reamer marked with a masking tape flag so it's easy to tell when you've reamed to full depth. These reamers are fairly expensive, so unless you're doing multiple projects calling for a shortened reamer it might be better to use an alternative. There have been several posts about 5th string peg reamer alternatives on Banjo Hangout that can be found by using the search feature. My first few banjos fitted with violin pegs had the neck hole tapered by wrapping a standard violin peg with sandpaper, using heavy duty double faced carpet tape to hold it in place. It's slow, but it works.
82. A scrap of ebony is shaped and fitted to the nut slot recess and the string centers are marked out. The String Center Spacing Guide PDF (newer PDF version of the spacing guide shown in photo is available at the bottom of this post) can be used to easily lay out equally centered string centers for either the nut or bridge locations.
83. The string centers are marked so they angle directly from the face of the nut to the associated tuner string post. The nut slots are cut at the same angle as these lines to minimize frictional effects on the string as it is tuned.
84. A 5th string nut is made by rounding a scrap of ebony to fit in a 5/32" hole drilled directly behind the 5th note location. Any close grained hardwood can be used for this purpose, but a small scrap of plastic rod can also be used.
Edited by - rudy on 07/09/2018 06:01:47
rudy - Posted - 07/10/2018: 05:00:38
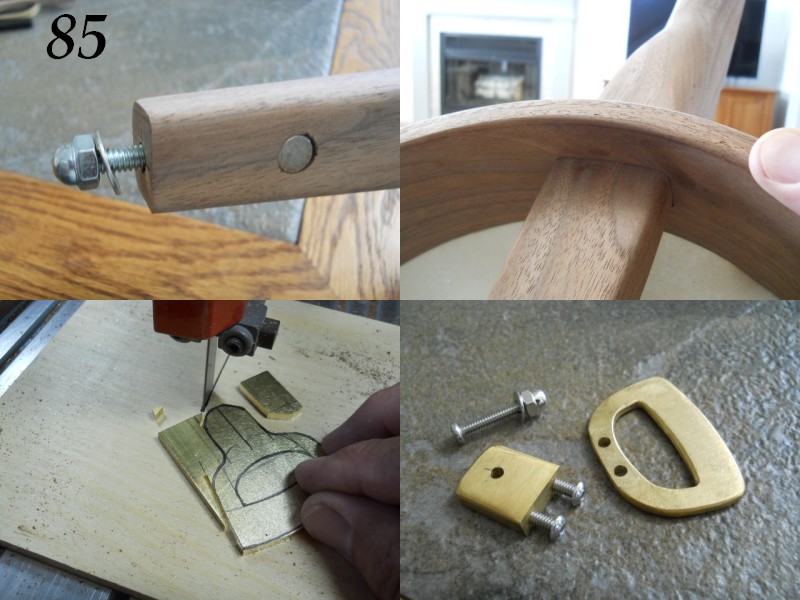
85. A shot of the "business end" of the neck extension showing the cross dowel nut, 1/4"-20 all thread rod, washer, and acorn nut, ready to use for joining the neck to the rim.
86. Here is a photo of the neck extension passing through the rim to demonstrate how closely it fits together. A good fit will be close enough that there will be no free play, so no means of fastening the heel to the rim is needed.
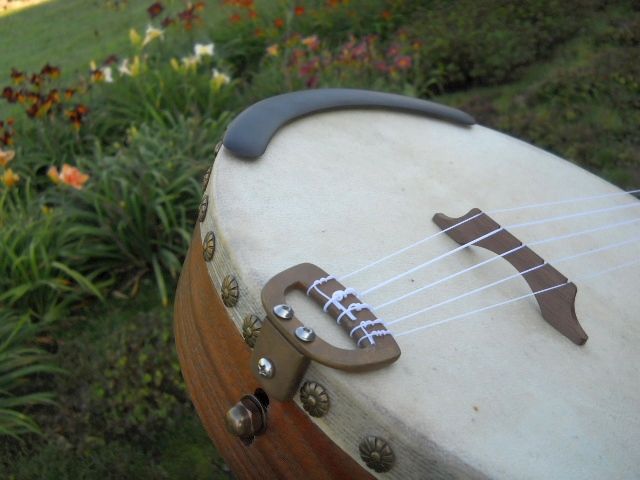
87. With the pegs taken care of it's time to think about a tailpiece for anchoring strings at the end of the rim. You can attach strings by using a "tie block" tailpiece as shown in the "Banjo building 101" topic referenced earlier, and there IS always the option of screwing a No Knot to the rim... but what fun would that be? I prefer to make a tailpiece pattern and make my own from brass stock. Brass is easy to cut and work, so it's not necessary to be intimidated. I didn't take a bunch of photos of the process of making it as it is all pretty basic cutting, filing, drilling, tapping, and sanding. The parts will be assembled and attached to the banjo "in the white", disassembling them a bit later for final finishing of the raw brass by polishing up a bit and using a patinating solution to darken it, available from many outlets such as Rockler.
88. The various parts of the simple brass tailpiece. The back portion attaches to the rim with a single bolt and the top section attaches to the angled surface of the back portion with two 3/8" length #6-32 button head screws.
rudy - Posted - 07/11/2018: 05:16:44
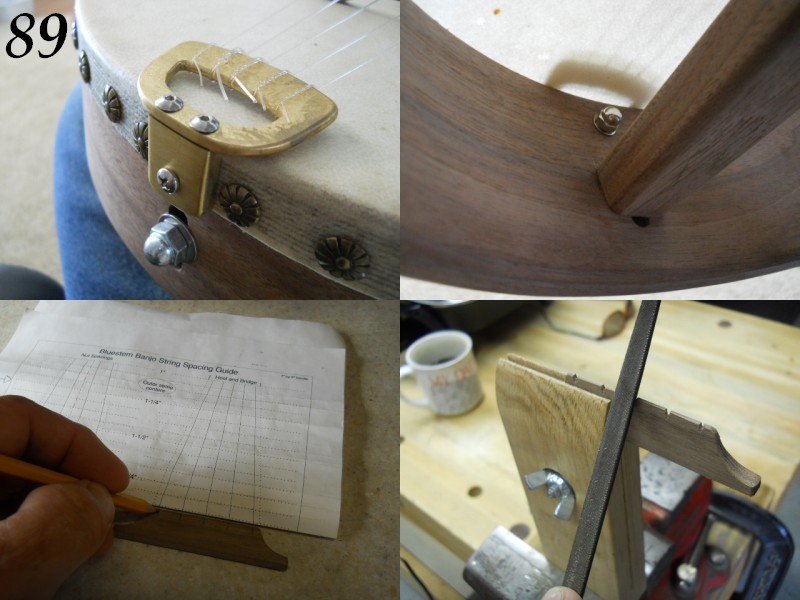
89. The brass components of the tailpiece are shaped, fastened together, and attached to the rim with a single #6-32 bolt.
90. Here's a photo of the acorn nut that holds the tailpiece to the rim. This photo was taken after the strings were attached to the tailpiece, so you can see their shadow above the head.
91. A bridge is made and string centers are transferred to the top edge using the string center spacing guide. (PDF link is provided in the July 9th, 2018 post above.)
92. The string slots are filed into the bridge at a 45 degree angle from each side. This makes a nice string notch in the bridge that breaks away cleanly at all sides of the string. This greatly minimizes string buzz created by strings passing through bridge slots, a common occurrence in standard bridge designs that utilize a slot sized close to the string diameter.
Edited by - rudy on 07/11/2018 05:19:05
rudy - Posted - 07/12/2018: 05:22:18
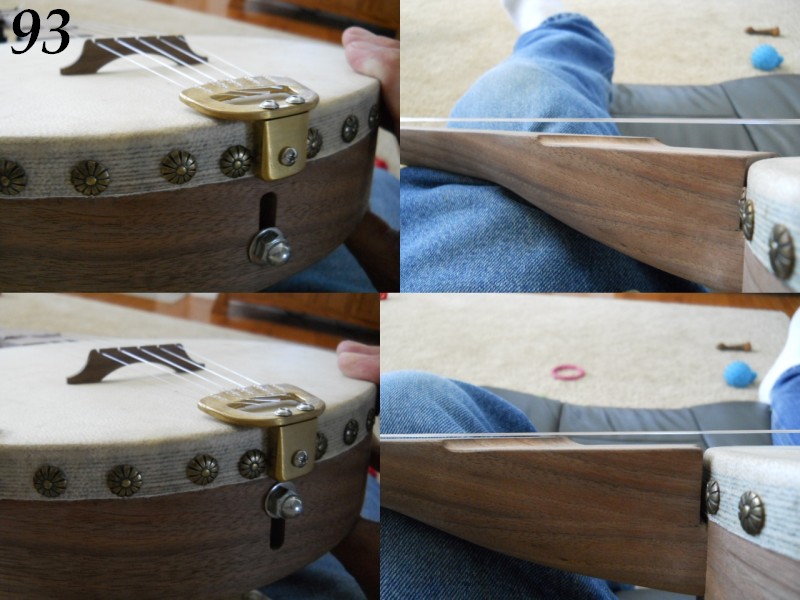
93. If the neck extension adjustment bolt is positioned at the bottom of the adjustment slot...
94. The strings will have about 1/4" of clearance over the upper portion of the fingerboard.
95. If the neck extension adjustment bolt is positioned at the top of the adjustment slot...
96. The strings will have no clearance over the upper portion of the fingerboard.
You obviously get to choose any point between those extremes. This range of adjustment permits easy setting of the action where it is best for the player. This also means that the string height can be adjusted to accommodate seasonal humidity fluctuations and their effect on the hide head "sag" or fluctuations in tension. This will also allow adjustment to account for changes in bridge height if the standard 5/8" isn't to your liking.
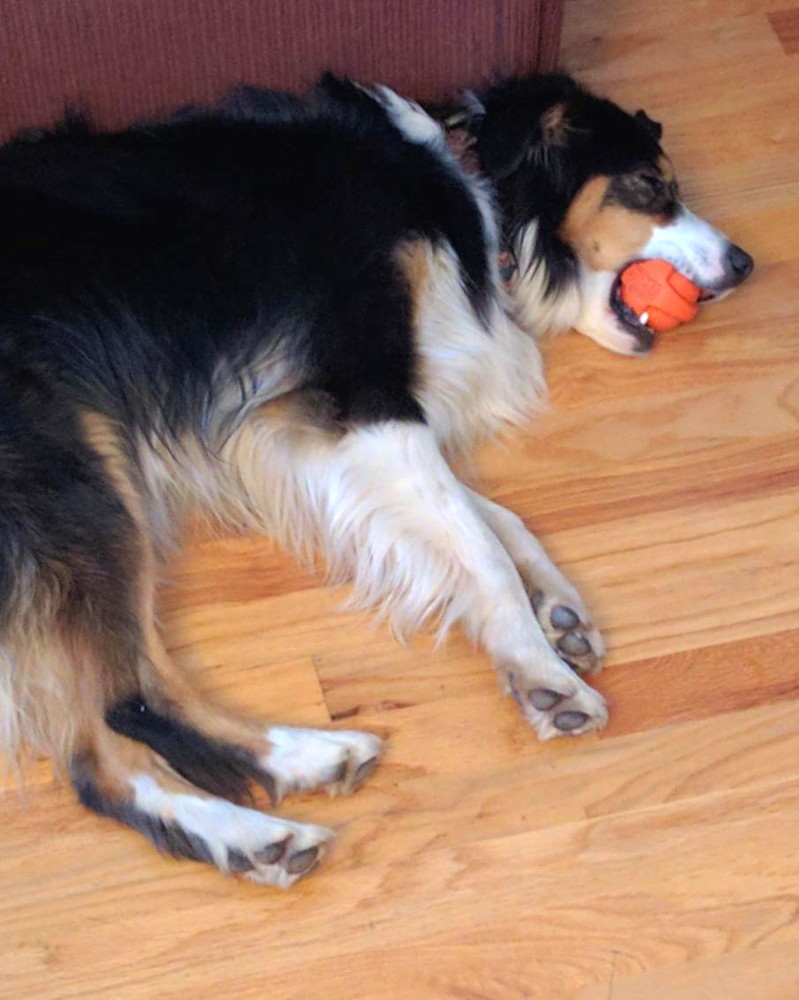
Note: Chocolate Labrador Retriever toys shown in photo have no effect on adjustment.
rubicon - Posted - 07/12/2018: 08:28:34
That is a awesome design you dont need a bunch of bridges to compensate for head sag
frisco slim - Posted - 07/12/2018: 09:38:22
"...Note: Chocolate Labrador Retriever toys shown in photo have no effect on adjustment..."
Ha! How about Australian Shepherd toys, would they have any effect?
rudy - Posted - 07/12/2018: 13:09:45
quote:
Originally posted by frisco slim"...Note: Chocolate Labrador Retriever toys shown in photo have no effect on adjustment..."
Ha! How about Australian Shepherd toys, would they have any effect?
It's possible...
My lab Toby follows me around as soon as he sees the pot, since he's absolutely certain that the goatskin NEEDS to be chewed. I'm glad I have Renaissance heads on anything else I have currently, as I wouldn't trust him any farther than I could throw him.
Here's the "guilty party" after I left my Snark SN-8 tuner unattended for a few minutes...

rubicon - Posted - 07/12/2018: 13:42:09
He's a handsome Dog for sure we always had black labs when I was a kid great dogs
rudy - Posted - 07/12/2018: 14:40:35
quote:
Originally posted by rubiconHe's a handsome Dog for sure we always had black labs when I was a kid great dogs
I've had 3 blacks and this is my first chocolate. He came as a 7 month old rescue from an older couple that purchased him and didn't realize what they were in for.
My wife and I had just taken the back door bell down after loosing our black lab a year earlier. We discussed the possibility of getting another dog and my wife said she would ideally like to get a rescue so we didn't have to go through the puppy phase, and she thought it might be nice to go with a chocolate. A few days later I was contacted out of the blue by a friend who had neighbors in their 70's who loved this guy dearly but failed to realize the amount of energy they would need to dedicate to him.
We went as soon as possible to meet him. When the owner told us he was completely housebroken and rang a bell at the back door to go out we knew it was meant to be.
He's a little over a year and a half now and he's not going anywhere! (I do keep a close watch on him when anything that looks like a rawhide (or a tuner) is close.)
Dan Drabek - Posted - 07/12/2018: 14:54:41
quote:
Originally posted by rudyquote:
Originally posted by rubiconThe jigs are really something difficult to make ??
In the majority of cases, no. Go back and look at photo #71 and text for a simple example. You'd be surprised by the number of folks that look at something as simple as drilling a couple of holes and figure "I don't need a jig or fancy setup for that". The truth is a jig can mean the difference between a professionally executed procedure and a sloppy job that can in extreme cases ruin all the work you've done up to that point.
Jigs such as rim forms, routing guides, or even the drill guide shown in #71 end up saving a bunch of time and valuable materials, so I don't understand anyone's resistance to making them.
I CAN tell you that taking all these *#@% photos and keeping track of the steps and what I want to convey in this topic most definitely adds a lot of time to doing a build!
I'll be using another simple "can't live without..." jig in the next post....
Yeah, tell me about it. :-> It takes a lot of dedication, and a bit of masochism.
DD
rudy - Posted - 07/12/2018: 20:12:11
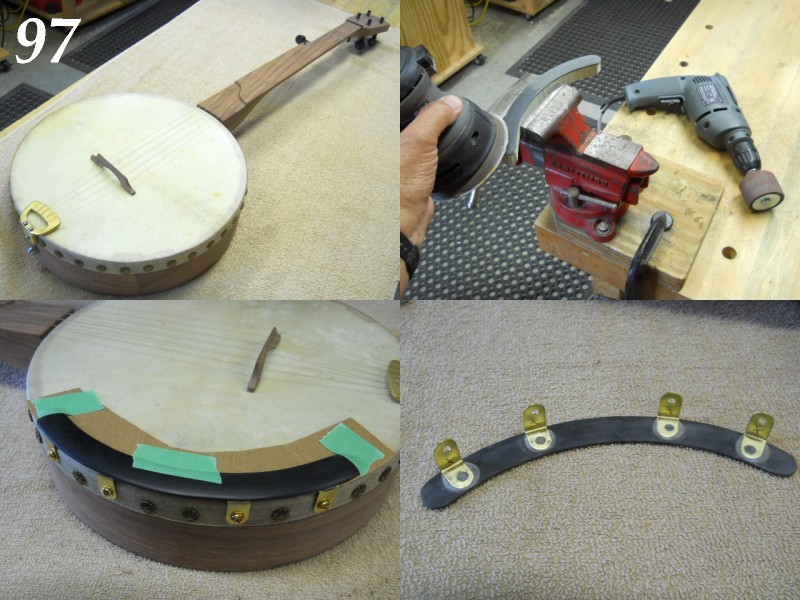
97. Technically "done" with the exception of applying finish, but I've become very accustomed to having an arm rest. I'm going to add the arm rest before taking it for a proper "In The White" test drive.
98. I cut a piece of 1/8" thick opaque black Garolite XX phenolic material for the arm rest. I normally make them from 3/16" thick material, but this piece was already cut, so I figured it was being put to good use. The 1/8" thickness is still thick enough to contour the top, so that's being done with the 2" sanding drum and smoothed out with the 5" random orbit sander. As always, the sander is wearing a 220 grit sanding disk.
99. I made up four .035" brass "L" brackets, pulled four of the tacks, and attached the brackets with brass screws at the tack locations. I slipped cereal box cardboard under the brackets and used "JB Weld" to bond the arm rest to the brackets.
100. I removed the arm rest and cleaned up the dried epoxy squeeze out with a Dremel fitted with a 3/4" diameter 80 grit sanding drum.
rudy - Posted - 07/12/2018: 20:15:07
OK, Time to test drive to see if there's anything I want to change.
It's initially strung with fluorocarbon fishing leader, but I'll string with Aquila Nylgut Classicals when it gets re-assembled after finishing the individual parts.
I spent 3 or 4 hours playing and I love it. I have a couple minor changes that I'll detail when final assembly is complete.
Tomorrow's Friday, the 13th, so I'm not doing anything that puts the new baby at risk!
Tough as it is, it all has to come apart right now. I'll tear it all down tomorrow and do the finish details over the next two days. The rim gets 3 coats of Min-wax wipe-on satin poly, the brass gets tossed in the tumbler for an hour and dipped in patinating solution, and the neck will be done with the heat infused Carnauba wax treatment.
Then it takes about 30 minutes to assemble everything and string it with Nylguts.
As the Terminator said, "I'll be back..."
Edited by - rudy on 07/12/2018 20:25:53
mreidsma - Posted - 07/12/2018: 20:22:33
Wow! It’s been great to follow the steps of the build, but I had sort of forgotten that you were making a playable instrument. (I do that with my own builds, too.) It sounds great, and I love the neck attachment and arm rest tricks. Can’t wait to finish my current project so I can start a new banjo and try some of these tips out!
-M
rubicon - Posted - 07/12/2018: 20:27:11
Looking good !! Sounding good !! can't wait to see it this thread has been the highlight of my day since I found it !
Edited by - rubicon on 07/12/2018 20:29:45
rudy - Posted - 07/12/2018: 20:29:13
Thanks Kindly.
I forgot to mention that this jo is a super-lightweight! I'm used to a bit heavier banjo, so it's nice to have something that weighs in at somewhere around 2 pounds!
cedarwax - Posted - 07/13/2018: 04:51:19
Congratulations, Rudy! Nice banjo, and a lovely sound. Great job!
rickhayes - Posted - 07/13/2018: 08:13:34
Looks and sounds great Rudy. Do you stain the banjo or just keep it natural and put on the minwax finish?
rudy - Posted - 07/13/2018: 11:38:32
quote:
Originally posted by rickhayesLooks and sounds great Rudy. Do you stain the banjo or just keep it natural and put on the minwax finish?
Hi Rick, I normally don't stain. I choose wood for both its mechanical attributes and natural beauty. Rims will get straight Wipe-on Poly and necks will get hot waxed. Both will preserve the wood's natural color, although both will make the appearance generally quite a bit darker in the process.
I occasionally will do maple with a stain, particularly if I purchase for figure in the wood, but still want something other than the stark brightness of light shaded wood. I'm not a fan of plain maple with clear finish. I guess it reminds me too much of all those cheap import electric guitars from the 60's - 70's.
rubicon - Posted - 07/16/2018: 15:18:22
I was looking at the original drawing what is the nut with 1 3/8 ?? Can't quite make it out
rudy - Posted - 07/16/2018: 15:51:55
quote:
Originally posted by rubiconI was looking at the original drawing what is the nut with 1 3/8 ?? Can't quite make it out
The original drawing is only a preliminary outline, but the nut dimension is 1-3/8". When the actual pdf is posted you'll be able to zoom in as close as you want without a loss in resolution; that's the beauty of the pdf format.
The drawing that is posted is only a low resolution jpg representing what the final drawing will look like. I'm working on putting the finishing details on the drawing, as well as re-assembly, adding a new set of Nylgut Classic strings and doing a couple quick-n-dirty video demonstrations.
I may be able to get up some finished photos tomorrow.
rubicon - Posted - 07/16/2018: 16:33:23
Ok thank you for the measurment the drawing isnt in pdf form yet I look forward to seeing it take care
Edited by - rubicon on 07/16/2018 16:36:20
rudy - Posted - 07/17/2018: 05:29:46
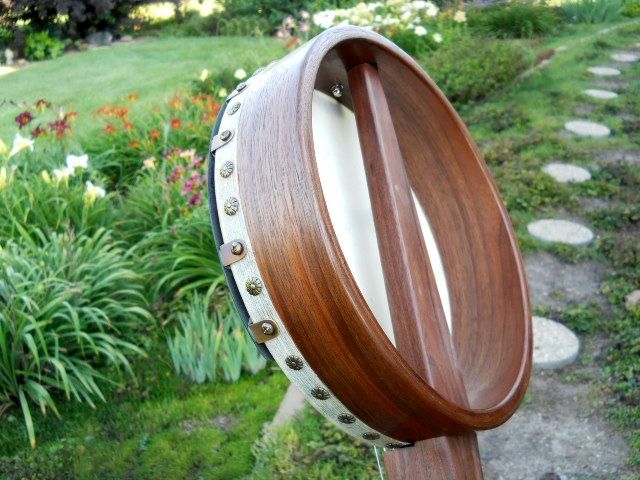
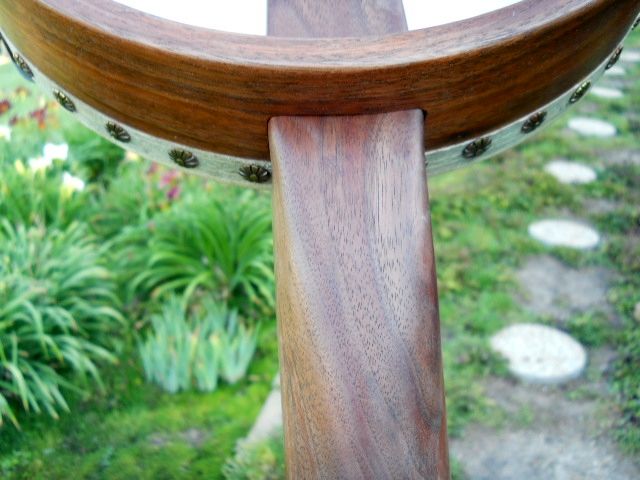
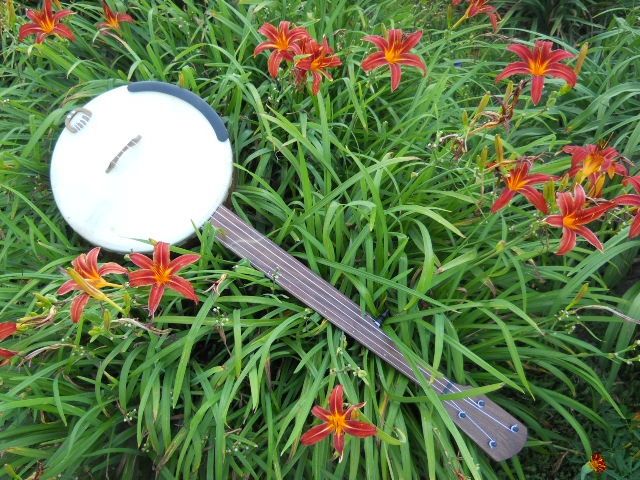
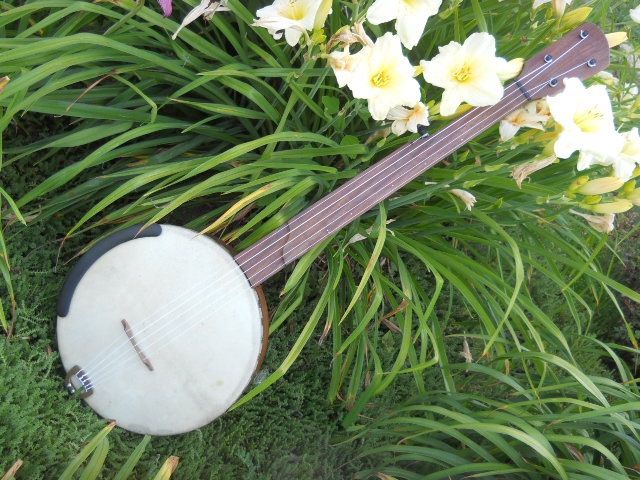
Finished up and re-assembled:
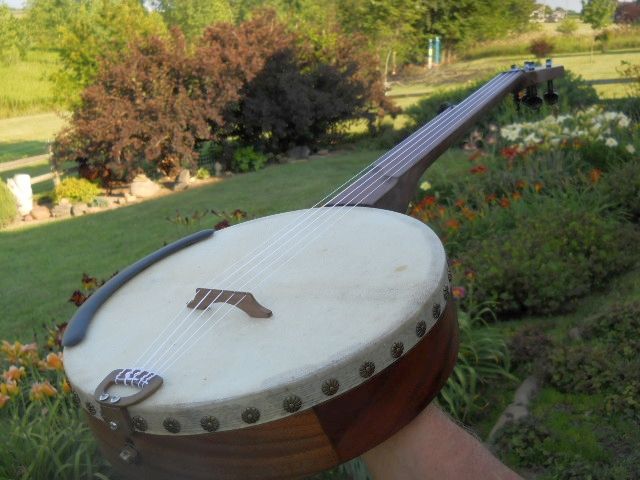
As one of the few final details I decided to add, Single 1/16" dots were added at the locations where frets would normally be placed. Single dots at 5, 5, 7, 10, and double dots at 12. These are at fret locations, NOT at the "between the fret" standard placement. I play up the neck enough that I've found that small and discrete markers help a bunch with proper intonation.
The double dots at the octave serve another purpose, too. Although a "fretless" banjo can have the bridge positioned anywhere on the head I've found it much better to lock into a single "scale length" (even on fretless) because it doesn't play with your muscle memory of where to land your fingers for good intonation. Since the fifth nut is placed at the fifth fret location for a 25-1/2" scale proper bridge location will ensure that note is in the "right" place.
In practice, the fretless bridge position is set by producing a chime over the double dots (or within 1/2" of that point), pushing the string down at the double dots and adjusting bridge position so the notes match. Obviously, without dots it doesn't matter, but the dots locate the bridge correctly without the need to measure the bridge location point.
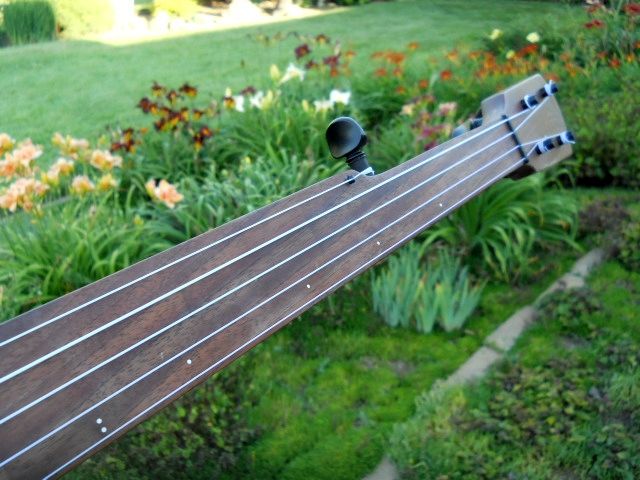
rudy - Posted - 07/17/2018: 05:32:29
A few more shots.
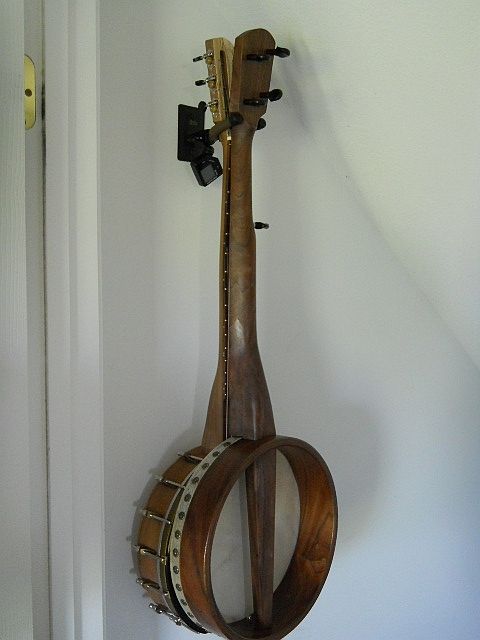
The last photo needs explanation. Directly across from the door going out to the screened porch is the basement door. I keep an instrument or two stashed there so I have quick access for a cup of coffee and porch picking whenever I feel the urge. This banjo is so light that I feel totally comfortable with just placing it in the same String Swing hanger as one of my other banjos. This won't be a regular parking place, but it serves the purpose at present.
Edited by - rudy on 07/17/2018 05:39:39
rudy - Posted - 07/17/2018: 05:43:30
New banjos always inspire a new tune or two, here's a pass through "Hannibal Levee" with the Nylgut Classics holding down the string duties.
rudy - Posted - 07/17/2018: 05:45:57
...and a new instrument always encourages us to stretch outside the standard repertoire a bit...
antonm - Posted - 07/17/2018: 09:15:55
Really helpful and inspiring thread! Thanks Rudy for sharing so much from your experience and knowledge! The banjo looks superb.
Dan Drabek - Posted - 07/17/2018: 09:54:57
Sounds great Rudy.
The perfect instrument for sitting on the porch on summer evenings and picking with a few friends.
Save me a beer.
DD
rudy - Posted - 07/17/2018: 14:10:35
quote:
Originally posted by Dan DrabekSounds great Rudy.
The perfect instrument for sitting on the porch on summer evenings and picking with a few friends.
Save me a beer.
DD
Ironically, I sat down with a new-to-me Sam Adams "Porch Rocker" beer (infused with lemon zest and flavoring) with a new banjo in one of a pair of new porch rockers made from recycled milk jugs.
I don't usually have a low tuned banjo on hand, but it's kind of handy because the low tuning fits a lot of the stuff I like to sing, too. It dawned on me that this would make a good banjo to test out a new pickup design I'm working on. The pickup should work equally well on steel or synthetic strings, so this presents an opportunity to test out the design.
rudy - Posted - 07/18/2018: 05:44:30
quote:
Originally posted by rubiconWill it be installed in the rim like a guitar ??
Part of what prevents the open back banjo, and banjos in general, from having a much wider use in performance is the difficulty dealing with amplification. My M.O. is to incorporate a pickup design that senses string energy AND head energy via what's imparted to the bridge. A microphone is the closest thing to that, but there's always a raft of problems that come along with that. A good sounding pickup that would work for steel or synthetic-strung banjos equally well that only requires a 1/4" cord into would be a great convenience.
It's not going to be a popular opinion to express, but if the amplification issue isn't addressed the banjo will go the way of the passenger pigeon. Sure, there will always be a small counterculture of banjo players, but it's a fantastic instrument for a lot of diverse musical forms, so it would be nice to see more "younger" players involved. Banjos have a very hard time competing in a world where anyone can quickly plug in a small amp at an open mic the way a gazillion guitar players can.
The "business end" will be two custom wound coils arranged in a RFI canceling configuration mounted just below the head. I've wound many of these as single coil pickups for lap steels. The output jack could be either rim mounted (that would be my preference in a performance banjo) or mounted through the neck extension or self-contained on the coil block. This shot of my bridge vise shows neo magnets being installed in bridge feet in the lower right photo.
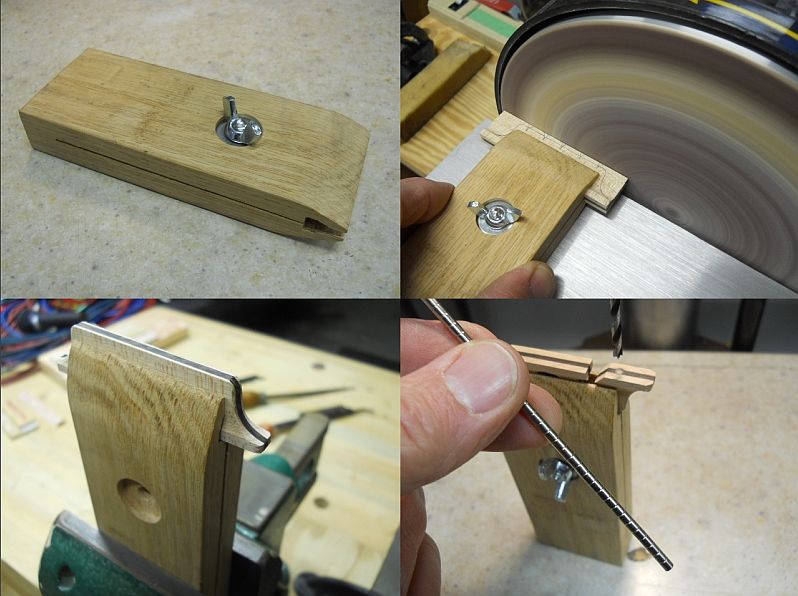
Edited by - rudy on 07/18/2018 05:54:01
rubicon - Posted - 07/18/2018: 06:15:51
My God you amaze me ! that a cool concept that banjo would sound great thru an amp !
Terms of Use | Privacy Policy | Privacy Consent (EU/GDPR Only)
Copyright 2026 Banjo Hangout. All Rights Reserved.