
DVD-quality lessons (including tabs/sheet music) available for immediate viewing on any device.
Take your playing to the next level with the help of a local or online banjo teacher.
Weekly newsletter includes free lessons, favorite member content, banjo news and more.
Premier Sponsors


|
Please note this is an archived topic, so it is locked and unable to be replied to. You may, however, start a new topic and refer to this topic with a link: http://www.banjohangout.org/archive/263173
Todd Treadway - Posted - 05/21/2013: 19:39:25
Having bandsawed out the peghead shape, I'm now at a point where I have to sand the edges, maintaining the perpendicular-to-the-fretboard surfaces. Some peghead designs are easy to sand using a spindle sander, but I shortsightedly chose one that includes areas where two convex curves meet to form an inside-facing point. I'm thinking a small belt sander might be a way to go ('cept I don't have one), but I wonder: How do any of you handle sanding these areas?
(Hope my description makes sense...)
Edited by - Todd Treadway on 05/21/2013 19:45:42
Quickstep192 - Posted - 05/21/2013: 19:46:22
I have a set of these "tadpole" sanders. You wrap the paper around them and use them to get into the corner. Depending on where your inside facing point is, it might be mostly end grain in addition to being a pain to reach. End grain is much harder to smooth. Resist the temptation to sand up and down in the corner, rather pulling the paper from the inside of the corner to the outside, sanding with the grain. Cross grain scratches will show up big time.
woodworkingshop.com/product/kl50000/
Dan Drabek - Posted - 05/21/2013: 19:52:22
For sanding hard to reach surfaces, I like to glue sandpaper to one side of a piece of wood veneer. I can trim it down with scissors to any shape i like. It's semi-stiff and won't round off edges, but is flexible enough to bend to a curved surface as needed. And thin enough to get into tight spots.
DD

Todd Treadway - Posted - 05/21/2013: 19:59:00
Oooooo, both of those ideas look like they'd be great for final sanding... Right now, my bandsaw cut is some distance off the pencil line. I have to remove quite a bit of wood fast & accurately. Would they work for that?
Edited by - Todd Treadway on 05/21/2013 20:02:46
rudy - Posted - 05/21/2013: 20:00:50
Very small inside curves, glue sandpaper on a short section of the appropriately sized dowel to make your own mini-drum sanders for the drill press. Use care not to burn your work.
Inside corners, glue sandpaper on shaped sections of scrap hardwood. You can use triangular pieces for really sharp details, going carefully across the side surfaces and finishing up by sanding with the grain using the side of the platen.
Hope that makes sense...
Ultimately you use these projects as "teachable moments" where you decide to modify your design to make things easy on yourself.
Like Pete Townsend would say while doing his finest of windmills, "Won't do that again...".
Dan Drabek - Posted - 05/21/2013: 20:02:05
If it's that far off, you might want to re-touch it up on the band saw, and/or, pare it down with a sharp chisel before sanding.
DD
rudy - Posted - 05/21/2013: 20:08:48
quote:
Originally posted by Dan Drabek
For sanding hard to reach surfaces, I like to glue sandpaper to one side of a piece of wood veneer. I can trim it down with scissors to any shape i like. It's semi-stiff and won't round off edges, but is flexible enough to bend to a curved surface as needed. And thin enough to get into tight spots.
DD
Dan, the veneer backing is a great idea. I often glue sandpaper to a variety of stuff for backing and I have found that using heavy duty double stick carpet tape is great for bonding sandpaper to 1/4" cork sheet and scrap pieces of heavy denim fabric. The thing that's cool is you end up with long 2" wide strips of backed paper and you can cut off whatever you need and even shape it with shop scissors.
I also glue a variety of grits to the sanded ends of two buck Chuck corks for quick detail work. Finally, a way to use those Cabernet corks!
rudy - Posted - 05/21/2013: 20:10:46
quote:
Originally posted by Todd TreadwayOooooo, both of those ideas look like they'd be great for final sanding... Right now, my bandsaw cut is some distance off the pencil line. I have to remove quite a bit of wood fast & accurately. Would they work for that?
If you need to remove more than the actual pencil line use power!
Todd Treadway - Posted - 05/21/2013: 20:28:44
Thanks, guys! I took a few minutes to take a pic to make things clearer, but you all seem to know what I'm talking about! Here's the pic anyway (a little bigger than I intended!), and of course I'm referring to the bumps near the top of the peghead. My only concern now is maintaining the parallel lines doing it by hand, but you've given me courage!

Edited by - Todd Treadway on 05/21/2013 20:30:57
Todd Treadway - Posted - 05/21/2013: 20:46:54
Rudy, I'll get closer to the lines with the spindle sander momentarily...
banjobart - Posted - 05/21/2013: 20:52:40
Use a 6" half round bastard file and then a second cut or fine file to follow. I have done over 4,000 this way and it is quick enough, a few minutes work. I did 28 today, it took only an hour or so after the spindle sander work.
sunburst - Posted - 05/21/2013: 21:22:38
Keep your old hotel room keys, credit cards, any of those plastic cards. They fit pretty well in a folded 1/4 sheet of sandpaper and give you a "sanding block" of sorts that will reach into corners pretty well.
I avoid inside corners when designing things, but sometimes in repair work and replica work it has to be done, and I haven't found a good substitute for simple hand work when it comes time to sand them.
PS
Old cards are also good for use as shims, spreaders, scrapers, and all sorts of other shop tasks.
Edited by - sunburst on 05/21/2013 21:26:26
Dan Drabek - Posted - 05/21/2013: 21:59:11
quote:
Originally posted by Todd Treadway
Here's the pic anyway (a little bigger than I intended!), and of course I'm referring to the bumps near the top of the peghead. My only concern now is maintaining the parallel lines doing it by hand, but you've given me courage!
No sweat, that's an straightforward shape. A small spindle sander or sandpaper dowel chucked in a drill press will take care of 95 percent of it. And a file will clean up the rest.
The thing with files is that they only cut in one direction. Sawing back and forth with a file will tend to mess up your angles.
Bart could do it in a few minutes, but then he's had a bit more practice than the rest of us. 
DD
ravedog - Posted - 05/21/2013: 23:09:13
there is a bit that works with a dremel, it's called a "split mandrel". basicly it's just a shaft that had a slot, about 1 1/2 inches long on one end. you slide sandpaper into the slot, wrap it around until you like the diameter you like. chuck it up and go. you can also use self stick paper and the grit of your choice,
a jewelry supplier will have them or you can find them on ebay in the jewelry area under tools-rotary tools. they're less than $2.00 each and last forever.
there is also a "screw mandrel that you use with pre-made rolls in 3/8th or 1/2 in .
check out jewelry supplies there are a lot of bits, burs and mandrels that are very helpful and handy to have around
chuck k
Fathand - Posted - 05/22/2013: 04:45:32
You definitely should have come closer to the line first time around. It is hard to keep the saw blade close on a 2nd pass when there is only wood on one side of the blade. I try to keep the saw blade touching the outside of the pencil line when sawing. Also looks like you used a fairly coarse blade where a fine one would have been better.
Use a rasp or file to get close now and then a drum sander if you have one. Then wrap sandpaper around dowels or pencils or little scraps of wood or whatever to get in there and hand sand.
mike gregory - Posted - 05/22/2013: 05:20:56
quote:
Originally posted by banjobart
Use a 6" half round bastard file and then a second cut or fine file to follow. I have done over 4,000 this way and it is quick enough, a few minutes work. I did 28 today, it took only an hour or so after the spindle sander work.
Be careful when choosing a 6 inch half-round bastard, so you don't end up with a 6 foot all-around bastard.
Saw one in a movie once.

Todd Treadway - Posted - 05/22/2013: 09:09:42
Appreciate the responses! I will forge ahead confidently now!
Banjobart -- 4,000?! 28 today??!! Maybe a chainsaw is the way to go!
Mike -- Thanks for the laugh!
retread -- As for the inlay, that bear has been my "logo" for a long time (I'm "Bear" on other forums), but I'll tell you a dirty little secret about the inlay: It's made from a pearloid Fender heavy guitar pick. Much easier to make than using real MOP! Just in case you've ever been tempted, well, now you know. Shhhh!
Edited by - Todd Treadway on 05/22/2013 09:13:12
Todd Treadway - Posted - 05/22/2013: 11:39:08
Not done yet, but much better now. Thanks for all the tips, everyone!
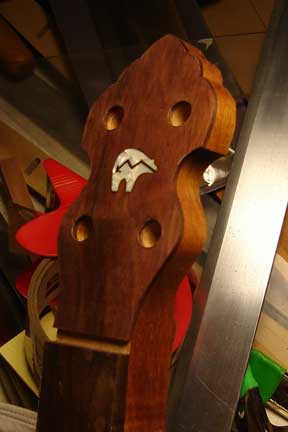
Todd Treadway - Posted - 05/22/2013: 11:39:08
(edited to delete double-post)
Edited by - Todd Treadway on 05/22/2013 11:41:32
mike gregory - Posted - 05/22/2013: 13:13:59
quote:
Originally posted by Todd Treadway
Not done yet, but much better now. Thanks for all the tips, everyone!
You're welcome.
And what is the significance of the crooked arrow starting at the bear's jaw?
Does represent the Inner Journey of the careless hiker?
Is the bear heading for a comfortable spot in the woods, away from the cameras of those who do the Charmin commercials?
Dan Drabek - Posted - 05/22/2013: 14:28:50
quote:
Originally posted by mike gregory
Does represent the Inner Journey of the careless hiker?
Alimentary my dear Watson.
Looking good Todd!
DD
Playin the radio - Posted - 05/22/2013: 18:59:04
I'd use files initially as Bart recommended. Files to add to your shop should include single cut and double cut 4" through 8" half-rounds, rat-tails in various diameters and lengths, a file card for cleaning and handles for file tangs. The cut typically gets finer as the file gets shorter. File handles can be of any shape or style or material but should be there so you don't put a nice goober in your wrist/forearm that requires a urgent care room visit. Add scrapers to your tool inventory and you can use your pocket knife as a scraper for situations like this.
The final product looks nice, however you finally did it.
Todd Treadway - Posted - 05/22/2013: 20:07:05
Not to prolong this topic, but I just gotta say,
"You guys are great!"
Thanks for the help, knowledge & humor -- Todd
retread - Posted - 05/24/2013: 19:02:44
Inlay from a guitar pick. Brilliant. Might try it some day, but I'll never tell.
Terms of Use | Privacy Policy | Privacy Consent (EU/GDPR Only)
Copyright 2026 Banjo Hangout. All Rights Reserved.


