
DVD-quality lessons (including tabs/sheet music) available for immediate viewing on any device.
Take your playing to the next level with the help of a local or online banjo teacher.
Weekly newsletter includes free lessons, favorite member content, banjo news and more.
Premier Sponsors


|
Please note this is an archived topic, so it is locked and unable to be replied to. You may, however, start a new topic and refer to this topic with a link: http://www.banjohangout.org/archive/215821
rudy - Posted - 09/16/2011: 07:37:08
Here’s my latest version of what I technically refer to as mountain banjo, being fretless and internally tensioned. This is obviously pushing the boundaries of the “mountain banjo” classification, but that’s the best I can come up with. It started with a particularly nice spalted maple turning block that I decided would make a better banjo than a bowl.
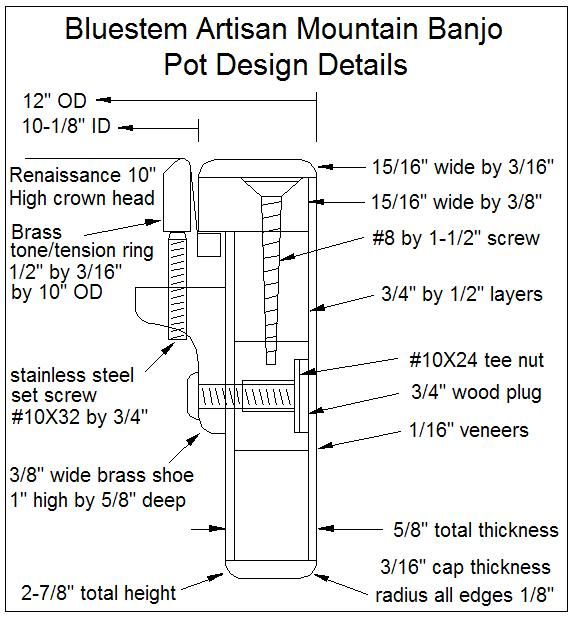
The pot features a 12” by 3” rim made by combining block construction with 1/16” laminate veneers of spalted maple on the outside and cherry on the inside. The rim is capped on front and rear with 3/16” ebony and has 12 tee nuts imbedded for attaching the internally mounted shop made patina finished raw brass shoes that are tapped to provide the means of applying tension to the brass tone ring. The tone ring applies tension to the stationary 10” Reno Renaissance head. The pictures should be self-explanatory for the most part. This tensioning system is extremely efficient; with about 1/2 turn of the screws providing enough force so there is no deflection in the head. I initially tensioned it using only 6 of the screws with no problem. I’ll try to get at least a nice cross section diagram of the rim wall posted in the Artisan Bracket folder in my photos section of my hangout home page in case anyone wants to duplicate the design. It already has a complete photo essay on how to fabricate the tensioning shoes used here.
The neck is my standard fare, I had a plain maple neck blank made up, so I used it. There is a 2024-T2 aluminum reinforcement bar embedded in the central portion of the neck, but it really isn’t necessary with the Nylgut strings. Ebony board with flush frets, scoop, mother of pearl markers, hand cut free form marker at the 12th position just for fun, Pegheds tuners, spalted maple overlay, Dobson heel, and embedded 1/4” by 20 cross dowel nut for attaching the neck to the pot.
The neck is secured to the pot by a single 1/4” stainless acorn nut at the heel end of the pot. A length of all thread is screwed into the cross dowel, a hollow 3/4” dowel stick is inserted through the 3/4” hole at the tailpiece end of the pot, the all thread is slid through this, the tailpiece positioned, and the whole assembly is joined when the acorn nut is added and tightened. I really love this system, as the action can be adjusted by simply loosening the nut and sliding the neck heel up or down to suit your preferences, and re-tightening the nut. Another nice thing about it is there is absolutely no stress placed on the rim. All of the force is applied by the dowel stick the heel attachment point. The tailpiece is hand cut polished stainless steel. There is an outline and dimensions for making your own tailpiece in the Artisan Bracket folder in my photos section of my hangout home page.
The banjo was finished off by adding Nylgut strings over one of my own bridges. The bridge is made from quarter sawn violin grade maple sandwiched to an internal layer of ebony. Since they are “plywood” they can be made extremely light while remaining strong. I also like the looks of the nice medullary ray grain on the bridge surfaces.

Edited by - rudy on 09/16/2011 07:38:11
 Artisan scoop |  Artisan rim side |  Artisan pot end |  Artisan peghead |
 Artisan neck end |  Artisan inside |  Artisan inside tailpiece |  Artisan inside heel |
 Artisan end |
rudy - Posted - 09/16/2011: 07:39:56
Here’s a quick video with solo playing and also with accompanying instrumentation to demonstrate it.
stigandr5 - Posted - 09/16/2011: 07:48:59
Wow, Randy, that's a stinkin' piece of art! And I mean that in the best sense of "stinkin'." Fantastic work and I'm sure it sounds wonderful (can't get videos to load where I am). Keep pushing boundaries!
dickinnorwich - Posted - 09/16/2011: 07:55:37
quote:
Originally posted by stigandr5
Wow, Randy, that's a stinkin' piece of art! And I mean that in the best sense of "stinkin'." Fantastic work and I'm sure it sounds wonderful (can't get videos to load where I am). Keep pushing boundaries!
Trust me, it does sound wonderful. I've watched/listen to the video 3-4 times and I'm mesmerized. Really haunting.
How did you set up the internal tensioning system? That's nifty.
Edited by - dickinnorwich on 09/16/2011 08:00:20
Shawn Hoover - Posted - 09/16/2011: 08:58:49
Oh my. I've been tortured for months, awaiting pictures of the completed instrument ever since seeing posts on the spalted maple rim and artisan brackets. Well done!
1901 Fairbanks - Posted - 09/16/2011: 10:20:53
Second what Dick said - Haunting. What a fine piece of work!.
uncle.fogey - Posted - 09/16/2011: 10:22:27
That's very cool, Rudy - beautiful.
I remember you posting the pictures of the internal tension hooks and I was impressed by that without even seeing the rest of the banjo.
Great work!!
slammer - Posted - 09/16/2011: 10:45:02
Coolest most inovative thing I've seen in my short banjo journey. I'd be damn proud of owning it, but to create it and build it yourself is over the top for me. The playing ability aint bad either !!! Thanks for the show and tell!!!
Slammer!!!
justdiggity - Posted - 09/16/2011: 11:21:41
That's awesome, Rudy. I found your pics of the artisan internal brackets - that was very helpful! I love this system because it's so simple and elegant. One question though - since the head is tensioned from underneath, do you ever run into a situation in which the head is actually higher than the top plate of the rim (i.e., no longer flush)? I'm trying to get a feel for how much the tensioning system distends the head to achieve proper tension. Do you have to account for this by seating the bead a bit deeper? and if so, by how much?
Really love it, though. You, sir, are evolving the banjo!
Jonnycake White - Posted - 09/16/2011: 11:33:35
Randy - as usual, you are THE MAN! T-nuts imbedded in the rim - genius. Workmanship - flawless. Sound - growls on the bass, rings on the treble. What more could you ask? Hollow dowel stick? Did you groove two halfs and glue it up, or drill through 12 inches of stick?
rudy - Posted - 09/16/2011: 12:34:14
Thanks, Guys and Gals. I appreciate all the kind words from my fellow banjo-building brethren.
"One question though - since the head is tensioned from underneath, do you ever run into a situation in which the head is actually higher than the top plate of the rim (i.e., no longer flush)?"
justdiggity, No problem with the crown depth as the synthetic heads don't really stretch appreciably. I just plan for the top of the head to be flush and it doesn't vary by more than 1/16" from loose to tight. The only thing that it would affect would be the height of the strings over the upper portion of the neck, and that would only require loosening the acorn nut and repositioning the neck heel to account for any difference in height. I've built about a dozen using this system or slight variation and it really works well.
"Did you groove two halfs and glue it up, or drill through 12 inches of stick?"
Jon, I make all my hollow perch poles the same way. I split a 1" square length-wise, use my Safe-T-planer to clean up the surface for an invisible glue joint, pass both pieces over a 1/4" round nose carbide router bit to form a semi-circle, add a piece of tape to the fence and do another pass just to make sure the rod will have a little clearance, slap on some Titebond Original and clamp the two halves together using a spare piece of all thread to center them. I pull out the all thread after a few minutes and ram a small piece of wet paper towel through musket-ball style to clear the excess glue. When the glue has dried I plane the square to exactly 3/4" and run it past a 3/8" carbide round over bit (rotating 90 degrees after each pass,leaving a little uncut at the end for registration that will be cut off later) to create the 3/4" round perch pole with a 1/4" bore through the center. Works great, and your friends will be amazed that you can hold a drill that steady!
Edited by - rudy on 09/16/2011 12:36:46
pfc54u - Posted - 09/16/2011: 15:31:05
Talk about a clean looking banjo! Great sound! I would characterize the tone hoop as free-floating on points, is this the way you see it? It seems to me to be a very nice configuration. Are those #8 machine screws pushing the tone hoop upward?
rudy - Posted - 09/16/2011: 17:51:54
quote:
Originally posted by pfc54u
Talk about a clean looking banjo! Great sound! I would characterize the tone hoop as free-floating on points, is this the way you see it? It seems to me to be a very nice configuration. Are those #8 machine screws pushing the tone hoop upward?
Peter, a 1" long #10X24 allen head set screw does the tensioning duties with a 3/32" Allen head T wrench. Yes, I'd classify it as a free-floating tone ring supported on 12 points, but it can't be quite described as free-floating since the tensioning points anchor it more or less solidly to the rim.
aeroweenie - Posted - 09/16/2011: 19:55:03
Beautiful! What features make this banjo a mountain banjo?
pfc54u - Posted - 09/16/2011: 21:24:31
quote:
Originally posted by rudy
quote:
Originally posted by pfc54u
Talk about a clean looking banjo! Great sound! I would characterize the tone hoop as free-floating on points, is this the way you see it? It seems to me to be a very nice configuration. Are those #8 machine screws pushing the tone hoop upward?
Peter, a 1" long #10X24 allen head set screw does the tensioning duties with a 3/32" Allen head T wrench. Yes, I'd classify it as a free-floating tone ring supported on 12 points, but it can't be quite described as free-floating since the tensioning points anchor it more or less solidly to the rim.
Randy, I'm thinking about the historical precedents. I have learned on this site that one of the "fixes" for tone hoops that don't ring is to set them on tacks that are hammered into the top of the rim (or a ledge on the outer rim). The second precedent that comes to mind is the tone bell banjo that has the tone ring resting its skirt on a ledge on the outside of the rim but with the inside having an air gap with the rim. For still another precedent, there are various incarnations of Gibson's ball bearing banjos which (from what I have read on this site) have a tone ring that essentially "floats" on a number of ball bearings that are more or less rigid because the springs they rest on are very strong. There is also a resemblance to some archtop banjo tone rings that sometimes look complicated but actually work by having a portion being a tone hoop with a diminished diameter.
The power of this general configuration is illustrated by the remarkable bass response that you have achieved with a 10" head. So congratulations to you for designing and building another of your wonderful banjos but also for developing another step in the sound systems of banjos. Peter
bricklifter - Posted - 09/16/2011: 21:43:20
great look and sound
bart reiter just sold his last internal resonator model
chris
Iderhobanjer23 - Posted - 09/17/2011: 03:18:42
rudy, always look forward to reading your posts and am truly envious of your setup/building skills. excellent banjo.
frankiej73 - Posted - 09/17/2011: 09:14:20
Wow! I am very much in awe of the beauty and innovation of this instrument. It's rare to see so many unique ideas in one instrument. Great job!
rudy - Posted - 09/17/2011: 17:46:42
quote:
Originally posted by aeroweenie
Beautiful! What features make this banjo a mountain banjo?
That’s a very good question, and it's one that I actually wrestle with a bit myself. My designs occasionally fall in the grey areas of what to call them, so I do the best I can for classification. They most definitely aren’t what Earl plays!
My “mountain banjo” designs DO have the head pushed up by an inner ring, although the head is markedly larger for better low end.
My necks are fretless, although I'm doing flush frets, but they are more position marker than fret. Frets by definition are actually raised bars designed to stop the vibrating string length to produce a specific note interval. Some of the historic mountain banjo makers certainly weren't above using frets, but you wouldn't want to exclude some of the original makers for occasional fret use.
Some think the mountain banjo is by definition crudely made, but I've seen some beautiful examples of "back hills" banjos that show obvious attention to craftsmanship and even a certain amount of "bling" beyond the strictly utilitarian form. If there's any doubt, a trip through the Museum Of Appalachia (HERE..) will certainly verify their sense of originality.
I like to think of my banjos as rooted in the basic design elements and "home-brew" mentality of the originals, but pushing the envelope forward to refine the designs to be even more functional than the originals. I don’t use anything beyond the small home shop's abilities, although Pegheds planetary tuners and 9", 10", and 11" Renaissance heads aren't reproducible by me. I do think that many of the old makers would have loved to have some of the materials that are within our grasp today to work with. I'm thinking they would have agreed to the "use what you have to work with" concept. It's just that we have so much more to choose from today.
Thanks to all for your gracious comments!
pfc54u - Posted - 09/19/2011: 09:14:48
I have two questions. First, why did you use T-nuts to attach the shoes inside the rim instead of ordinary wood screws? Second, how did you drill the holes for the T-nuts? I am assuming that the holes do not go all the way through the rim . . . only to be covered up by the rim's outer veneer. Did you use an angle drill? If so, how did you keep it straight . . . did you build a jig that fits inside the rim and holds your angle drill straight? Well, maybe there are more than two questions here.
rudy - Posted - 09/19/2011: 18:27:59
quote:
Originally posted by pfc54u
I have two questions. First, why did you use T-nuts to attach the shoes inside the rim instead of ordinary wood screws? Second, how did you drill the holes for the T-nuts? I am assuming that the holes do not go all the way through the rim . . . only to be covered up by the rim's outer veneer. Did you use an angle drill? If so, how did you keep it straight . . . did you build a jig that fits inside the rim and holds your angle drill straight? Well, maybe there are more than two questions here.
Hi Peter,
Tee nuts were chosen for a couple of reasons. First, they are much stronger and since the rim is only 5/8” total thickness there isn’t enough depth to get a screw in place that can serve as a reliable fastener. Second, I wanted to make it easy to quickly change the head if necessary, and every time a wood screw is removed and inserted the holding power can be somewhat diminished. I can loosen the tensioning screws, remove the screws from the tee nuts and change a head in a matter of a few minutes and reassemble with no worries of degrading the integrity of the fastening system.
No angle drill (or any internal drilling) necessary. It’s just a matter of planning out how everything goes together. The tee nut flange recesses (3/4”) were drilled in the block portion of the rim from the outside. A clearance hole for the tee nut threaded body portion was drilled next, the tee nuts pressed into place, and a 3/4” section of dowel rod glued in to plug the extra depth. The dowels were sanded flush with the outer surface of the block portion of the rim and the veneer layer was applied over the block portion of the rim. It might sound complex. But it’s actually simple to implement.
country frank - Posted - 09/20/2011: 02:18:32
Stunning Rudy, thats remarkably beautiful and fiendishly clever. You are indeed an inventive man, many thanks for sharing the build details and great footage.
Edited by - country frank on 09/20/2011 02:18:59
rudy - Posted - 09/22/2011: 19:32:33
Thanks again for the kind remarks. I have added additional information and a few pics and drawings at my website:
bluestemstrings.com/pageArtisan.html
rudy - Posted - 12/19/2011: 08:58:39
Thanks Paul. It's always a surprise when a topic shows up 3 months later!
bordertownbrown - Posted - 12/19/2011: 10:39:45
Randy, I'm sure glad someone revived this topic because I may have missed it first time or maybe just forgot but that is one fine banjo. I like your system for the head tension and think about building something on that order but haven't yet decided exactly how I want to do it.
Many thanks for sharing your concepts and designs with us.
Richard
BaldPaul - Posted - 12/19/2011: 10:46:46
As a board newbie I keep finding amazing stuff! Old news to you guys but what can I do? I'm also new to Banjo which may mean my opinions are moot because I don't know what I'm talking about! Anyhow, your tension system looks like it was dipped in win. The clean look of the head surounded by wood in the same plane (mostly) with no hardware or evidence of it to be seen. Epic. To my eye it looks "right".
Stivini61 - Posted - 12/19/2011: 10:50:26
I'd like to nominate Randy for "Banjo Innovator in Chief" of the known banjo world. Second anyone?
pfc54u - Posted - 12/19/2011: 11:14:50
I'll second that. Ever since I first saw this idea when this thread began, I haven't been able to get it off my mind.
Dave1climber - Posted - 12/19/2011: 16:20:00
Just found this thread thanks to bordertownbrown, and I am impressed with the look, design, and workmanship all of which is First Class. And yes "dipped in win".
rudy - Posted - 12/19/2011: 19:38:52
Aw shucks, you guys are makin' me blush...
As far as me being an innovator, I ain't buying it. My guess is that most of these ideas could be found in one form or another while flipping through Bollman and Gura's "America'a Instrument", a most excellent read I might add. It's eye candy for us goofy banjo nerds.
Well, I'm not one for resurrecting old threads for no purpose, but it sounds like a few folks have gotten a dose of additional inspiration out of this one, and that's a good thing (to quote Martha). I sometimes sit at my computron with a banjo and it was coincidental that I just happened to be playing this one when I noticed this thread was bumped up to the top. I've got my main gig jos stuck in the closet in their bags and I've got 4 more normally hanging on the wall behind the door. Those are handier for a quick spin while I'm noodling on the computer.
RBuddy - Posted - 12/20/2011: 04:13:08
I'm with Richard, Thanks Paul for the bump. How the heck did I miss this in September?
Randy, man, 110% OUTSTANDING!
You better look the other way cause I'm huggin' that banjo and I'm not a big hugger. It just makes ya want to hold it and not let go.
Very very cool.
edit - (Blush all you want)
Brian
Edited by - RBuddy on 12/20/2011 04:14:06
Shawn Hoover - Posted - 12/20/2011: 08:57:11
You're not alone, RBuddy. That banjo does things to people. When I first saw it, I told a buddy the satin ebony looks so good I want to lick it.
I've definitely gone back multiple times to look at the pictures and watch the video. How about some more recordings, rudy?!
rudy - Posted - 12/20/2011: 12:44:39
quote:
Originally posted by shoover
You're not alone, RBuddy. That banjo does things to people. When I first saw it, I told a buddy the satin ebony looks so good I want to lick it.
I've definitely gone back multiple times to look at the pictures and watch the video. How about some more recordings, rudy?!
Thanks, Shawn. I haven't had enough spare time to do any further recordings, as I've been busy with lots of other projects. You may have caught my last topic regarding a new Boucher early banjo project I've got going:
Just prior to starting that one I finished up a new project totally unrelated to banjo, a low tuned mandolin based on the baritone uke body size and shape. (Demo below) I did this one to more closely match my limited vocal range. Thare are a few other assorted videos on my Youtube channel.
Terms of Use | Privacy Policy | Privacy Consent (EU/GDPR Only)
Copyright 2026 Banjo Hangout. All Rights Reserved.


