
DVD-quality lessons (including tabs/sheet music) available for immediate viewing on any device.
Take your playing to the next level with the help of a local or online banjo teacher.
Weekly newsletter includes free lessons, favorite member content, banjo news and more.
Premier Sponsors


|
Please note this is an archived topic, so it is locked and unable to be replied to. You may, however, start a new topic and refer to this topic with a link: http://www.banjohangout.org/archive/180531
DanKnowles - Posted - 06/13/2010: 20:50:02
FIRST LOOK
Have you ever found a hidden treasure? Inherited a million bucks from a uncle you never knew you had? Found a nickle on the sidewalk? Knew you'd have to give it back?
Well if you have then perhaps you will understand how I felt when I was first contacted about restoring this Minstrel era banjo.
I have been privileged to work on many fine instruments as both a builder and repairman. Each is a challenge and each has its own story to tell. I feel a tremendous responsibility not only to my clients, but also to the instruments that come into my care. Don McCarty, one of the luthiers who I did some early training with used to tell me, "It should look like you haven't been there!"
When I was contacted in regards to this banjo my interest was really piked.
First through a series of emails, then personal phone calls we laid down the ground rules of this restoration. When complete the banjo is to be playable. All new parts must be aged so as to appear to be original to the instrument. All of the patina and dry appearance of this banjo must not be changed. All repairs must be reversible.
Once the rules were set the banjo was shipped. Excitedly I watched the UPS tacking as the banjo made it way to Paris. Then it arrived. I opened the box and looked over my new patient. She was old. Even the paper faking a banjo head was old. After a good look over of the banjo I got to work.
First I got out my trusty Kodak Easy Share camera and began to document the instrument. Here are some of those photos.
Looking from the peghead towards the body.
The peghead back with the remains of a home carved peg. This peg was obviously not made by the original maker. I guess I'll be making some new pegs for this one.
A back view of the 5th. sting ledge.
Back view.
Heel lamination. Although this looks loose, the lamination is solid and not coming apart.
Another heel/ rim view showing the de-lamination of the rim. At some time this banjo has been quite wet. I think that this will be the most difficult part of the repair. Also note the hole just peaking out from the bracket shoe. This one has been moved a some time in its life.

The perch pole. Note all of the discoloration on the rim, its been wet here too.
I love these shoes! Many old banjos were decked out with drawer pull hardware for shoes. Because of the orientation of the star we can tell that these were made for a banjo. The ledge part of the shoe would be sideways, not horizontal. All of the square nuts were hand done as the placement of the hole varies considerably.
Here is the inside of the rim where the dowel stick passes through to the neck.
Another loose lamination.
Damage to the rim.
Here is something which makes me believe that this banjo was once used as a stage prop. A paper head. This is some old and very thin paper mounted almost like a head. It makes me wish that this banjo could talk.
Lastly a neck shim.
In the next post we will disassemble the instrument. Document the damage and start planning its restoration.
Marc Nerenberg - Posted - 06/13/2010: 21:45:02
This has all the makings of another great thread! What a privilege it is to be able to watch you work on these fascinating projects. Who knew this building/restoring stuff would be so utterly fascinating?
omiimii - Posted - 06/13/2010: 22:15:13
as much as i have enjoyed your other threads about banjos you have made from scratch, i find this one particularly exciting. we all know that you can make some of the most stunning banjos out there but seeing how you have this beautiful banjo from it's current state, now that's a challenge that i will enjoy watching.
i really like the water stains on the rim and hope that they stay visible!
mojo_monk - Posted - 06/14/2010: 05:09:50
Oh wow...this is gonna be better than TV! 
-Sean
2ftlbanjer.wordpress.com/
wrightedward - Posted - 06/14/2010: 06:37:05
I am very excited to see such a piece of history,looking forward to following this one all the way .I know you can do it and do justice to it
Eddie
Brooklynbanjoboy - Posted - 06/14/2010: 06:47:13
I think the owner who commissioned this restoration lays down some fair and understandable rules:
#61656; When complete the banjo is to be playable.
#61656; All new parts must be aged so as to appear to be original to the instrument.
#61656; All of the patina and dry appearance of this banjo must not be changed.
#61656; All repairs must be reversible.’’
Sometimes, though, such reasonable approaches to restoration exert limits on what might be possible. Playability is what I shoot for in restoration, but sometimes it has to be sacrificed in favor of preserving the artifact.
This kind of challenge always put me squarely in the midst of several restoration conundrums. Do I wash away the grim and go for a combination of period authenticity and playability, or essentially preserve the thing as a living document – for example, in this instance, I’d be hard pressed to sacrifice the paper drum until I knew more about it.
I hope you put your trusty camera to good use during the course of this project. I look forward to seeing how you solve these problems. In the end, restoration is essentially part detective work and part problem solving. Looking forward to seeing this unfold.
Thanks for sharing,
Lew
Viper - Posted - 06/14/2010: 07:07:14
A great teaser before the Othello thread is even closed! Dan, you are a fine entertainer! Looking forward to this trip through banjo history.
trapdoor2 - Posted - 06/14/2010: 10:57:30
I can only think of two people who should be licensed to do this sort of work: George Wunderlich and Dan Knowles.
I am so glad you have a digital camera and aren't afraid to use it!
What cool bracket-shoes! I hope you make a silicone casting/mould of 'em, they should be easy for a casting house to reproduce.
This banjo has all the bells and whistles that scream "early banjo"...that is, pre-1870's. Interesting peghead, very guitar-like. The neck looks to be Oak but the pot appears to be something like Poplar. Is the tension hoop riveted iron?
Edited by - trapdoor2 on 06/14/2010 14:37:41
BrittDLD1 - Posted - 06/14/2010: 13:29:34
Hi Dan --
It's hard to see all of the details... especially the dowel...
This banjo is reminiscent of a "Dave Jacobs" banjo -- made in NYC,
c1850s-60s.
The peghead, 5th bump, and even the dowel seem similar...
But the Jacobs "style" was also copied by others. For the last few
years, I've been trying to identify the c 1860/70s NYC maker who
produced some similarly-constructed "knock-off" models of:
... o a Jacobs-style banjo
... o a Boucher "rabbit-ear" style banjo
... o a "Lyre" peghead -style banjo
The construction on all thee "knock-offs" was VERY similar. The main
differences were the copying of the "iconic" details -- the peghead shape,
and the 5th bump -- from the three original banjos.
They all had NY hardware, and the three common features were:
... o a laminated rounded heel,
... o a 3/4"-deep frailing scoop,
... o a round tapered dowel, with three 2-line "bands" turned into it.
Here's a front view of the Jacobs-style "knock-off". more photos are shown at the
bottom, in the "attachments":
One of these NYC-made Boucher "rabbit-ear"-style "knock-offs", is shown on Phillipe
Revel's website. (Compare the "common features" to the "Jacobs k-o" above, and in
the attachments below):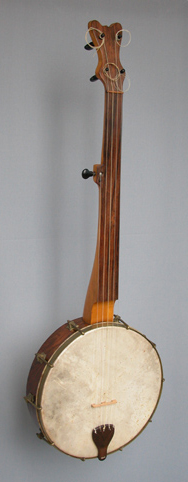
perso.numericable.fr/~revephil...strel.htm
The NYC-made "Lyre" peghead banjo had a peghead *similar* to this one, shown on
The Banjo Sightings Database. But it did not have the fancy "ogee" cut at the 5th
string. And it would have the "common features" similiar to the other two "Knock-offs":
banjodatabase.org/ViewMoreImag...undefined
And lastly... here is a REAL c 1860s Dave Jacobs banjo -- shown on Bill Michal's
Banjo On My Knee site: 
banjoonmyknee.com/ws13-5.html
Best-
Ed Britt
Edited by - BrittDLD1 on 06/14/2010 13:58:31
 1. c1860s/ྂ70s Jacobs-School FRONT |  2. c1860s/ྂ70s Jacobs-School BACK |  3. c1860s/ྂ70s Jacobs-School PEGHEAD |
mojo_monk - Posted - 06/14/2010: 17:08:10
That "Banjo on My Knee" website just sucked up about 3.5 hours of my day - and I feel like I've only scratched the surface. I've been to the end of the internets and back in search of old banjo stuff, but have NEVER seen this site!!! Thanks, Ed
- Sean
2ftlbanjer.wordpress.com/
Edited by - mojo_monk on 06/14/2010 17:08:34
Brooklynbanjoboy - Posted - 06/14/2010: 18:37:37
That Lyre peghead was sufficient to cross George Wunderlich's eyes (BCG, 2005).
 |
XXXris - Posted - 06/14/2010: 19:48:01
Thanks for posting--a handsome instrument, and I'm looking forward to seeing what you do, this should be a good learning experience.
aj_fuller - Posted - 06/15/2010: 07:01:42
This is going to be a VERY interesting thread- can't wait for more!
While I understand the general intent of the "All repairs must be reversible", but I am not sure how one could address some of the rim lamination or structural issues in a namer which is reversible. I guess the approach would have to be consultation with the owner about the issues which effect structural stability under normal tension and playing conditions to agree to those aspects which might be irreversible?
Thanks again to Dan for sharing his amazing work with all of us - exciting, entertaining and educational all wrapped into one nice package!
A.J.
GrassJam - Posted - 06/15/2010: 07:28:20
It's great to see how much interest this thread has gotten already... but can you imagine how interesting it must be for me? That's my banjo that Dan is restoring. Isn't the internet great? Now we can all watch as the restoration moves forward. Thank you Dan for taking the time to document this project, not only for me, but for all Hangout members.
Brooklynbanjoboy - Posted - 06/15/2010: 09:39:06
Hey Paul. Care to tell us a bit about where this banjo came from, what you know of its provenance, etc? Some of us obsessive-compulsive banjo collectors (OCBC) would like to know.
Lew
GrassJam - Posted - 06/15/2010: 10:43:42
Hi Lew... I am a part-time antique dealer specializing in pre-1850 American furniture, folk art, and vintage musical instruments. I bought this banjo about 10-12 years ago at an antique show in Massachusetts from two lady antique dealers specializing in vintage fabrics. I asked, but they did not know anything about its history. The next part is going to kill you... when I asked the price, they said, "25 dollars". I did not bother asking for a discount.
Paul
Brooklynbanjoboy - Posted - 06/15/2010: 12:34:51
Wow. I love those kind of stories. Until now, I thought they only happened to Reed Martin and Jim Bowman.
DanKnowles - Posted - 06/15/2010: 19:58:36
Thank y'all for joining in on this new endeavor. I hope you will enjoy this process as much as I do.
I'll try to reply to as many comments as possible.
Lew & A.J.
In respects to the restoration, I intend to not disturb any signs of age or grime other than those in which I have no viable choice. I will use hot hide glue exclusively, no Titebond, epoxy, super glues or other 'modern' glues. Parts will not have finish added except as a step in creating a vintage look on new parts.
Marc,
I hadn't thought about casting some of these shoes... But you know how I am about chasing ideas. Just casting could be a post in its self. Thanks for passing this my way.
Ed.
Thank you for your insightful post. I always learn when you post. Last night I uploaded my photos, which is what I do before I look at the post, found your post, followed the link to Banjo On My Knee, got lost in the great photos and never got around to making my post. My My...
This banjo does look a lot like the Jacobs in the photos. But this banjo has no markings anywhere on it. The pegheads are quite similar, does the Jacobs have a thin peghead? This one is around 1/2" thick. Are there any other parts or details you would like to see photos of?
Do you have any photos of authentic prewar (Civil War) bridges?
Paul,
I am so glad to see you here and posting. I don't think I ever asked you how, where you got the banjo or how much you paid for it. What a great story. Some day Ill tell you the story of finding my Cubley banjo.
TAKING IT APART
Well here we go I'll be taking the 1850's apart. I need to find all of the cracks, delaminations and etc. I'll photograph and document each step and piece as it is removed. Also as I work I am documenting each piece and all damage on a drawing.
Here the banjo is on my bench, head down.
First I'll loosen each of the brass, hand made, square bracket nuts. I will loosen most them only enough to be able to remove the bracket shoe from the rim. I am trying to retain all of the corrosion. Because the sizes of these nuts is not consistent, I'm using an adjustable wrench. 
Here is the shoe, the nut is just a bit loose.

This one though, is coming all the way off. Things aren't moving the way I'd like. 

Now removing the shoe nut.
Gently starting to ease the shoe out of the hole.
Out!
Here is the removed set, nut back on.
Each set is tagged with painters low residue tape, numbered, the number registered on the drawing and wrapped for storage in a paper towel. 
deuceswilde - Posted - 06/15/2010: 20:57:40
"Do you have any photos of authentic prewar (Civil War) bridges? "
Not photos, but cuts...
Attached is from"Observations on the Banjo and Banjo Playing." Also from Rice's book 1858.
 |  |
DanKnowles - Posted - 06/18/2010: 19:15:50
TAKING APART 2
In this post I'll be taking more of the banjo apart. This has been quite interesting and exciting for me. It almost feels like being an archeologist. I am the first person in perhaps a hundred or more years who has taken this instrument down to its component pieces. Anyway enough verbiage... I'll get to work.
Here I'm starting to remove another square nut. Most of these hand cut nuts come off quite easely but a few are problematic.
After removal it makes a nice little mummy wrapped in paper towel.
Another one comes off...
Is wrapped and is listed in the documentation.
Here is a bracket nut with some interesting corrosion. The photos don't really do it justice.

Just before it is removed.
Coming off.

Off... I really like this turquoise colored oxidation. It is gorgeous! Note the mess on the paper head.
All six wrapped up.
Steven M - Posted - 06/18/2010: 23:48:35
I do alot of this in my business as antique dealer. You are lucky those hand cut nuts came of so easily. Sometimes the threaded bold is rounded off at the ends or otherwise damaged making unscrewing very difficult indeed. I can see you are going to have fun on this project:)
trapdoor2 - Posted - 06/19/2010: 12:42:32
Based on the color of the corrosion, it wouldn't surprise me if some component there was copper, perhaps the nut. Some brasses will corrode to that bright blue-green but usually they are more green. Great pix!
Stringbean45 - Posted - 06/19/2010: 13:19:17
Hi Dan,
I've always heard, "you can't make a silk purse out of a sow's ear", so will be interesting to see how this project turns out.
I don't know anything about restoring antique insturments, but usually when I repair something, I try to remove as much dirt, rust, and corosion, as possible, and try to make it look as good, if not better, than when it was new.
I do think I understand were you are going with this, as I've seen people that restore old cars, overspray paint in certain areas, on purpose, and do little things like throw a little piece of carpet that has been cut, under the seats, because that's the way most of them came off of the assembly line.
I will have to trust you, as there were many times on the Ebony Banjo Project, when I couldn't figure out where you were going, and I think even you got lost a few times, but the final result was outstanding.
Thanks again for letting us in on the project. Guess I will have to start looking closer at flea markets, yard sales, and antique shops.
Don
DanKnowles - Posted - 06/19/2010: 18:19:45
Steve,
I felt lucky that tey came of as easly as they have. This instrument has been VERY WET at sometime during its life. The water marks and the delaminations show this.
Marc,
Most of these nuts & shoes apear to be some brass formulation which is (I believe) a mixture of copper and zinc.
DanKnowles - Posted - 06/19/2010: 19:09:10
TAKING IT APART 3
During this post we take the neck off of the rim. This was not a difficult task but like all the others that involve this banjo must be done very carefully.
Fist the screw securing the neck had to be removed. Here I am using my granddads (maybe even my great-grandads) screwdriver. It seams to fit better than any of my other ones.

Here I am testing to see how difficult the pull will be.
Out she comes...it is nicely fitted, but it comes loose without any hanging.


And out!
The neck is now wrapped in its own personal cocoon of paper towels and secured with painters tape.

This is an interesting little piece of wood. It was shimming the neck in the tension hoop cut out. It is an old piece of oak, most likely white, with some nice ray flecks in it.
Here is the old paper head in its own box. Just thought you might like to see this one.
DanKnowles - Posted - 06/19/2010: 19:19:58
Don,
On this project I won't be trying to make a silk purse out of a sows ear... I'll be just care taking the sows ear.
I feel very protective of this banjo. It is like having an extremely frail and ancient grandmother to visit. Most folks wouldn't grab a wad of makeup and paint her up. They'd stop, sit and listen to her tell her stories in her own way. That is how I feel towards this instrument. It is a artifact of yesterday, with its own story, not mine, to tell.
As to getting lost on the Ebony Banjo... heck, I'm still lost!!!
tomberghan - Posted - 06/19/2010: 21:47:19
Fancinating!!!
This restoration is in the right hands Dan.
I look forward to watching this instrument be restored (versus fixed or repaired). You really are the best person for this job I think.
Tom
DanKnowles - Posted - 06/20/2010: 11:51:22
Tom,
Thanks for your vote of confidence, I'll ty to measure up.
Steven M - Posted - 06/20/2010: 12:23:58
Dan, you mentioned that the dowel came free without the need for hanging. What does hanging entail?
DanKnowles - Posted - 06/20/2010: 12:35:29
TAKING STOCK
Now that the banjo is all apart it is time to take a very intensive look at the instrument. What are its real problems? What should be repaired and what ,if any should not? How will these repairs be attempted?
First though lets take a look. Most of the problems are on the rim so we go there first.
Here is the dowel stick mortise, there are several cracks here.
Here we have lifting lamination on the scarf joint. From the looks of things this is one place that the rim was once wet. 
Another crack this time in the small dowel stick mortise.

Here on th bottom side of th rim, below the small mortise is a fracture caused by being dropped or hit.

Most of the holes for the bracket shoes have cracks like these.

More shots of the scarf joint...

More cracks...
The banjo packed for safe keeping.
Throughout this process I have been documenting all of the damage and location of parts on this drawing. This will help me keep track of all of the banjos issues and help in planning for this project.
I have early decided to use Hot Hide glue in all of the repairs. It meets our all criteria. Properly prepared it is as strong as most modern glue. It is reversible. If sometime in the future someone disagrees with my method of restoration they will be able to reverse all of my work. It will not discolor the wood like most modern glue. Properly used will leave almost no residue. Also the moisture in the hid glue tends to swell joints closed. On the downside it must be properly prepared and used.
Here is a partial listing of jobs in the repair:
9" of repairable cracks
Repair/ re-glue seam separation
New Minstrel style bridge/ aged
Banjo Pegs, hand turned and aged of Boxwood or Persimmon
Skin head, aged and installed
Hand made wooden minstrel style tailpiece, aged, tied with wire or gut
Gut strings
Setup
jbalch - Posted - 06/20/2010: 15:28:40
Dan:
What kind of flesh hoop will you use to mount the head?
That may seem like a dumb question...but I think it is important to the look of the finished banjo.
JB
GrassJam - Posted - 06/21/2010: 07:31:25
Wow Dan, there is absolutely no question that my banjo is in the right hands! Your photo documentation, attention to detail, and care that you are giving this instrument is simply outstanding. Thanks so much!
Paul
DanKnowles - Posted - 06/21/2010: 19:27:47
John
If you will look back at Taking it Apart 3, photos 2 & 3, sitting just above the tension hoop (because the banjo is face down) you will see a thin steel band. This is the flesh hoop that I will use. It appears to be quite old, perhaps even original.
Paul,
Thanks for your vote of confidence. I hope you are enjoying this as much as I am!
DanKnowles - Posted - 06/21/2010: 20:06:40
PEGS 1
This post begins the making of the hardware for the 1850's. First I'll make the pegs. Later on the tailpiece and near the completion the bridge. But first starting the tuners...
These tuners will be somewhat like violin tuners, tapered, friction pegs. They will be sized so that very little wood will have to be removed from the peghead holes for fitting. And the will be loosely modeled after a flamenco guitar tuner, a bit more elongated and curvaceous. These pegs (tailpiece to) will be made of aged persimmon.
Here is the model tuner:
The first job is splitting the wood into blanks. This is done to maximize strength by minimizing grain run out. 


Each blank is mounted in the vice and the centers are found and marked.

Excess wood is trimmed off...
And the first one is loaded into the lathe.
tomberghan - Posted - 06/22/2010: 06:00:10
Not that you need any help . . . but here are some nice looking pegs for something a little nicer looking (I think) than your standard modern violin friction peg. (Just for ideas)
I remember being very impressed with the pegs you made for your Goshen banjo.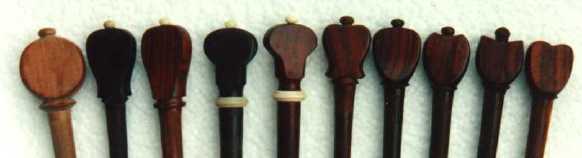
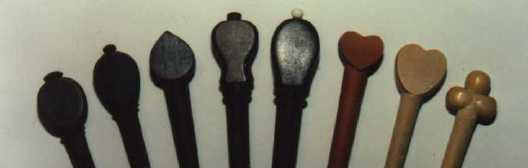
Edited by - tomberghan on 06/22/2010 07:03:17
tomberghan - Posted - 06/22/2010: 07:06:51
Yes, these are very nice Dan! (just posting them here so others can see what your Goshen pegs look like)
DanKnowles - Posted - 06/22/2010: 19:32:17
Tom,
Thanks for all the peg photos! These must be from your lute collection. Or all of these from one lute?
DanKnowles - Posted - 06/22/2010: 20:06:51
PEGS 2
This post will deal with the basic turning of one of the pegs, roughing it in. The first step is truing the blank. This is done with a large gouge.

After the basic rounding of the blank is complete the various large shapes are marked out. Then I make two depth cuts, one at each end of the shaft. This is to establish my taper. These must be precisely made or the shaft will not match with the taper of my reamer. 
The shaft is shaped...
And smoothed with a file.

Here you can see the marks for the peg top and the pips.
richla - Posted - 06/23/2010: 06:20:45
Being very new to the world of banjos, I can confidently say that I know less about banjos than anyone here, but this is a FASCINATING project to read about and follow along. Thank you for taking the time to post all the pics and documentation of your work!
Jonnycake White - Posted - 06/23/2010: 10:37:59
quote:
Originally posted by trapdoor2
Based on the color of the corrosion, it wouldn't surprise me if some component there was copper, perhaps the nut. Some brasses will corrode to that bright blue-green but usually they are more green. Great pix!
trapdoor2 - Posted - 06/23/2010: 14:03:30
quote:Agreed. I should have been more specific, I guess. I didn't mean that there was a copper alloy present, I meant that it looked like one of the pieces might be made from copper by itself. Bronze and Brass are both copper-based alloys and both typically produce "signature" colors when they corrode (see "Verdigris"). With a bit of further research, it appears that Brass, Bronze and Copper may produce a variety of greens and blues, depending on the chemical composition of the oxidizing atmosphere. Salt air produces greens, acidic air produces blues. This is why the Statue of Liberty is her lovely bluish green.
Originally posted by Jonnycake Whitequote:Take a look at the photo up above of the removed bracket, with nut back on. It appears the bracket screw, if not the star itself, is brass.
Originally posted by trapdoor2
Based on the color of the corrosion, it wouldn't surprise me if some component there was copper, perhaps the nut. Some brasses will corrode to that bright blue-green but usually they are more green. Great pix!
DanKnowles - Posted - 06/23/2010: 18:28:15
Rich,
Thanks for your kind comment. This banjo is so interesting to me I figured it might just interest some other folks too.
Jon,
I don't know what I could say here except that I feel quite sure that the shoes and the nuts are brass.
Marc,
I did not know a lot of that about the oxidization. It's fascinating.
One question though if I see you at Uncle Dave Days and I find that you are carting a nice blue or perhaps brown glass wine bottle, are you coloring your innards?
DanKnowles - Posted - 06/23/2010: 18:51:52
PEGS 3
Well here is some more lathe work in creating the pegs for this banjo. Yesterday the peg was roughed in. So today I will start by refining the pegs shape, specifically the aria around the pip.


Now the top of the knob. I'm tying for a nice bulbous shape.
Here I'm shaping the shoulder/ neck of the knob.

Now I begin to refine the three pips.
Here is the peg basically turned.
Tomorrow I'll try to post some photos of shaping the knob. In the mean time here is the knob fully shaped with its fist coat of tint.
This photo is for John B___... the explanation will be soon!
Edited by - DanKnowles on 06/23/2010 18:54:31
tomberghan - Posted - 06/24/2010: 04:54:23
Nice peg Dan!
You never mentioned which kind of wood it is.
What is it? Why did you select that particular variety?
Bluegrass-Gibbs - Posted - 06/24/2010: 05:37:54
wow, this is such an interesting and informative thread - I'm really looking forward, like many others, to seeing the restoration process unfold. other HO member's input is fascinating too - I've learnt so much already from just 2 pages!
thanks all
Becca
Jonnycake White - Posted - 06/24/2010: 09:46:16
I'm looking forward to the knob shaping. So far my own efforts have been befitting of my amateur status.
Edited by - Jonnycake White on 06/24/2010 09:46:49
Terms of Use | Privacy Policy | Privacy Consent (EU/GDPR Only)
Copyright 2026 Banjo Hangout. All Rights Reserved.


