
DVD-quality lessons (including tabs/sheet music) available for immediate viewing on any device.
Take your playing to the next level with the help of a local or online banjo teacher.
Weekly newsletter includes free lessons, favorite member content, banjo news and more.
Premier Sponsors


|
Please note this is an archived topic, so it is locked and unable to be replied to. You may, however, start a new topic and refer to this topic with a link: http://www.banjohangout.org/archive/309690
dpgetman - Posted - 10/04/2015: 20:20:26
After one failed attempt to make a banjo pot, I have just completed my first successful banjo build. I am making this post about the build on the hangout because I would likely not have been inspired to attempt the build or had the know how if not for the volumes of information available through the hangout and hangout members.
I am also posting because the build involved the construction of a wooden tubaphone, which I have never seen before, so I thought a record of it would be helpful to other folks who wanted to try it.
Below are also many links for the sources I used, parts I bought, and inspiration I took, all from hangout members. These are the folks I benefited from most (thanks fellas!). Note, in particular, Bluestem Strings Open Back Design Primer and LeVan Banjos Building a Banjo Series.
Bluestem Strings
bluestemstrings.com/index.html
bluestemstrings.com/pag...esign.html (Open Back Design Primer)
Ken LeVan
banjohangout.org/archive/251301 (Building a Banjo Series)
Rickard Banjos
rickardbanjos.com/site/
Hickler Banjos
hicklerbanjo.com/Home.html
Tools I used:
Drill
Drill press
Dremel with drill press
Miter saw
Table saw
Router
The pot I set out to make has a walnut body with a cocobolo rim cap, a tubaphone style tone ring made out of cocobolo, and a silver spun sleeve with a brass tube that sits on top of the tubaphone. The pot is 5/8” thick, 3” deep from rim cap to the top of the silver spun ring, and 12” in diameter made up of three block-rings, each made out of 8 segment blocks.
The tubaphone tone ring is 5/8” thick with 1/8” inside, top, and bottom walls, a 1/4” outer wall and a 1/4” trench with 32 holds drilled around the inside wall. Here is a pic of the dry assembled rim.
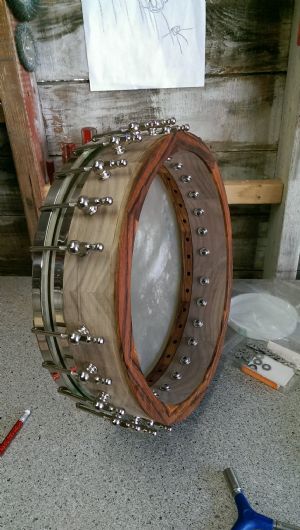
I chose walnut and cocobolo after rehicklerbanjo.com/Testing.html">viewing Hickler Banjo’s Wood Tonering Test page: hicklerbanjo.com/Testing.html. ; I made the 12” wooden tubaphone because I have always wanted to, but never played, a 12” or a tubaphone banjo, and couldn’t afford to buy one.
I purchased a 1 1/2” x 4” x” 36” piece of walnut and a 1” x 4” x 24” piece of cocobolo from a local hardwood supplier and took full advantage of the “cut offs” bin, which most of these folks have, where you can get good deals on the relatively short pieces of wood you need for this kind of project
The printable chart I used to make the measurements for the segments I found on the Bluestem Strings banjos site here: bluestemstrings.com/BluestemBa...Guide.pdf
Cutting the Rim Blocks
After several failed attempts to cut tight 22.5 degree angles on the 8 segments with my miter saw, I came up with a table saw solution that gave me very tight angles:
cut your rectangular blocks slightly over the longer side length in the rim segment guide
line them up as one block, top face to bottom face, and clamp
set the table saw angle to 22.5 degrees (if you are cutting an 8 segment ring)
cut one angle on the clamped block
flip the blocks and set the fence on the table saw to the length specified for the long end of the blocks in the rim guide
cut the opposite angle
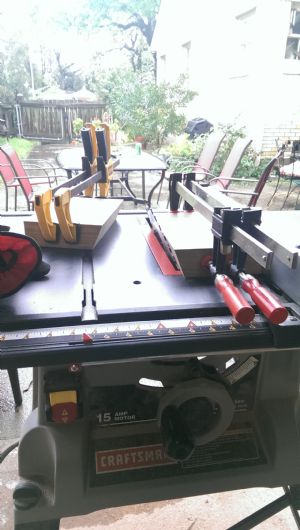
Note: keep those little triangles from the edges for each ring, they will come in handy later
Once the walnut and cocobolo blocks were cut, I arranged them on a piece of wax paper on top of a 13” square of 1” thick formica, wrapped them with a nylon tie-down tight, and then clamped each piece to the formica, ensuring that the edges were flush in case the tightening process pushed one edge up over the other, which happened on several, and let dry overnight.
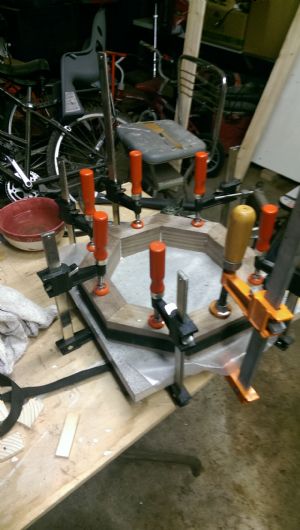
Routing the Rim Blocks
To route the rims sections, I used a circle routing jig I bought from Rockler. Once the octagons were dry, I outlined the rim center and screwed the outer edges of the octagons to pieces of scrap wood. Then, I used the seam lines of the octagon to find the center. for the jig to anchor in. I glued four of the triangles I saved from cutting the blocks on the table saw together into a diamond shape that was the same height as the blocks, using the triangles from the block cutting ensures that the hight in the middle is the same as the height on the outer edge. Then I drilled a hole in the center of the diamond the same diameter as the anchor peg on the jig and lined the bit up about 1/8” from the rim cut I wanted to make, to leave room for sanding down later on the drill press drum sander.
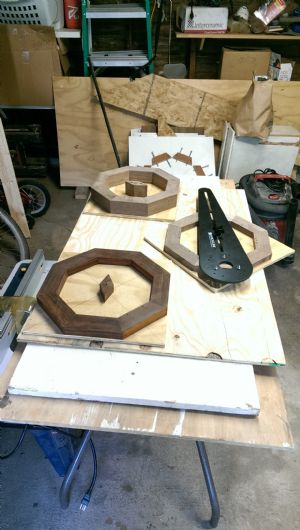
I set up each rim segment prior to beginning routing because I wanted to use exactly the same measurement on the jig for each to ensure the rim segments were the same, cutting the center for each and then moving to the outside for each. I cut the center before the outside because I anchored the octagon on the outside, you could do either I suppose. I cut with a 2” long spiral cut router jig, coming down into the wood about 1/4” at a round to prevent the bit from pushing out. The spiral cut bit works better than other bits because it cuts all the way up the bit, rather than just at the tip, and produces less tear out. Even at 1/4” per round, I still found irregularities along the rim and some bit drift, but the extra 1/8” gave me some wiggle room to sand away at the end. I repeated this process for the outer cut.
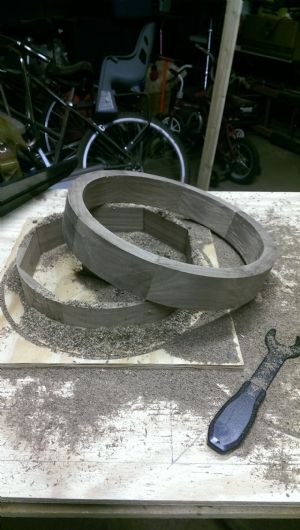
A key element of the tubaphone assembly is a deep, but thin shelf or shoulder for the tone ring to sit on so it has the freedom to vibrate. Before glueing the cocobolo to the walnut, I routed a shoulder into the top of the walnut ring about 3/8” deep, leaving a 1/4” of walnut for it to glue to and 3/8” of gap for it to ring over. It is important to do this before you glue them together as cutting this shelf would require a specialty bit once they are assembled.
I also took the opportunity of having the router table set up and the segments not yet glued together to cut the rabbet for the purfling at the bottom of the walnut rim segment.
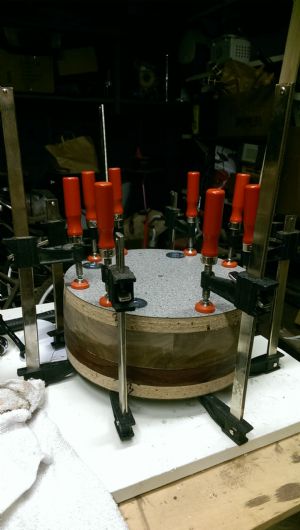
Once the rims and tone ring shelf were cut, I glued them together, even though I planned to cut a 1/4” segment from the cocobolo for the rim cap and a 1/8” segment to expose the center of the tubaphone. I did this to add stability for cutting the top of the tubaphone and rim cap from the cocobolo section, which were the hairiest part of this process. To get a tight fit, I made a jig with two 12” rounds of formica for the top and the bottom which I secured with bolts on the inside and clamps on the outside and let dry overnight.
Wooden Tubaphone Tone ring
Once the rim was glued up, I turned to the wooden tubaphone tone ring. I tried this once before and realized the importance drilling the 32 holes around the inside of the ring before routing the trench. Routing the trench first leaves very weak walls that will fracture if you try to drill through them. Drilling the holes first gives you a good chunk of wood to drill into and routing the trench after does not affect the holes in any way.
Already having a Dremel, I splurged on a Dremel drill press, a 1/4” Dremel router bit, and a cutting wheel.
I made a right angle brace out of two flooring boards to back the rim up against, lined up the cutting wheel just below the 1/4” line from the top of the cocobolo, eased the wood into the cutting wheel about 1/8” deep and then eased the rim around the brace to keep the Dremel from pushing out. I repeated this process until I got about halfway through the rim, then reversed the process to cut into the rim from the inside using a convex brace that operated in the same way. Note that I also added a wooden brace for the Dremel press with zip ties. Even though I took great care to make a straight cut, this still turned out a little uneven, so make sure you leave some room to sand down the unevenness.
I then repeated this process cutting another 1/4” thick ring, one for the rim cap on the bottom of the rim and one for the top for the tubaphone.
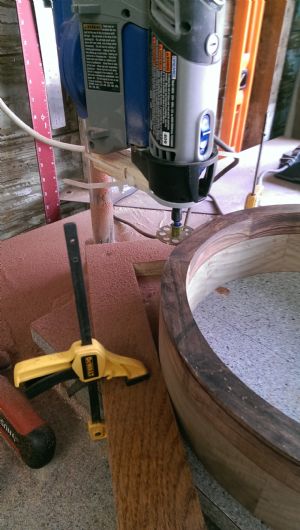
To drill the holes in the tone ring, I used a handheld drill set flat on my bench with a shim on the back, making sure it was pointed level as they are usually at an angle when set flat on a tabletop, and set the tonering on a pair of flooring boards t a shallow angle and clamped to a deck I made for my tabletop drill press so I could adjust the height to meet the bit and slide the rim into the drill bit. I used a foster bit to avoid tear out.
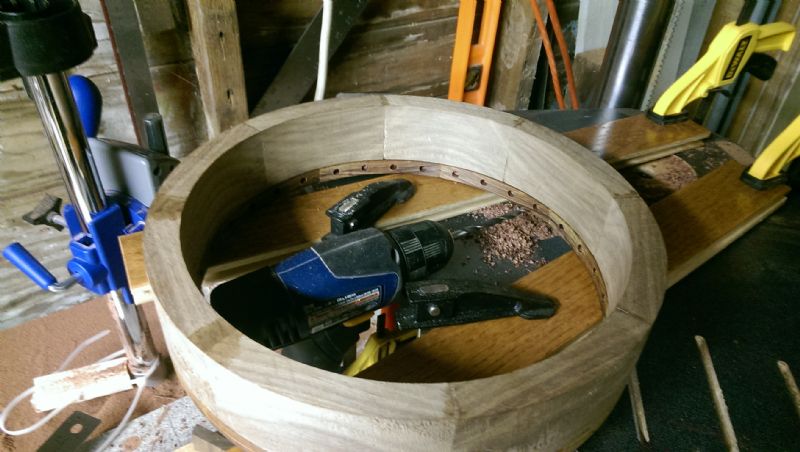
I cut the trench in the tubaphone with a Dremel router bit using the Dremel drill press with the rim set against the same right angle brace so it could rotate (brace not in pic). I made sure to leave a thicker wall (about 1/4” thick) on the outside to accommodate the brass rim, which touches down right at 1/4”, without putting pressure on the tubaphone top over a void. This was a little harrowing, because of the width of the walls, but went smoother than I expected. The drill press was less stable than I wanted it to be, but I made a brace to keep it level with little trouble.
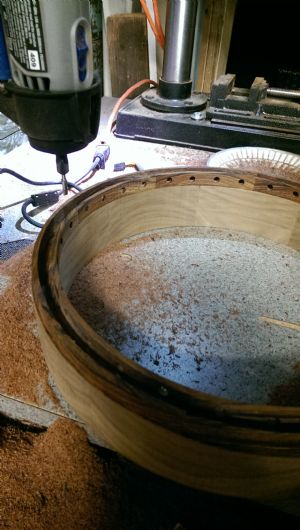
Once the trench was cut, I glued the top of the tubaphone on straight away because of the fragility of the top (anything can happen in a garage shop and its infinitely easier to cut a glued segment than to glue such a thin piece) using the sandwich jig I used to glue the pot segments earlier on.
Then, I shaved a 1/32” strip off the edge of the tone ring/rim assembly to slide the silver spun sleeve over using a router with the rim backed up against the right angle brace I made. This process was tedious and required a very thin shave, then a test fit with the sleeve, then a deeper shave, then a test fit, etc. I was able to get a very tight fit, though. Go slow.
Purfling
The purfling was not time consuming, but I did not get it exactly right. The standard length of the purfling available where I am was a bit too short to make the circumference of the pot, so I had to make two joints. Thought I tried to get them precise, there were gaps at the ends that I filled with wood filler.
Drilling the shoe bolt holes
I used the notched tension hoop I bought from Bill Rickard to measure the spots for the shoe bolt holes. NOTE: you cannot flip the tension hoop to measure these as they are not precisely the same on either side, which I learned the hard way. You must measure with the notches facing upward, just as it will ultimately sit on the pot.
To minimize tear out, I routed a base to rest the rim on in my drill press out of some old butcher block the same diameter as the inside of the pot. Then I taped the inside of the pot and used the drill press to make the holes.
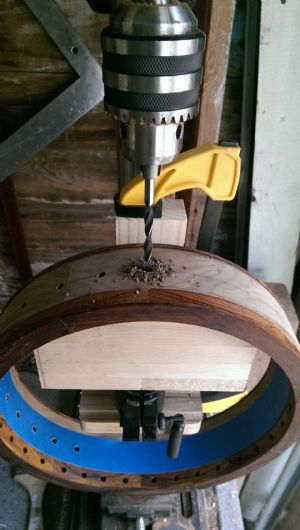
Rim Sanding
To sand down the rim to the diameter I needed to match flush with the diameter of the silver spun skirt, I used a right angle brace I made out of old floor boards to hold the rim flush against the drill press sanding drum for the outside and a block I attached on a sliding anchor to the drill press table to brace for the inside of the rim. I then locked the braces in, sanded a bit until there was no friction, sized up the sleeve, and scooted the brace a bit closer and sanded again until I got the proper diameter for inside and out.
Neck Shaping
I picked up a “shop second” neck from White Mountain Banjos months ago which, considering the craftsmanship Ron Grimsley puts into his work, I considered a real favor (thanks Ron!). The headstock was too thin for his production quality, so I opted to make a headstock and volute cover out of leftover cocobolo.
I used a hot pipe method to bend the headstock cover and opted to carve the curve out of the volute, considering the steep curve and the brittleness of cocobolo.
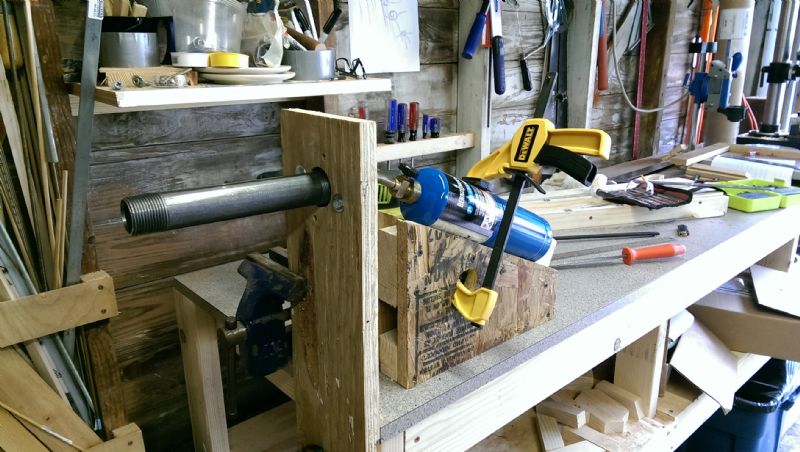
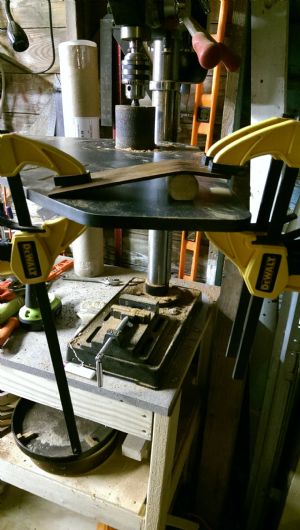
I used the drum sander on my drill press to shape the volute piece.
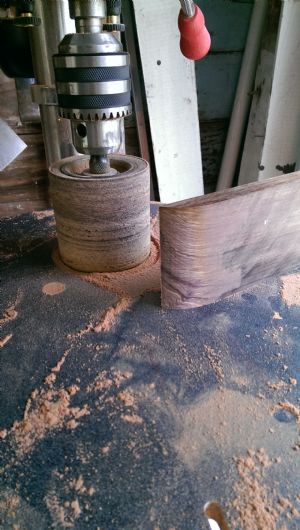
Then I glued the pieces in place and used a coping saw and Dremel to do the final shaping.
I followed the same procedure to do the heel cap.
Neck Attachment
To attach the neck to the pot, I went with a “Rudy Rod” method. Special thanks to Rudy at Bluestem for his detailed write ups on this technique. Be assured, it is as elegant, efficient, and effective as he asserts. Ken LeVan has done some very interesting things with this approach as well, which he was also kind enough to post. LeVan and Bluestem have slightly different approaches, I went with a hybrid.
Bluestem Strings banjohangout.org/archive/270727
LeVan Banjos banjohangout.org/topic/305112
Using leftover walnut and cocobolo from the rim construction, I made a dowel still with two 1/4” x 1 1/8” strips of walnut on either side of a 1/4” x 1 1/8” strip of cocobolo. I glued these together and then cut the stick in half perpendicular to the cocobolo strip right in the middle. Then I took each half and routed a half circle trench along the middle so when I glued them together, I had a 1/4” hole running through the middle. Then I traced the arc of the rim along the edges and sanded them to fit flush with the inside of the rim.
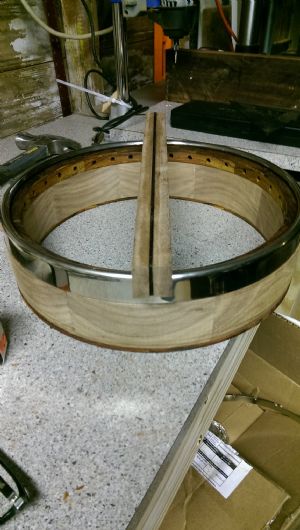
To measure the height of the neck, which I asked to be precut for a 12” arc, I located the middle of the neck heel between the bottom of the tension ring cut and the heel. Then I measured the approximate location in relation to the top of where the head would be and drilled a 1/4” hole in either side of the rim. I then attached the neck to the rim with a nylon tie-down and strung it up. With the strings on, I could then inch the neck up and down until the strings were the appropriate distance from the fretboard. When I had it right, I inserted a pencil I filed down to a 1/4 diameter and slid it into the rim hole to mark the neck.
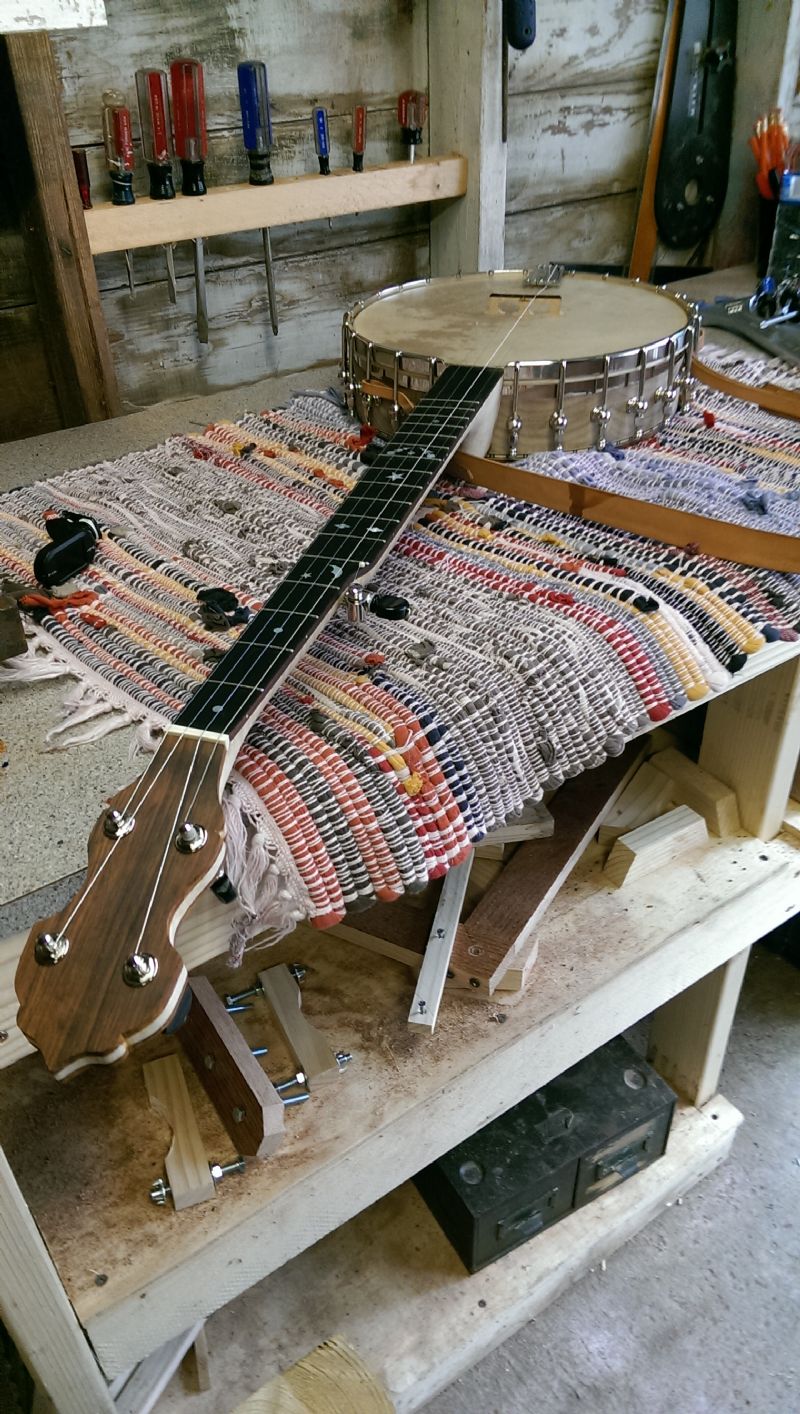
Here are the pictures of the dry assembly. It sounds wonderful, I will post sound files asap!
Dan Drabek - Posted - 10/04/2015: 21:06:52
Congratulations, and welcome to the club. There are very few woodworkers who ever attempt to build a stringed instrument from scratch, and now you are one of them. Your tubaphone looks great and has, I believe, the first wooden tubaphone-style tone ring I have seen. It will be exciting to hear how it sounds. I haven't yet read the full story of it's construction, but I will.
DD
pollywaffle - Posted - 10/04/2015: 21:36:27
Great work. I have been using a similar process to round my rims without a lathe. Your process is more civilized and I shall take advantage of that. Great info.
rudy - Posted - 10/05/2015: 03:35:27
Hi David, congratulations on a job well done!
Thanks for taking the time for such an exhaustive detailed account of your build, it's always nice to see how folks with small shops overcome potential obstacles that they are presented with. It sounds like you learned a ton in the process, and that's always a good thing.
The more of these types of detailed accounts the better. I certainly continue to learn, and I wish I would have had the resources that are available today when I started building. (That was in the pre-computer / internet days...) It never ceases to amaze me how inventive folks can be with a limited number of tools. It truly proves that where there's a will there's a way.
Yesterday I tried a new-to-me technique that astounded me in how much it's going to help me in the future. I spent the entire day perplexed as to why I hadn't used it earlier, and a bit saddened to think of the shear number of hours it would have saved me had I picked it up 30 years ago! Such is life, though. All we can do is keep learning, and with contributors such as yourself we're facing a bright future!
Helix - Posted - 10/05/2015: 05:03:49
Sometimes the student's work exceeds the masters, very nicely done, those mentioned should thank you for the mention.
I have used several of Ron Grimsley's necks in new builds, I gave him truss rods and fingerboards, he gave me paddleheads, I could order parts and build the rim in the meantime, those necks play music.
I really like and support the laminated dowel stick because I think it's better structurally, it won't be any weak point in the future.
The headstock looks like a brand new oreo cookie, good enough to eat, real nice. And for a 2nd, that's a nice rescue.
You are way ahead, keep going.
ken61 - Posted - 10/05/2015: 05:36:16
David
Thank you for posting this very detailed account of your banjo building experience.
It shows through the words and pictures the great drive you had to do this, the fun you had, the learning which took place, and the satisfaction you gained.
Some of us build banjos in FULLY equipped shops having been woodworkers for dozens of years, and some of us , like yourself, build banjos with limited tools, genius incite, and unbelievable DESIRE .
Believe me , yours is the greater accomplishment and should bring the greater satisfaction.
I thank you for sharing and showing that DESIRE is the biggest tool in the toolbox.
Beautiful banjo!
ken61
flailing - Posted - 10/05/2015: 06:24:08
Thanks for posting this David. I look forward to building a banjo one day and post like yours are really going to help. I would love to hear how that tubaphone sounds.
Gord
lazlototh - Posted - 10/05/2015: 06:27:53
Great Project and Post.
Can we hear some sound files?!
The tone ring design is impressive!
Tom in Maine
Ken LeVan - Posted - 10/05/2015: 06:39:56
Very cool indeed!
Not only cool, but unique- the first woodie tubaphone ever made as far as I know. Everything you have done looks great. Wonderful job.
Did you get the spun sleeve from Bill Rickard? I think the combination of the ball brackets and ball end nuts is particularly good-looking, as is the combination of woods you used.
Your presentation of the whole project is also very well done.
Many thanks for sharing this with all of us.
Ken
dpgetman - Posted - 10/05/2015: 07:03:34
Thanks everyone, I just uploaded a sound test file. I was in a bit of a rush, sorry for the sloppy playing! But I think the recording represents the lows and highs pretty well. The link below is to the sound file in my music page (its the only file up there at the moment).
banjohangout.org/myhangout/mus...?id=80379
DPG
Jonnycake White - Posted - 10/05/2015: 07:08:52
I'm impressed! A wood tubaphone is something I've never heard of - but it seems a good alternative. I too would be very interested in a sound file, and especially another one from a metal tubaphone for comparison.
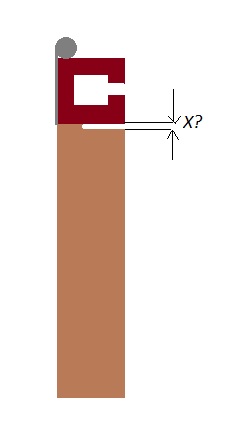
A picture is worth a thousand words, so I've made a crude picture to see if I understand what you did, and to ask a simple question: What is the dimension X?
 |
dpgetman - Posted - 10/05/2015: 07:21:31
A picture is worth a thousand words, so I've made a crude picture to see if I understand what you did, and to ask a simple question: What is the dimension X?
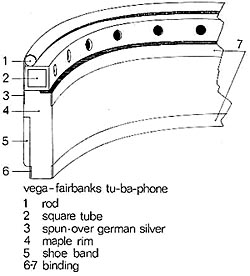
I believe I went with 1/16, just real thin. There is a bit of discussion about this shelf/shoulder on the hangout, I like this little diagram for clarity.
dpgetman - Posted - 10/05/2015: 07:25:12
I just posted up another sound file of a Hilarie Burnham song I really love to play.
banjohangout.org/myhangout/mus...?id=80379
flailing - Posted - 10/05/2015: 09:15:21
Real nice David - thanks for posting those sound files.
Gord
Dan Drabek - Posted - 10/05/2015: 09:29:54
Sounds mighty fine. Warmth with a lot of presence. Well played and well recorded.
DD
Crusty - Posted - 10/05/2015: 09:40:37
That does sound nice. It's a Tubaphone voice for sure but not as bright as with the brass spacer and a bit more timbre.
Zachary Hoyt - Posted - 10/05/2015: 09:58:09
That is a very impressive banjo and design. I would never have guessed it was possible to make a wood tone ring like that. Thanks for the detailed photos and explanation. It sounds great too.
Zach
Ken LeVan - Posted - 10/05/2015: 10:42:20
The whole idea of exploring different wooden tone ring designs is an interesting one, and I think what you have done is inspiring.
hhunter44 - Posted - 10/05/2015: 11:59:13
hhunter44 - Posted - 10/05/2015: 12:00:31
I love it. I am a Tubaphone fan/player and I am just amazed at the work you did in creating the heart of the ring with the simplest of power tools. My hat is off to you.
Hugh
Ken LeVan - Posted - 10/05/2015: 13:36:51
The sound files sound great! Great expressive playing also, and expressiveness is a quality of tubaphones and one I strive for in my own banjos - harder to achieve and often less appreciated than sheer volume.
The rim is horizontal grain walnut 8 sections, which looks extremely nice, is going in the proper direction, and you have "locked it in" top and bottom with the cocobolo rim cap and tone ring which stagger the joints like a block rim, which is a good solid construction. You have obviously thought this through even while giving yourself tricky construction challenges, and have "aced" it, in my opinion.
The tone ring has a "U" shaped cross section, which you routed out in situ. Is it oriented so that the opening is on the top as in the pic, or did you flip it? Either way would work, it's just a design question - you could do it either way.
I think your decision to use a brass 1/4" hoop on the top as the head bearing was a very wise one for several reasons, as was the spun skirt, a traditional feature which you are re-purposing for a whole new reason, which I like a lot - a creative adaptive reuse of an earlier thing which has lost its original use except for those who use skin heads.
To repeat myself, you have thought this through and haven't stepped on several "roller skates".
Ken
pollywaffle - Posted - 10/05/2015: 14:50:55
The more I read your process, the more I take from it for better results. Thanks again.
dpgetman - Posted - 10/05/2015: 19:54:35
Rudy, I'm dying to know, save us all 30 years and share the technique!
DPG
quote:
Originally posted by rudy
Hi David, congratulations on a job well done!
Thanks for taking the time for such an exhaustive detailed account of your build, it's always nice to see how folks with small shops overcome potential obstacles that they are presented with. It sounds like you learned a ton in the process, and that's always a good thing.
The more of these types of detailed accounts the better. I certainly continue to learn, and I wish I would have had the resources that are available today when I started building. (That was in the pre-computer / internet days...) It never ceases to amaze me how inventive folks can be with a limited number of tools. It truly proves that where there's a will there's a way.
Yesterday I tried a new-to-me technique that astounded me in how much it's going to help me in the future. I spent the entire day perplexed as to why I hadn't used it earlier, and a bit saddened to think of the shear number of hours it would have saved me had I picked it up 30 years ago! Such is life, though. All we can do is keep learning, and with contributors such as yourself we're facing a bright future!
dpgetman - Posted - 10/05/2015: 20:04:52
Thanks everyone for the wonderful feedback and especially those (Rudy, Ken, Dan, Helix, and Zach) who have contributed so much to folks like me venturing into the territory. Also, special thanks to Jane Rothfield and Hilarie Burhans for the wonderful tune I hope I did not butcher to badly in the test file. I am working on three new rims as I write to pair up with an old Gold Tone, Framus and a shop second neck I have laying around but am also carving my first neck as well, so much obliged for the support!
Ken, I am following your guidance on staining and finishing next, so keep an eye out for an update and thanks in advance for saving some troubleshooting!
DPG
hhunter44 - Posted - 10/06/2015: 09:41:27
quote:
Originally posted by dpgetman
Thanks everyone for the wonderful feedback and especially those (Rudy, Ken, Dan, Helix, and Zach) who have contributed so much to folks like me venturing into the territory. Also, special thanks to Jane Rothfield and Hilarie Burhans for the wonderful tune I hope I did not butcher to badly in the test file. I am working on three new rims as I write to pair up with an old Gold Tone, Framus and a shop second neck I have laying around but am also carving my first neck as well, so much obliged for the support!
Ken, I am following your guidance on staining and finishing next, so keep an eye out for an update and thanks in advance for saving some troubleshooting!
DPG
I am also thinking of retrofitting a Framus 5 string with a tubaphone and this would be the way to do it without the extra expense. They're not much to look at but there is something about it that intrigues me. As Ken mentioned earlier, this project is inspiring.
Hugh
dpgetman - Posted - 10/06/2015: 10:16:35
quote:
Originally posted by hhunter44
quote:
Originally posted by dpgetman
Thanks everyone for the wonderful feedback and especially those (Rudy, Ken, Dan, Helix, and Zach) who have contributed so much to folks like me venturing into the territory. Also, special thanks to Jane Rothfield and Hilarie Burhans for the wonderful tune I hope I did not butcher to badly in the test file. I am working on three new rims as I write to pair up with an old Gold Tone, Framus and a shop second neck I have laying around but am also carving my first neck as well, so much obliged for the support!
Ken, I am following your guidance on staining and finishing next, so keep an eye out for an update and thanks in advance for saving some troubleshooting!
DPG
I am also thinking of retrofitting a Framus 5 string with a tubaphone and this would be the way to do it without the extra expense. They're not much to look at but there is something about it that intrigues me. As Ken mentioned earlier, this project is inspiring.
Hugh
I agree Hugh, there is something intriguing about those old Framus banjos... I think its the shoe design, how they hook on the bottom of the pot. I found my old Framus long neck in pieces in a box at the back of an old friend's instrument repair shop. He noticed me looking at it and gave "the mess" to me gratis immediately. Took a bit for a nube like me to get it playing, but I did and I played it for years. I always really liked the feel of the neck as well. My plan is to re-do the headstock, refinish the neck, get it set up for a rudyrod, and attach it to a wanut rim with a wenge rimcap and top and a rolled brass tonering on the outside diameter of the rim, rather than that flimsy archtop setup it originally had. Then I think its time for a new group "Love for parts banjos" or something like that.
DPG
Crusty - Posted - 10/06/2015: 10:36:40
Here's a tip David.
Most woodworkers these days appreciate double stick tape for it's usefulness for temporarily locating work pieces and jigs, but most have found the following deficits of it: it's on the thick side, adhesive is often left behind when removed, and it's on the spendy side to buy. An alternative that I like better is to cover both surfaces to be adhered with masking tape (firmly adhered with a small roller) and then use cyano adhesive between the tapes (don't most of us buy the big bottles these days?). It's thinner, holds better, doesn't leave any residue behind when the tape is removed, and costs less than DST.
pollywaffle - Posted - 10/06/2015: 17:02:06
Possible stupid question... How much does the spunover sleeve add to the overall sound?
dpgetman - Posted - 10/06/2015: 18:36:49
quote:
Originally posted by pollywaffle
Possible stupid question... How much does the spunover sleeve add to the overall sound?
A stu-pendous question Ms. Waffle! I can't offer the complex sound diagrams I developed that prove this due to certain agreement I still have with the Russian government, but I can say that I've had the pleasure of playing both a Little Wonder (brass ring with no sleeve) and a Senator (brass ring with sleeve) and the latter has a slightly less plunky tone with more sustain than the former. I preferred the Senator. Also, I figured the sleeve would offer additional support for the potentially fragile wooden box of the tubaphone. Additionally, I noted that tubaphones seem always to be accompanied by a sleeve, so I followed suit.
DPG
Edited by - dpgetman on 10/06/2015 18:37:41
dpgetman - Posted - 10/07/2015: 08:38:42
quote:
Originally posted by Crusty
Here's a tip David.
Most woodworkers these days appreciate double stick tape for it's usefulness for temporarily locating work pieces and jigs, but most have found the following deficits of it: it's on the thick side, adhesive is often left behind when removed, and it's on the spendy side to buy. An alternative that I like better is to cover both surfaces to be adhered with masking tape (firmly adhered with a small roller) and then use cyano adhesive between the tapes (don't most of us buy the big bottles these days?). It's thinner, holds better, doesn't leave any residue behind when the tape is removed, and costs less than DST.
That is a good tip, thanks! Where is Dry Gulch, TX anyways? Anywhere near Houston?
Crusty - Posted - 10/07/2015: 10:28:28
It's my hill top outside Austin.
It's not as well known as Slipsen Falls, WI.
Since you're in a receptive mood for tips, here's another that I distilled from posts here by Wyatt Fawley and others for locating a neck onto a rim. Using wide packing tape, attach a straightedge (Home Depot has small aluminum angle sticks that are straight) to the fingerboard, shimmed at the first and twelfth frets to the action height that you want and aligned along the third string path. Clamp the neck vertically in a padded vise so that the heel cut is level. Stick a bridge of the desired height (with 1/16" trimmed off the cap) onto the head at its scale location using double stick tape. Set the rim down onto the neck heel and then move it until the straightedge touches the top of the bridge (the 1/16" trim was to allow for the bridge depression into the head under taut strings - you may want more). At that point you can mark for the dowel stick or coordinator rods and the action will come out just like you wanted it to be. You can also use this method to glue a dowel into the neck and hold things in place while the glue cures.
rudy - Posted - 10/07/2015: 13:17:40
quote:
Originally posted by dpgetman
Rudy, I'm dying to know, save us all 30 years and share the technique!
DPG
quote:
Originally posted by rudy
Hi David, congratulations on a job well done!Thanks for taking the time for such an exhaustive detailed account of your build, it's always nice to see how folks with small shops overcome potential obstacles that they are presented with. It sounds like you learned a ton in the process, and that's always a good thing.
The more of these types of detailed accounts the better. I certainly continue to learn, and I wish I would have had the resources that are available today when I started building. (That was in the pre-computer / internet days...) It never ceases to amaze me how inventive folks can be with a limited number of tools. It truly proves that where there's a will there's a way.
Yesterday I tried a new-to-me technique that astounded me in how much it's going to help me in the future. I spent the entire day perplexed as to why I hadn't used it earlier, and a bit saddened to think of the shear number of hours it would have saved me had I picked it up 30 years ago! Such is life, though. All we can do is keep learning, and with contributors such as yourself we're facing a bright future!
I will post it as another topic so as not to drift off from this discussion, but my internet is down and I'm coffee-shop inter-webbing until they get it fixed.
Ken LeVan - Posted - 10/07/2015: 14:00:12
quote:
Originally posted by pollywaffle
Possible stupid question... How much does the spunover sleeve add to the overall sound?
Not a stupid question by any means - a good one - here's a possibly stupid (or at least uninformed) answer, because I don't really know, but I can guess, having dealt with many tubaphones: Probably as little as it adds to the sound of an actual brass tubaphone, wherin the 1/4" hoop is probably much more important, sound-wise. The skirt was there historically for the wet setting of skin heads so the rim didn't get slimy.
They add much to the look of the instrument, and I think it was a very smart thing to do on this banjo mechanically because of the fragility of the end grain joints on the 8-segment thin-wall wooden tubaphone ring The skirt acts like a barrel hoop and holds the tone ring and rim assembly together. As I said before, dpgetman has thought this design through very cleverly.
Dan Drabek - Posted - 10/07/2015: 15:19:30
The spun sleeve also protected the wooden rim from warping due to moisture from mounting skin heads.
DD
Ken LeVan - Posted - 10/07/2015: 15:55:43
quote:
Originally posted by Dan Drabek
The spun sleeve also protected the wooden rim from warping due to moisture from mounting skin heads.
DD
Yes!
dpgetman - Posted - 10/09/2015: 06:51:22
quote:
Originally posted by rudy
I will post it as another topic so as not to drift off from this discussion, but my internet is down and I'm coffee-shop inter-webbing until they get it fixed.
Think I found it! banjohangout.org/topic/309875 really elegant design move Rudy. And a real stunner!
DPG
Terms of Use | Privacy Policy | Privacy Consent (EU/GDPR Only)
Copyright 2026 Banjo Hangout. All Rights Reserved.


