DVD-quality lessons (including tabs/sheet music) available for immediate viewing on any device.
Take your playing to the next level with the help of a local or online banjo teacher.
Weekly newsletter includes free lessons, favorite member content, banjo news and more.
Premier Sponsors


|
Please note this is an archived topic, so it is locked and unable to be replied to. You may, however, start a new topic and refer to this topic with a link: http://www.banjohangout.org/archive/270727
rudy - Posted - 09/19/2013: 09:38:39
Hi All,
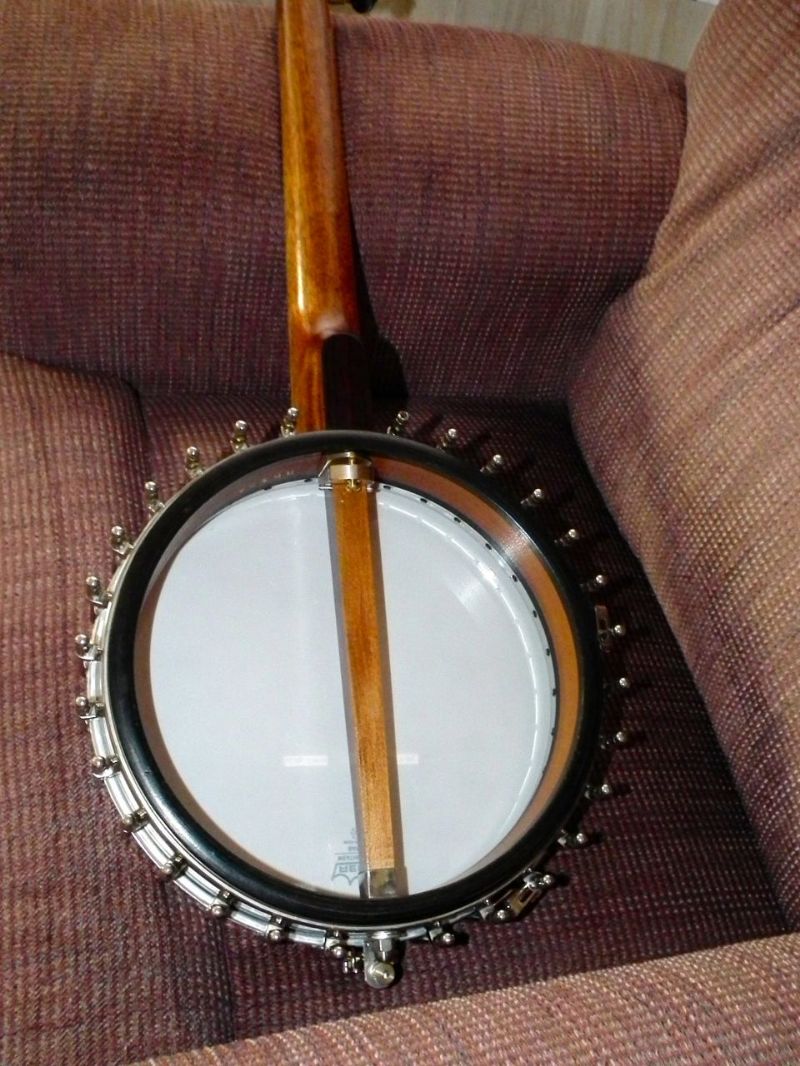
I've been fielding a few personal e-mails about my method of neck attachment using 1/4"-20 all thread rod and acorn nut at the tailpiece so I added a bit of additional information on my Open Back Banjo Design Primer page:
bluestemstrings.com/pageBanjoD...n.html#23
The new material is listed under section 23, "Neck Attachment".
There's also a new look for the Bluestemstrings.com home page.
Edited by - rudy on 09/19/2013 09:40:18
Lyndon Smith - Posted - 09/20/2013: 10:33:33
Rudy: Is the hole for the barrel bolt drilled at 90 degrees to the fret board plane or parallel to the heel angle?
I know the all thread bar will flex a bit but my gut feeling says that the barrel bolt should be parallel to the heel angle and this seems to be born out by the diagrams on your (excellent) web site.
grm405 - Posted - 09/20/2013: 10:52:54
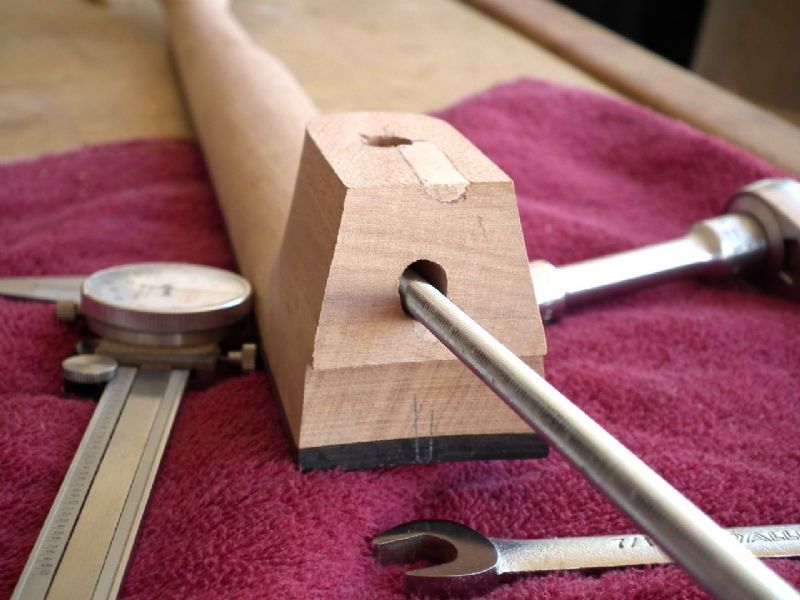
I made a jig to drill the heel hole at 90 degrees to the rod hole. Simply use a 1/4" drill in the rod hole to hold in it place in the heel and drill the pilot hole for the cross-dowel hole in the heel using the hole in the long section as a guide. The two holes are laid out to intersect at the 90 degrees. Keep in mind that there is no fixed relationship between the direction of the dowel and the heel; for example the Vega dowels slope down at about 2 degrees relative to the heel. That is how they made the banjos.
I don't like using threaded rod as it screws thru the cross-dowel until it hits the wood behind and can split or damage the heel. In my first attempt I used a threaded insert instead of a cross-dowel and the all-thread pushed it right out of the heel when it bottomed out in the heel.
I prefer a straight 1/4' rod threaded the required distance on each end. The end for the cross-dowel is just threaded enough so that it bottoms out when the rod reaches the back of the cross-dowel. Pretty simple to thread each end and the smooth rod slides thru the hollow dowel much easier than the fully threaded rod. Particularly if the hole isn't quite straight, as my first attempt was.
Gerry
Edited by - grm405 on 09/20/2013 10:56:51
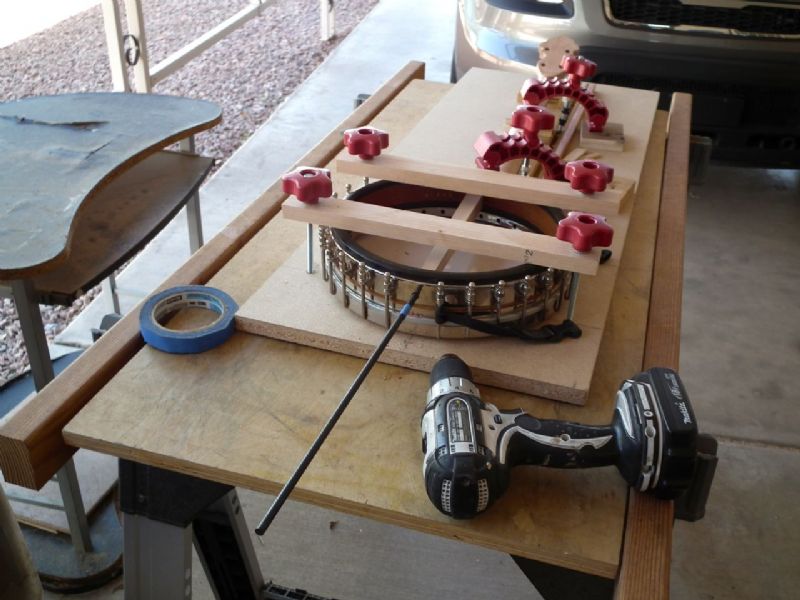 Drilling coordinator rod hole in heel. Note 24" x 1/4"drill (Harbor Freight) | 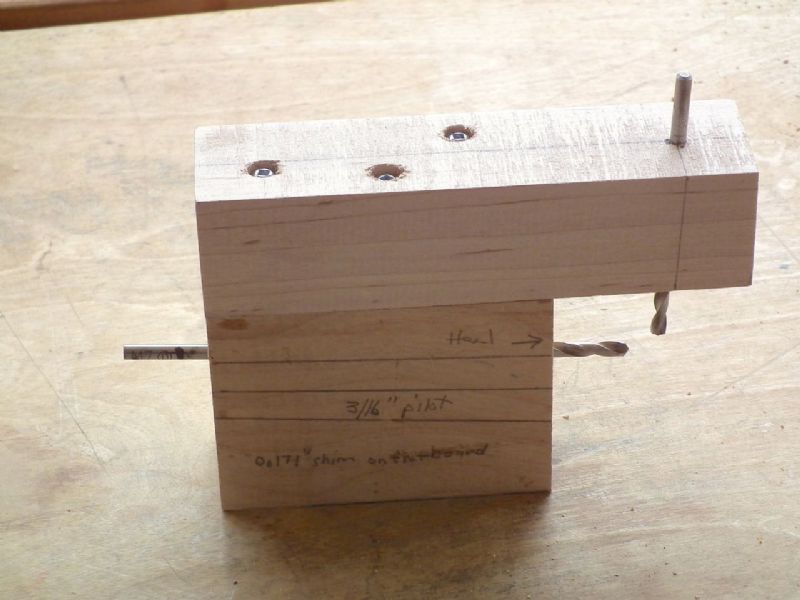 | 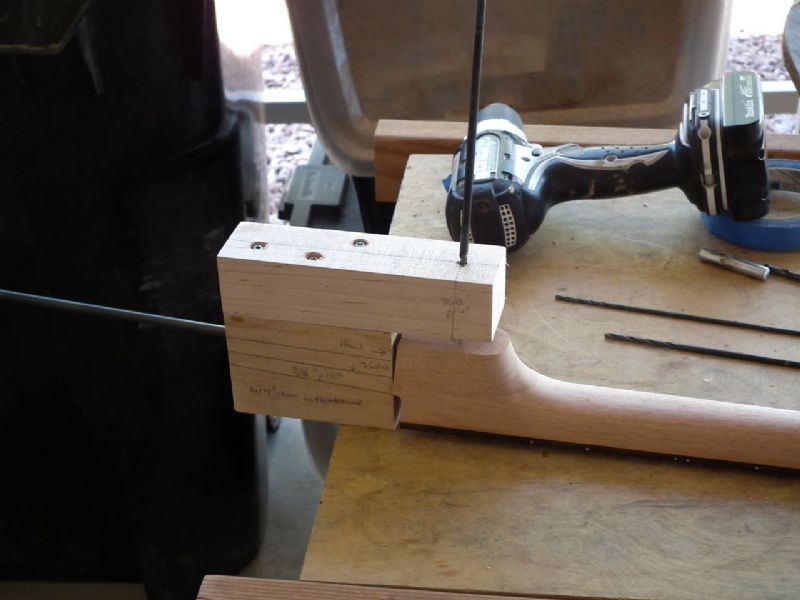 Drilling hole for cross-dowel with jig |
rudy - Posted - 09/20/2013: 11:51:55
quote:
Originally posted by Lyndon SmithRudy: Is the hole for the barrel bolt drilled at 90 degrees to the fret board plane or parallel to the heel angle?
I know the all thread bar will flex a bit but my gut feeling says that the barrel bolt should be parallel to the heel angle and this seems to be born out by the diagrams on your (excellent) web site.
The hole for the barrel bolt is parallel to the heel angle. It's just a bit of common sense engineering to realize that you want your force applied in a straight line across the width of the rim. A small amount of angular deviation won't matter as the attachment method is quite forgiving.
rudy - Posted - 09/20/2013: 12:19:24
quote:
Originally posted by grm405
I made a jig to drill the heel hole at 90 degrees to the rod hole. Simply use a 1/4" drill in the rod hole to hold in it place in the heel and drill the pilot hole for the cross-dowel hole in the heel using the hole in the long section as a guide. The two holes are laid out to intersect at the 90 degrees. Keep in mind that there is no fixed relationship between the direction of the dowel and the heel; for example the Vega dowels slope down at about 2 degrees relative to the heel. That is how they made the banjos.I don't like using threaded rod as it screws thru the cross-dowel until it hits the wood behind and can split or damage the heel. In my first attempt I used a threaded insert instead of a cross-dowel and the all-thread pushed it right out of the heel when it bottomed out in the heel.
I prefer a straight 1/4' rod threaded the required distance on each end. The end for the cross-dowel is just threaded enough so that it bottoms out when the rod reaches the back of the cross-dowel. Pretty simple to thread each end and the smooth rod slides thru the hollow dowel much easier than the fully threaded rod. Particularly if the hole isn't quite straight, as my first attempt was.
Gerry
Hi Gerry.
There's a reasons why I chose the cross-dowel, part of which you realized when you opted for the insert. Threaded inserts (and hanger bolts) are a BAD idea in neck end grain. Always have been and always will be. That's why I spent so much energy to come up with a workable alternative that could be done easily in the home shop. Your angle gig is a great example of how it can be done even MORE easily.
The hole which accepts the threaded rod is drilled a bit past the cross-dowel hole, I like to shoot for an extra 1/2" of depth, but the actual depth is unimportant as long as the rod has somewhere to go.
If you do the rod correctly it can't possibly go more than the exact distance beyond the insert that you choose. I insert the all thread rod until it contacts the barrel nut and mark it 3/8" outside of the heel face. Screw the all thread into the heel to this marked depth, insert the rod through the rim and mark the rod to a length that will be capped by the acorn nut.
You can now pull everything apart and cut the all thread off. When it's time to assemble:
1. Screw the all thread in until your previously marked depth is flush with the heel.
2. Slide the rod through the rim and channeled dowel stick.
3. Add the tailpiece bracket and acorn nut.
4. Tighten
The all thread can only go a thread or two further into the barrel nut. It is physically impossible for the all thread to go in any farther.
I spent a LOT of time and numerous permutations to the basic attachment system to reach the "ultimate" design. I just want folks to experience the JOY of putting a neck on like this!
If you need to disassemble for further heel work it takes all of 30 seconds to have a bare heel. I did a demonstration of pulling a neck off for Craig Evans when he was shooting video so the advantage could be plainly seen.
The part that is troublesome is when someone fails to understand the principal of the channeled dowel and attempts to do a "simpler" version as some of the other posts in this and other topics have indicated. I'd hate to see the attachment system get a bad rap from someone doing it improperly. that's why I posted additional information at my website when I got e-mail questions from a few folks that didn't understand the principal.
I drill the barrel bolt hole to 25/32" and glue the barrel in place with Titebond so the diameter of the bolt fits with a fair amount of precision to the bored hole in the neck. Some drill this much larger, but you really have to consider the engineering of the entire system. If the barrel nut doesn't bear uniformly against the neck wood there is a possibility of the barrel nut acting as a wedge against the end grain of the neck. I shouldn't need to spell out the possible consequences of that.
Edited by - rudy on 09/20/2013 12:24:50
Dave1climber - Posted - 09/20/2013: 14:10:50
Rudy
Thanks for your concise drawing's and explanation. I plan on using the barrel bolt concept on my next neck that I will be making for a 1925 Gibson ball bearing TB3. I will be using the original coordinator rods to keep it looking original.
Ken LeVan - Posted - 09/20/2013: 14:12:27
I have adapted Rudy's method as my "dowel-stick of choice". It's a great invention.
I use a 1/4" aluminum rod, which has WAY MORE than the tensile strength needed for this application. You are essentially putting the hollow dowel stick into compression.
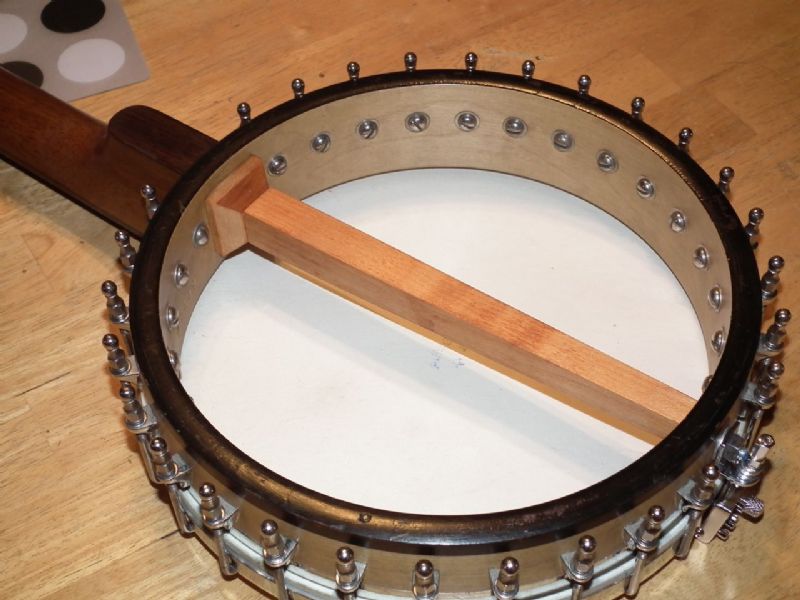
 I use a square aluminum piece that is inserted into the heel parallel with the heel angle. Here's a pic of it:

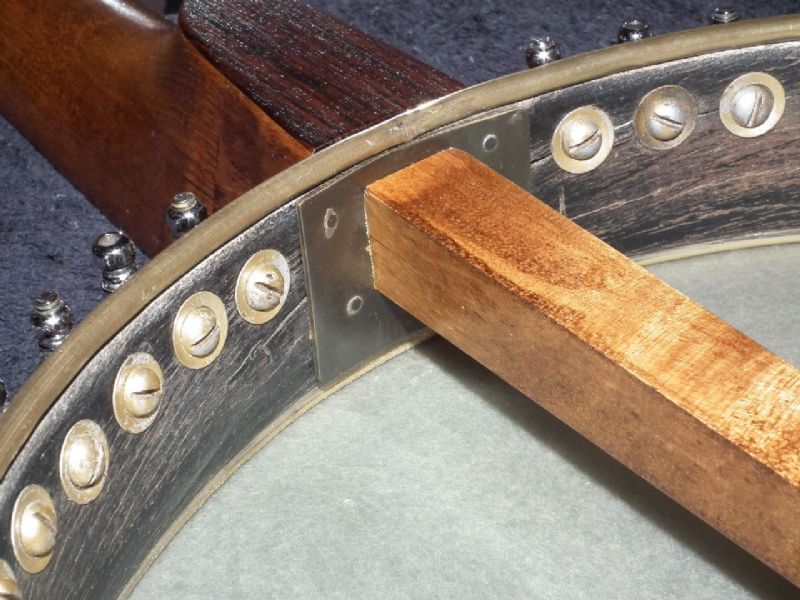
Here in this pic you can see the square anchor showing through the heel. which has become a decorative element.

grm405 - Posted - 09/20/2013: 14:18:35
I drill the cross-dowel to 25/64" (think you have a typo as 25/32" would be rather oversize.) I leave my cross-dowel free-floating so I can adjust the neck up and down and still retain the full dowel stick dimensions where it passes thru the square miter in the pot. This is something you don't have to do with new construction using only a small 17/64" hole/slot thru the rim, but do when replacing an existing dowel in an old pot.
I find that I have no problem removing and re-installing the rod numerous times, despite the freely moving cross-dowel, but I did put a couple of dimples between the two sides so I can turn it with a scribe or pick if it gets turned too far to start the rod. I have only had to use these once in perhaps a dozen removals of the rod to adjust the heel cut.
In one of my "conversions" (actually resetting the neck on an old L&H) I had to place the cross-dowel so far back in the heel due to the very short nature of the original heel I would likely have drilled right thru the back of the heel if I went 1/2" beyond the cross-dowel. For me, threading a length of 1/4" rod only takes 5 minutes and places the rod consistently correctly with no chance of the rod turning instead of the nut when I tighten things.
Personally, I think that "simplifications" of such a simple system is asking for problems, ie trying to avoid the making of the hollow dowel by using some substitute. I think your dowel adds significantly to stability of the system since it covers a 3/4" square area and looks better too. This was apparent particularly with the spunover L&H rim, which is only about 1/4" thick.
Great system Rudy, and I certainly think it has great application to old banjos as well as new construction.
Gerry
Ken LeVan - Posted - 09/20/2013: 14:39:11
I am trying to figure out how to adapt Rudy's system to retrofits of dowel stick construction, where the rim has a 3/4" x 3/4" square hole that would interfere with the compression of the hollow dowel against the rim. I think you need to plug the hole and use a large "washer" trhat covers it, as I have shown above.
If a customer wants a dowel reset, unless it is an important vintage pot that should be restored, I will recommend a "Rudy rod conversion.
Ken
rudy - Posted - 09/20/2013: 14:53:37
Jerry, Thanks for the typo correction. The 25/64" hole is the obvious "3/8" oversize" choice.
Ken, I think Gerry has some good shots of a channeled dowel he used for conversion that has an enlarged shoulder over the 3/4" square hole for that type of conversion. He'll probably jump in here.
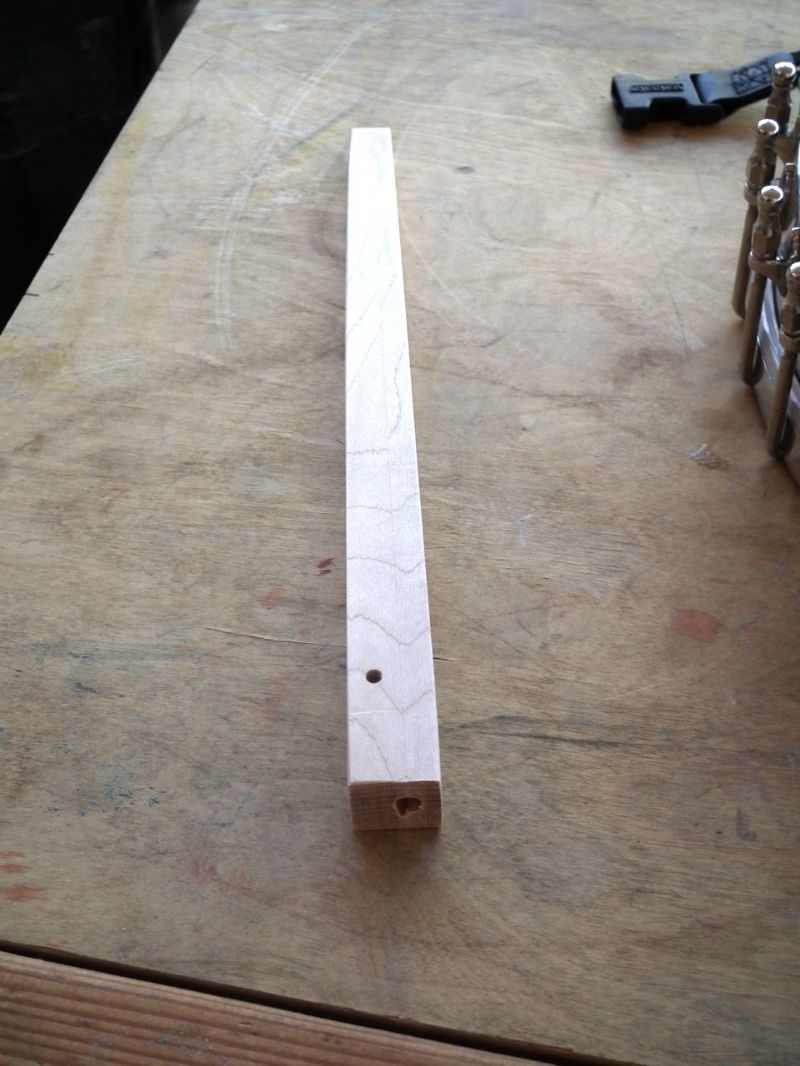
I've been doing the channeled dowel as a square version tapering from 1" to 3/4". I think it actually looks better and adds even more stability for thin rim designs.
Ken LeVan - Posted - 09/20/2013: 15:05:27
I have no problems with enlarging the shoulder, and I have made various "dowels" that do that, but I want to make a seamless conversion that doesn't look like a "conversion" Hence, the "washer".
grm405 - Posted - 09/20/2013: 18:21:31
Ken, I have mounted the dowel 3 ways on conversions/neck resets.
One is to use a fitted wood washer behind the dowel covering the square hole. Works, but I don't like the looks.
The second is to cover the hole with a fitted .065" thick brass plate. Works and doesn't look too bad, but not like a regular dowel stick.
Third, the one I like is to use a standard Vega neck brace. The dowel runs thru the hole but is cut just short of the heel (outside of the rim}. The the brace is installed and handles the compression of the rod. This requires you offset the rod hole to one side of the hollow dowel, to make room for the cross-pin of the neck brace. This works and looks exactly like a regular conversion.
You can handle the adjustability of the neck by slotting the hole in the neck for the rod and leaving the cross-dowel/coordinator rod floating or by notching the end of the dowel stick where it passes thru the square mortise, so that the entire dowel moves up and down a little (only need about a .060" notch if you do this. I don't like this since it moves the dowel from its original position during adjustment, and with a Vega pot there isn't a lot of room below the stick to move it before the brace looks out of position.
Pictures of the three different types are shown below. I prefer the third method, with the free-floating rod and neck brace. The only way to distinguish if from a conventional dowel stick is the use of a drilled acorn nut for a tailpiece hanger. If I had a lathe I could easily make a ball mount which would make it indistinguishable from a conventional dowel conversion. The Tubaphone pictured has been assembled and at tension for over 6 months with no change in stability. I was concerned about the effect of the compression on the cross-pin hole, so far that is a non-issue.
Gerry
Todd Treadway - Posted - 09/21/2013: 08:19:38
Nice looking work from both of you, Gerry and Ken! Rudy, I'm not sure what the additional information is since I last studied that page (maybe nothing, 'cause it wasn't long ago). But I do have a question: How the heck do you drill a hole through the length of the dowel stick?!
Stop banging your head on the wall, Rudy! That was an attempt at humor, even though I once asked it for real, and you graciously directed me to the Bluestem page...
Here's my actual question: Did you arrive at the conclusion to flare the dowel stick as a result of problems or failures with a standard-shaped stick, or was it more of an intuitive, common-sense thing? I used the "Rudy Rod" method for the two banjos I've made, but opted for a straight tapered stick for a more standard appearance. Worked wonderfully, with no issues at all so far, but might I be in for trouble down the road?
rudy - Posted - 09/21/2013: 08:51:15
quote:
Originally posted by Todd Treadway
Nice looking work from both of you, Gerry and Ken! Rudy, I'm not sure what the additional information is since I last studied that page (maybe nothing, 'cause it wasn't long ago). But I do have a question: How the heck do you drill a hole through the length of the dowel stick?!
Stop banging your head on the wall, Rudy! That was an attempt at humor, even though I once asked it for real, and you graciously directed me to the Bluestem page...
Here's my actual question: Did you arrive at the conclusion to flare the dowel stick as a result of problems or failures with a standard-shaped stick, or was it more of an intuitive, common-sense thing? I used the "Rudy Rod" method for the two banjos I've made, but opted for a straight tapered stick for a more standard appearance. Worked wonderfully, with no issues at all so far, but might I be in for trouble down the road?
Hi Todd, I can assure you that you are NOT the only person to have asked me that question...
Don't sweat your channel dowel configuration, yours will work fine and if you ever decide to beef it up in the future it's a simple as pulling the neck off and substituting a differently profiled channeled dowel stick.
The flair (as shown) is offered as a way to demonstrate that the basic system is very flexible and can be modified or altered in many ways to adapt the basic premise for a particular usage or design. The bottom line is to add a bit more surface area for the heel end of the channeled dowel to minimize flexing of the heel to rim connection point. My current "state of the art" dowel is square and tapers from 1" to 3/4" at the end:
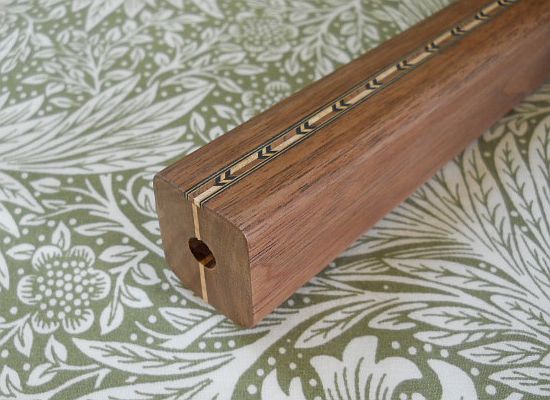
The actual form and bearing surface area of the dowel needs to be based on the relative rigidity of the rim. A 3/4" block constructed rim works fine with a dowel stick of 3/4" diameter due to the rim's rigidity, but if you are working with thin wall rims (as I have been lately) you need a bit more area for the rim wall to seat against.
Always consider what you're doing here is basically trapping the rim wall between the neck heel and dowel stick end with the force exerted by the all thread rod. The channeled dowel stick will then prevent the neck from flexing in any direction because it is locked to the rim at the tailpiece end.
Edited by - rudy on 09/21/2013 08:56:32
Todd Treadway - Posted - 09/21/2013: 09:21:07
quote:
Originally posted by rudy
Don't sweat your channel dowel configuration, yours will work fine and if you ever decide to beef it up in the future it's a simple as pulling the neck off and substituting a differently profiled channeled dowel stick.
Whew! Good! And of course, you're right about substituting a new dowel stick if I wanted to -- they're pretty easy to make. Another advantage to this system!
Edited by - Todd Treadway on 09/21/2013 09:22:53
BanjoBach - Posted - 09/23/2013: 20:11:13
Rudy, thanks once again for sharing your well thoughtout idea, this time for a dowel stick attachment. This has brought forth a number of other interesting posts, such as grm405's heel drilling jig to name only one.
rudy - Posted - 10/01/2013: 03:09:00
quote:
Originally posted by grm405
Ken, I have mounted the dowel 3 ways on conversions/neck resets.One is to use a fitted wood washer behind the dowel covering the square hole. Works, but I don't like the looks.
The second is to cover the hole with a fitted .065" thick brass plate. Works and doesn't look too bad, but not like a regular dowel stick.
Third, the one I like is to use a standard Vega neck brace. The dowel runs thru the hole but is cut just short of the heel (outside of the rim}. The the brace is installed and handles the compression of the rod. This requires you offset the rod hole to one side of the hollow dowel, to make room for the cross-pin of the neck brace. This works and looks exactly like a regular conversion.
You can handle the adjustability of the neck by slotting the hole in the neck for the rod and leaving the cross-dowel/coordinator rod floating or by notching the end of the dowel stick where it passes thru the square mortise, so that the entire dowel moves up and down a little (only need about a .060" notch if you do this. I don't like this since it moves the dowel from its original position during adjustment, and with a Vega pot there isn't a lot of room below the stick to move it before the brace looks out of position.
Pictures of the three different types are shown below. I prefer the third method, with the free-floating rod and neck brace. The only way to distinguish if from a conventional dowel stick is the use of a drilled acorn nut for a tailpiece hanger. If I had a lathe I could easily make a ball mount which would make it indistinguishable from a conventional dowel conversion. The Tubaphone pictured has been assembled and at tension for over 6 months with no change in stability. I was concerned about the effect of the compression on the cross-pin hole, so far that is a non-issue.
Gerry
Thanks for the pics, Gerry.
I've got a Vega #7 to do a conversion neck for; I'll most likely make a new plate that resembles the original to cover the 3/4" square hole and serve as the "washer" for the channeled dowel method of attachment.
I believe I can re-use the original brace yolk so it will look original and I'll be able to do the conversion in a way that doesn't alter the pot. I want to make sure the original neck can be replaced in the future if desired.
grm405 - Posted - 10/01/2013: 07:40:59
Rudy,
The only change I make to the pot is drilling out the tailpiece hole from roughly 7/32" to 17/64" so I can get the 1/4" rod thru there. You have to do this in any conversion using a 1/4" rod, including the way you want to.
This hole is totally hidden by the tailpiece hanger and I could convert back invisibly. Keep in mind that the Vega dowel is mortised into a square recess in the rim about 1/8" deep, so that the only purpose of that hole is to put the screw into the dowel end in there. The dowel itself it held securely in position by the mortise. If you plug the heel hole you will find that you cannot get the dowel into the pot as it will be too long when the extra length necessary to reach the back of the mortise is added. You have to insert it thru the large square hole and then slide in the "washer". That was my first conversion attempt using a wooden washer.
I have used 4 different methods for conversions. The one which works the best (on the Tubaphone) is the complete replacement dowel, with the tension on the rod carried by the neck brace. This banjo has been assembled and used for 6 months with no sign of any loosening or change due to elongation of the neck brace pin hole. If it ever does elongate I will drill it out and insert a small brass tube to spread the force over a larger area.
The only change I will make when I convert another banjo is to keep the dowel full length, ie. flush with the outside of the rim or just a few thousands shy instead of cutting it about 1/16" short. This would limit any future rim distortion to a few thousands of an inch. So far I have seen none with my current conversion, but I would rather be safe.
Gerry
rudy - Posted - 10/01/2013: 08:32:09
Thanks Gerry. I knew I'd have to drill the tailpiece hole out, but that won't affect returning the original neck should the owner want to do so in the future. Thanks for the additional info, it will come in handy when this gets worked on over the winter.
Helix - Posted - 10/01/2013: 10:03:02
Thank yu rudy, very nice work.
Does the all-thread make a difference in the sound of the bnjo?
rudy - Posted - 10/01/2013: 13:30:19
quote:
Originally posted by Helix
Thank yu rudy, very nice work.
Does the all-thread make a difference in the sound of the bnjo?
Not that I can hear.
Mike D. - Posted - 10/04/2013: 12:03:45
Rudy, how does your attachment system account for the slight clockwise rotation of the neck? Do you drill the hole for the threaded rod at an angle or is it so slight that it doesn't matter?
rudy - Posted - 10/04/2013: 13:04:14
quote:
Originally posted by Mike D.
Rudy, how does your attachment system account for the slight clockwise rotation of the neck? Do you drill the hole for the threaded rod at an angle or is it so slight that it doesn't matter?
Hi Mike,
The amount of angular deviation at the heel from neck "rotation" on the heel axis is so small that there's no effect on the connecting system. The neck, rim, and channeled dowel are drawn tightly together when the acorn nut is tightened and the minimal amount of clearance from the drilled holes ensures that there's enough wiggle room.
Terms of Use | Privacy Policy | Privacy Consent (EU/GDPR Only)
Copyright 2026 Banjo Hangout. All Rights Reserved.