DVD-quality lessons (including tabs/sheet music) available for immediate viewing on any device.
Take your playing to the next level with the help of a local or online banjo teacher.
Weekly newsletter includes free lessons, favorite member content, banjo news and more.
Premier Sponsors


|
Please note this is an archived topic, so it is locked and unable to be replied to. You may, however, start a new topic and refer to this topic with a link: http://www.banjohangout.org/archive/264486
d13design - Posted - 06/10/2013: 03:17:41
Hi All.
I've finally (after what feels like an eternity) finished the shaping of my first rim - a block construction rim with 11" outer diameter and a planned thickness of 3/4" - and am ready to embark on shaping the inside next.
The outside of the rim now shaped - finally
This is currently all done by hand using rasps, planes and sandpaper so it's not a quick process but I was hoping for some advice for the shape of the top of the rim as I can't afford a tone ring given this is my first foray into the world of banjo making. Do any of the examples below look preferable?
Thanks for your help.
Dave.

rudy - Posted - 06/10/2013: 04:22:18
1 & 2 will both experience unwanted rattles and buzzing from the flat area between the top of rim and the head surface.
3 has too abrupt of a edge for the head to be pulled down over, you'll end up "kinking" the head and/or breaking the edge of the rim, since it's only wood.
4's yer man...
d13design - Posted - 06/10/2013: 05:26:30
Thanks chaps - I knew I could count on the BHO.
#4 it is - here's to another 15 hours with the rasp :-(
Dave.
Fathand - Posted - 06/10/2013: 06:44:26
A 1/4" round brass rod bent into a hoop of 11", the size of your rim can make a pretty decent sounding tone ring (hoop). It just sits on top of a rim like picture #1.
I bought a 3ft piece of this rod in a Hardware store for about $9.00 Canadian. I later bought a 6 ft piece in a Metal Market for $6.00 so the material is not expensive. Since you probably do not have a metal roller, you could start the rolling process by wrapping it around your rim then hand bend to finish it.
quote:
Originally posted by d13design
Hi All.
I can't afford a tone ring given this is my first foray into the world of banjo making. Do any of the examples below look preferable?Dave.
Shawn Hoover - Posted - 06/10/2013: 07:29:00
Nice job on the outside. Now, if I was faced with a schedule of 15 hours for the inside, I would be looking for other means to shorten it. The best thing would be bandsawing close to the line, but it's too late for that. Perhaps a rotary rasp at this point, or attack it with the coarse rasp as fast as you can and finish with a drum sander in the drill press?
Dan Drabek - Posted - 06/10/2013: 07:42:04
Shouldn't take more than 20 minutes with a vise, and a 10" half round rasp and file. Pencil in a line to work to on the inside, and rasp diagonally from the inside out, turning the rim as you go.
DD
Or, you could just do it with a router.
Edited by - Dan Drabek on 06/10/2013 07:45:01
d13design - Posted - 06/10/2013: 08:17:42
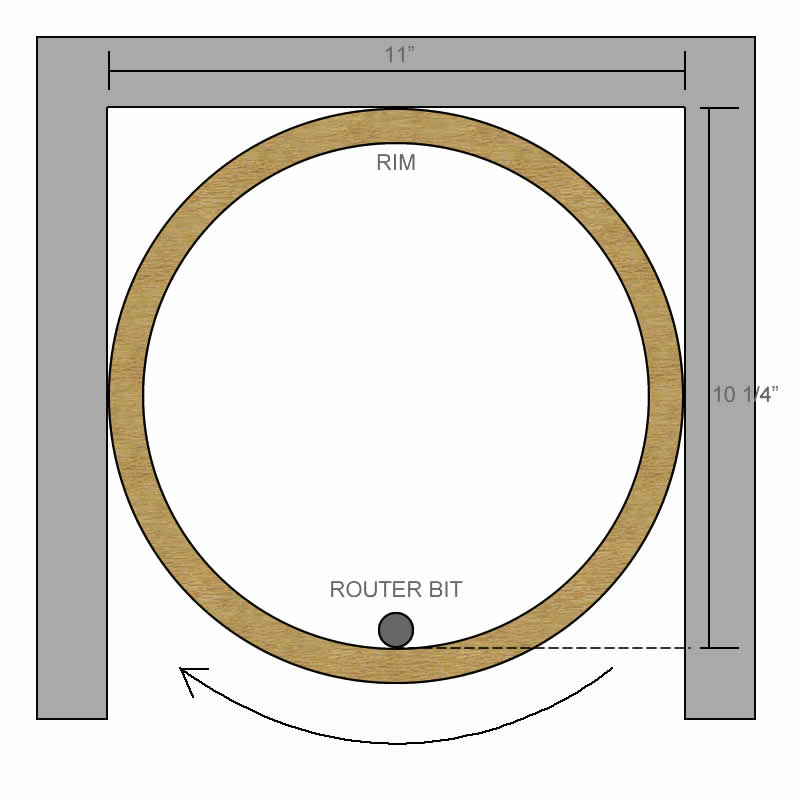
I'm not looking forward to doing it by hand - maybe it's my rasp technique? I have a handheld router which I suspect can be bolted to a workbench:
diy.com/nav/fix/power-tools/gr...=12910139
Do you think a setup like this (diagram attached) might get some results? I've spent so long shaping the outside I'd be devastated if I messed things up this late in the game ;-)
Dave.
 |
davidppp - Posted - 06/10/2013: 08:36:53
#4 for sure -- but seriously consider the 1/4" bent brass rod on top of #1, though tone is, of course, always a matter of taste. I've brazed mine, but solder should do or even just brass end-to-end. If you cut the length so that its outer edge sits just above the outer edge of the rim, the head tension will likely hold the rod ends snug up against each other.
Dan Drabek - Posted - 06/10/2013: 10:23:49
quote:
Originally posted by d13design
Do you think a setup like this (diagram attached) might get some results? I've spent so long shaping the outside I'd be devastated if I messed things up this late in the game ;-)
It will work, but try it with just two boards in the shape of a "V" rather than three boards in the shape of a "U". Go slowly, make several passes, taking off just a little wood with each pass. Creep-up on the final cut.
And, of course, the accuracy of the cut will only be as good as the accuracy of the outside of your rim.
I know what you mean about messing up. When making a guitar or banjo, there's always about a half dozen times when I really hope I don't slip. If you're careful and take your time, you won't. (except when engraving pearl ![]() )
)
DD
Helix - Posted - 06/10/2013: 12:13:00
Wait, maybe it's 15 hours, maybe less, but Nothing will replace the time and experience of this artist doing his /her own rim by hand. Nothing takes the place of that. No machine, no process, so enjoy the hard work while you can, there is something that the builder transfers to the material. Your thoughts are in your hands, same blood.
Messing things up late in the game, or building from crisis to crisis, when it wasn't like that 3 seconds ago, is not worth it to me. I use jigs all the time, but my rasps give me a feel for each piece of wood that it is my privilege to work with.
Take your time and enjoy the trip along the way, these days won't come again.
Shawn Hoover - Posted - 06/10/2013: 12:52:27
I didn't want to say router because I haven't tried it on a rim, but I've heard it's done. Like Dan said, light passes. If you don't have a proper router table, make sure that thing is mounted very securely.
Good question about rasp technique. If you feel like you can bear down on it and it's not removing material, could it be the rasp is dull, too fine of a cut, or just not a good rasp?
rudy - Posted - 06/10/2013: 12:58:12
quote:
Originally posted by d13design
I'm not looking forward to doing it by hand - maybe it's my rasp technique? I have a handheld router which I suspect can be bolted to a workbench:
diy.com/nav/fix/power-tools/gr...=12910139
Do you think a setup like this (diagram attached) might get some results? I've spent so long shaping the outside I'd be devastated if I messed things up this late in the game ;-)
Dave.
Although you're guiding the rim, technically you're freehanding with a router bit without a guide bearing. I would STRONGLY recommend not doing it. You can figure out a way to use a block that will limit your depth of cut, but that's the only way I'd consider that type of setup. You can see a few examples of depth of cut limiting blocks in my photos here on the Hangout. I take it you don't have a drill press, or I'd suggest looking at the non-lathe alternatives on my website.
You could also use a 2" diameter 80 grit sanding drum in a hand-held electric drill to do it safely with minimal risk of doing anything irreversably damaging to your rim. You can achieve good results doing it by hand that way.
RBuddy - Posted - 06/10/2013: 19:04:22
Whenever you trap the wood between the router cutter and the "fence" on something other than a table saw with a straight fence you are opening yourself up for trouble. The wood can get caught and just take off, out of your hands and out of control, and be dangerous.
The relief angle down into the center of the rim from the outside edge of the rim doesn't have to be very dramatic to allow free vibration of the head without buzzing. A few, like 3 degrees, is probably adequate for that.
Roughing out that with a good file or rasp shouldn't take more than 10 minutes, sandpaper from their another 10 minutes to make it smooth and pretty.
If you are saddled with hand tools, and don't want to take the rasp/file route, I'd suggest using a scraper to form the angle down to the inside of the rim. Only has to be a few degrees. You can also use a wood scraper to form the basic radius the head will have to tighten over. The fine cut of scrapers doesn't react so badly to the change in direction of grain in a block rim. Sanding will be necessary to finish it up of course. But scrapers are efficient and controlled and you'll learn a lot about wood in using them. Just google wood scrapers, you will learn a lot and can make a good scraper easily. Even broken glass will do in a pinch as a scraper.
I see finishing up the inside of your rim as the biggest hurdle you have left if you expect to have what looks like a normal banjo on the inside. That's the tough job ahead without power tools. If that's where you are headed with "shaping the inside', I might go there next and worry about the head fit later.
RBuddy - Posted - 06/10/2013: 19:26:58
I should have said the outside looks GREAT, good going so far!
Brian
aeroweenie - Posted - 06/10/2013: 19:30:06
D13, I know where you're coming from, I've been shaping my rims by hand too. I like rasping, but it is too easy to go too deep, or worse, to tear the wood on the edge of the rim. Be very careful. It is the endless sanding that bugs me the most. Good luck!
d13design - Posted - 06/11/2013: 01:33:16
Wow - a treasure trove of advice and experience.
I think I've been warned off the router approach and I'll stick with doing it by hand for now, after all the time I've put in so far it would be good to finish it how I started (the neck was shaped by hand too, with a little bit of help from a jigsaw here and there).
You're right Rbuddy - it's the inner surface I'm about to tackle next and then I'll look at the profile for the tone ring. Tempted by hand rolling some brass as I can pick some up for about $8 that's long enough to do the trick - can you really bend this by hand without heating?
Thanks again.
Dave.
 Shaping the heel - second pass |  Smoothing the neck - starting to actually feel like an instrument! |
Dan Drabek - Posted - 06/11/2013: 15:54:08
I don't mean to beat a dead horse, and I would never encourage someone to do something on a power tool that they felt uncomfortable with. But just to clarify my suggestion, the picture shows the router set-up I was describing. (I don't have a spare rim blank, so I used a hose clamp to demonstrate)
Pressing the rim against the angled boards brings the workpiece into the cutter. Any errors in handling can only move the workpiece away from the cutting head. There is no fence/cutter to get trapped between, and no way to cut any deeper than the jig will allow. And if you take only shallow cuts on each spin of the rim, there will be no tendency for the cutter to grab and throw the workpiece. I've used this setup quite a few times with no bad experiences. I do have to flip the workpiece and make a cut on each side with something as deep as a banjo rim, and The finish is not perfect, but it allows me to rough-out the basic thickness, and I do final surface machining with a sanding drum chucked in a drill press, using the same two-board method.

Of course, the inside cut will only be as accurate as your outside surface, since that's what's riding on the jig.
That all said, what works for me may not necessarily work for you, and as with any woodworking machines, you must do what you feel comfortable with, and what you feel is safe. I don't usually use a blade guard on my table saw, but I would never recommend the practice to anyone else. It's a calculated risk I'm willing to take for what I believe are certain benefits. So far, I still have all my banjo playing fingers. ![]()
DD
davidppp - Posted - 06/11/2013: 16:54:11
1/4" brass rod can be bent by hand, but do it a little at a time as you try to get to a circle (if you don't have a rolling machine). Be wary of the ends. I.e., give yourself a bit extra at each end (the stock is cheap) to grab onto; it's close to impossible to get the right curve all the way to the end.
I once tried 3/8" and was ASTOUNDED by the difference. Even with the rolling machine (in a shop at work), I nearly broke my arm turning the crank.
mike gregory - Posted - 06/11/2013: 17:30:17
And now that it's waaaaayyyyyyy too late, I notice the topic, and would have gladly suggested a nice rectangular rim, with a soft drink bottle as the head.
So, the excellent picture by Mr. Dan Drabek shows a very good way NOT to mess up.
but, next time, save yourself a H![]() LL of a lot of time and effort, and just cobble up a Squared Eel.
LL of a lot of time and effort, and just cobble up a Squared Eel.
youtube.com/watch?v=_YTRzKr538Q
d13design - Posted - 06/20/2013: 08:51:32
I'm tempted by the hand-bent brass rod as I'm assuming it'll give the sound a bit of a boost? I'm not expecting too much in the way of tone from my first attempt but am I right in thinking that a simple tone ring would at least give me a head start?
Also, I know that, with the tension hoop alone, I need a head with a low collar, would the same be true if I were to raise things up a bit with a tone ring?
Thanks.
rudy - Posted - 06/20/2013: 09:14:58
quote:
Originally posted by d13design
I'm tempted by the hand-bent brass rod as I'm assuming it'll give the sound a bit of a boost? I'm not expecting too much in the way of tone from my first attempt but am I right in thinking that a simple tone ring would at least give me a head start?Also, I know that, with the tension hoop alone, I need a head with a low collar, would the same be true if I were to raise things up a bit with a tone ring?
Thanks.
If you are referring to the crown height of the head (low, medium, or high crown) when you say "low collar" be aware that the relationship of the tension band top and head surface does NOT change by what's underneath. That relationship will always stay the same when using the same crown height head on different styles of rim and tone rings.
Edited by - rudy on 06/20/2013 09:16:08
Terms of Use | Privacy Policy | Privacy Consent (EU/GDPR Only)
Copyright 2026 Banjo Hangout. All Rights Reserved.