DVD-quality lessons (including tabs/sheet music) available for immediate viewing on any device.
Take your playing to the next level with the help of a local or online banjo teacher.
Weekly newsletter includes free lessons, favorite member content, banjo news and more.
Premier Sponsors


|
Please note this is an archived topic, so it is locked and unable to be replied to. You may, however, start a new topic and refer to this topic with a link: http://www.banjohangout.org/archive/330189
rudy - Posted - 04/25/2017: 06:29:28
Edited by - rudy on 04/25/2017 13:01:34
Bart Veerman - Posted - 04/25/2017: 06:58:10
I've always wondered how "they" would make that overlap fit - thanks for killing the suspense 
Fabulous work!
rudy - Posted - 04/25/2017: 07:39:18
quote:
Originally posted by Bart VeermanI've always wondered how "they" would make that overlap fit - thanks for killing the suspense
Fabulous work!
Hi Bart,
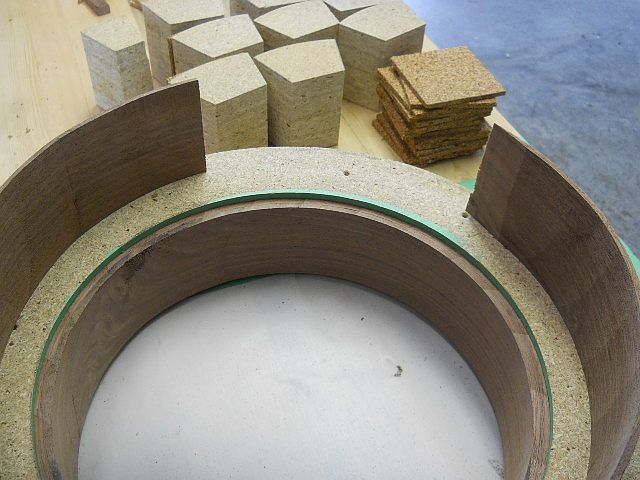
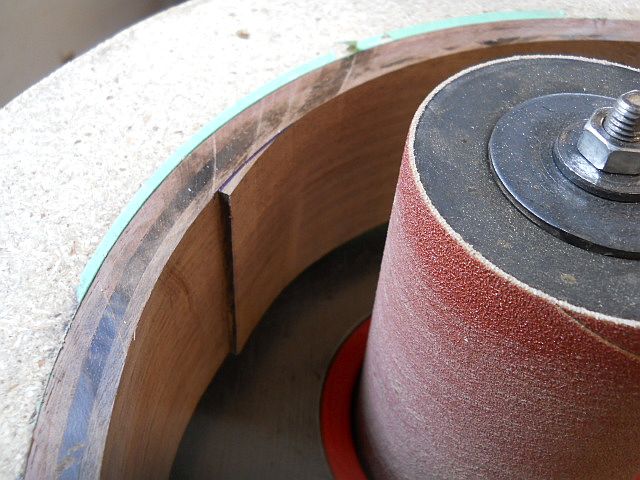
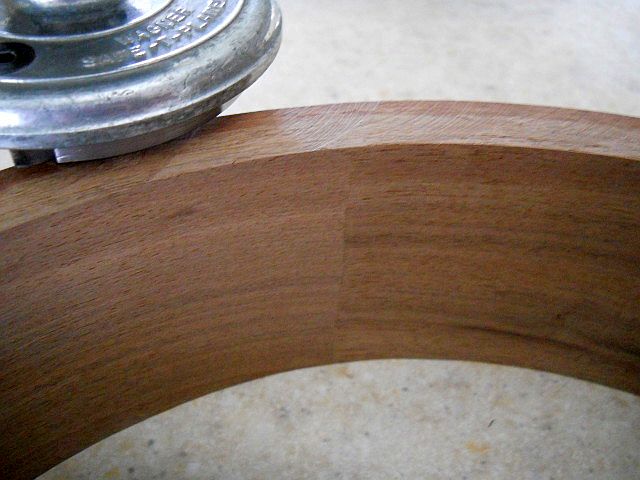
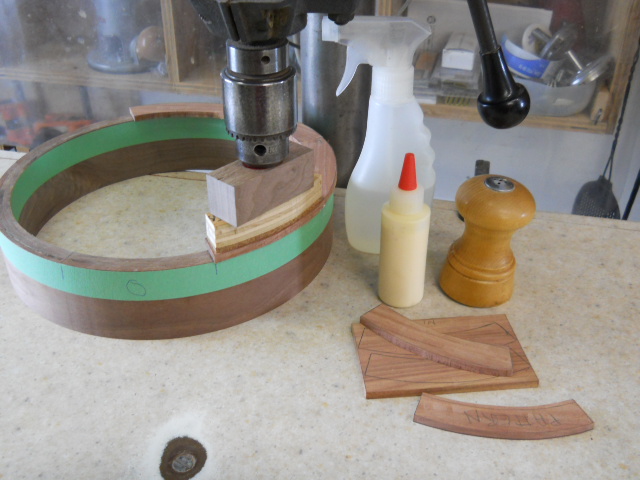
Most everyone pre-cuts the overlap to fit, but I've found this to be much easier. It wouldn't be able to be done with a typical 1/4" layer, but the .1" easily conforms to the starting ramped area.
The vertical oscillating spindle sander is just a great tool for this kind of thing. I sand the starting "ramp" with it, sand off the overhang after each layer is added, and do a quick cleanup of the inner wall to prepare for the next layer.
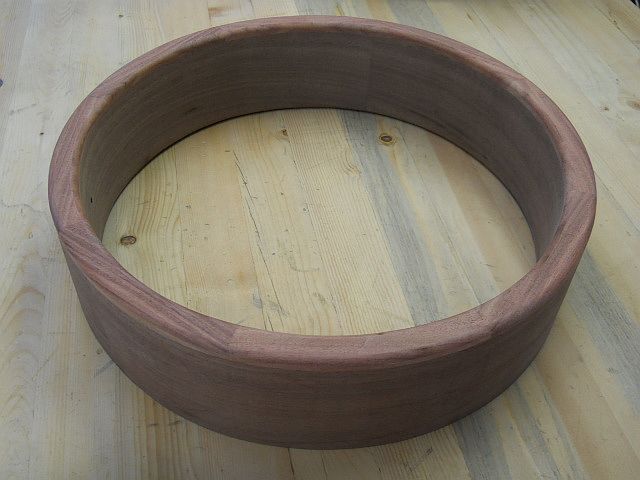
The rim shown here has 5 layers to produce a 1/2" wall rim, but it's obviously pretty easy to adjust to suit your preference.
Dan Drabek - Posted - 04/25/2017: 08:46:50
A beautifully simple, clean, neat and efficient system, Rudy. Something about it is very of Zen.
I'm not quite sure that I'm seeing the sheet metal backstrap, and how it functions.
The results are beautiful. Which of course is what really counts. But your process appears to be smooth sailing and enjoyable, which is equally important.
DD
Zachary Hoyt - Posted - 04/25/2017: 09:47:49
It looks like a very good system. I'd like to give it a try but I may not have time until the fall or winter. I think it would also be a good way to build soundwells for resonator guitars, which I have previously done on a hot pipe but not with such nice results. Thank you for posting this.
Zach
rudy - Posted - 04/25/2017: 13:28:04
quote:
Originally posted by Dan DrabekA beautifully simple, clean, neat and efficient system, Rudy. Something about it is very of Zen.
I'm not quite sure that I'm seeing the sheet metal backstrap, and how it functions.
The results are beautiful. Which of course is what really counts. But your process appears to be smooth sailing and enjoyable, which is equally important.
DD
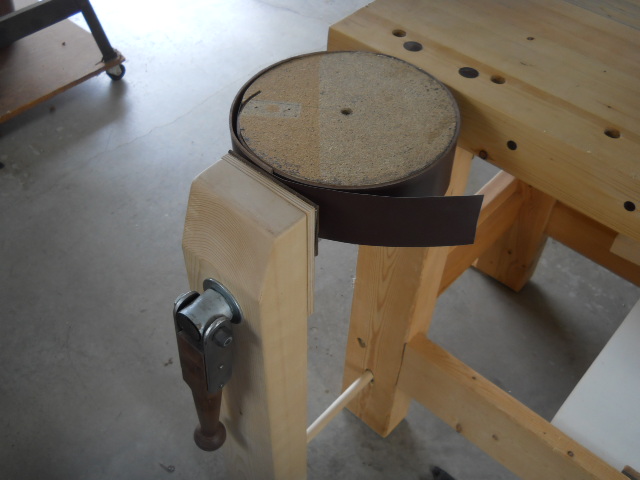
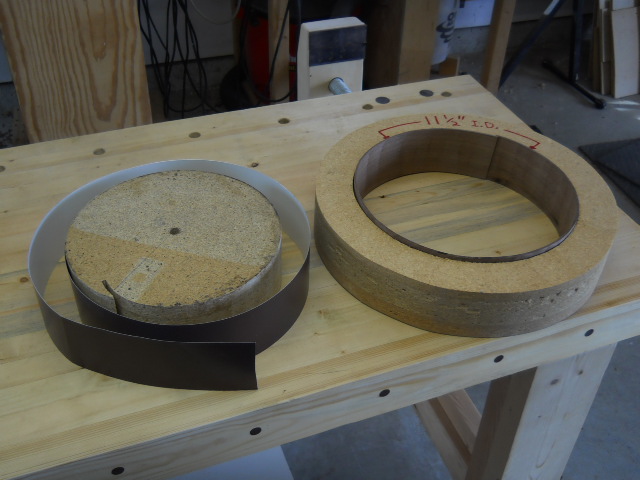
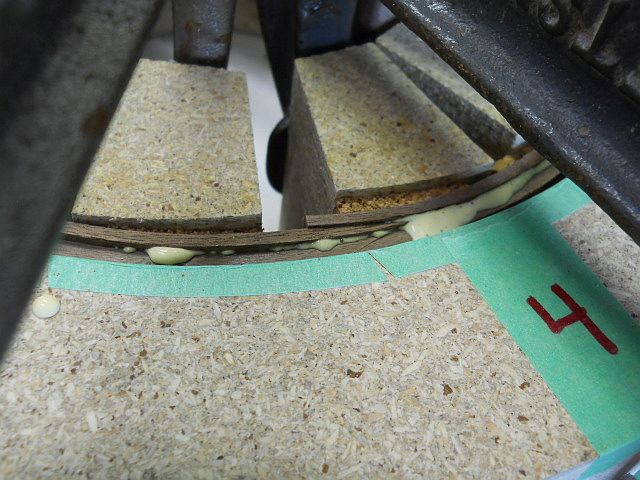
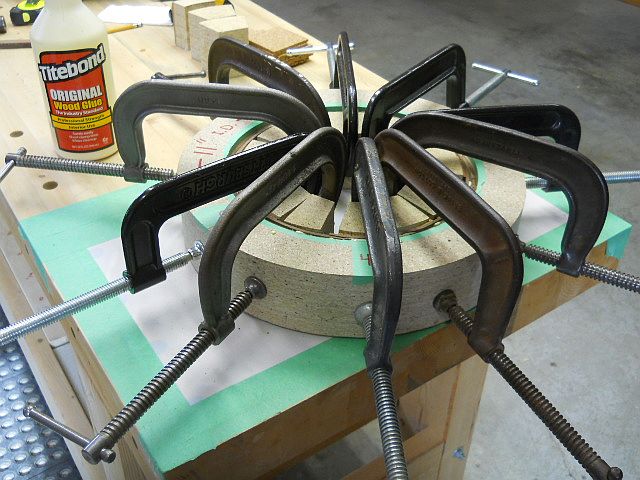
Dan, The backstrap can be seen attached to the rolling form shown on the left side of photo #3.
It's simply a length of aluminum roll flashing cut to 3" wide and attached about 4" behind the "tuck cut" of the rolling form. A lamination is formed by pulling it out of the steam box, tucking the end into the "tuck cut", placing against the bench and rolling it up. The backstrap serves as an additional surface that helps bend the lamination by adding support to the outside of the bend. I attached it using a couple of 2" drywal screws so the flat heads wouldn't dent the laminations when they were rolled up.
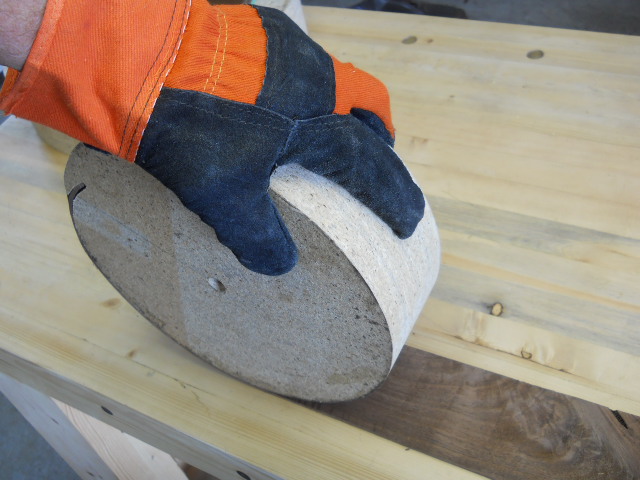
The first two photos show the rolling process in a bit more detail.
I'm totally into the Zen of creating in a slow and low effort way.
After you do a few rims like this it becomes almost enjoyable, which has never been the case for me in the past when doing laminated rims. I first realized the ease of working thinner layers when bending them over the outer diameter of an internal form. I like that process very much, but the external form as shown here has the added advantage of the rim being formed to the perfect diameter needed to match the head size that is being used.
The external form eliminates all that cipherin' which tends to make my brain hurt. 
Dan Drabek - Posted - 04/25/2017: 15:22:18
One sometimes sees the steamed rim construction as illustrated in vintage photos from the '60's and 70's where there is pictured a team of sweaty guys wrestling with crank handles and heavy machines to force quarter inch plies into place with brute force and fierce determination. No wonder beginning banjo makers are scared away from the rim making process. I know I was until the idea of block rims came along. I eventually make my first bent rim using ( not surprisingly) .10" thick plies, and it wasn't so intimidating any more. I do see that you have gone to an outside mold on this one, as Ken LeVan has recommended in the past, and I believe is definitely the best way to go. The outside dimension is the critical one, and with the outside mold, it becomes almost automatic.
I've personally settled on the combination of a block rim with inside and outside steam bent laminations, but I don't believe it's superior in any way to the fully laminated rim in either sound or strength. But I'm still experimenting.
Your method is much more approachable for someone attempting their first banjo and I think you've once again done a service to the home craftsman by eliminating some of the voodoo from the process, as well as boiling it down to the fewest possible steps. And, of course, eliminating the need for a large lathe, or a specialized rim-turning assembly.
DD
rudy - Posted - 04/27/2017: 17:40:29
quote:
Originally posted by Dan DrabekOne sometimes sees the steamed rim construction as illustrated in vintage photos from the '60's and 70's where there is pictured a team of sweaty guys wrestling with crank handles and heavy machines to force quarter inch plies into place with brute force and fierce determination. No wonder beginning banjo makers are scared away from the rim making process. I know I was until the idea of block rims came along. I eventually make my first bent rim using ( not surprisingly) .10" thick plies, and it wasn't so intimidating any more. I do see that you have gone to an outside mold on this one, as Ken LeVan has recommended in the past, and I believe is definitely the best way to go. The outside dimension is the critical one, and with the outside mold, it becomes almost automatic.
I've personally settled on the combination of a block rim with inside and outside steam bent laminations, but I don't believe it's superior in any way to the fully laminated rim in either sound or strength. But I'm still experimenting.
Your method is much more approachable for someone attempting their first banjo and I think you've once again done a service to the home craftsman by eliminating some of the voodoo from the process, as well as boiling it down to the fewest possible steps. And, of course, eliminating the need for a large lathe, or a specialized rim-turning assembly.
DD
Hi Dan,
I refer to that method of construction as a combination rim, and I do really like it. Although it (for me) is more time consuming, it produces a VERY strong rim. I've stated in the past that I'd have no problem driving a truck over a combo rim.
The block center lets you add highly figured outer and inner layers, inlay banding, add decorative wedges over lamination joints, and all kinds of other fun banjo rim making bling.

The banjos you have been featuring lately certainly speak of your attention to detail and great workmanship.
Edited by - rudy on 04/27/2017 17:46:42
Dan Drabek - Posted - 04/27/2017: 19:35:50
quote:
Originally posted by rudy
Hi Dan,I refer to that method of construction as a combination rim, and I do really like it. Although it (for me) is more time consuming, it produces a VERY strong rim. I've stated in the past that I'd have no problem driving a truck over a combo rim.
The block center lets you add highly figured outer and inner layers, inlay banding, add decorative wedges over lamination joints, and all kinds of other fun banjo rim making bling.
Rudy, thanks for your kind word. And yes, those are the two reasons why I've come to prefer it. With 1/10" inner and outer plies, it's not only decorative with the use of fancy wood, but it greatly reinforces the block rim joints. With typical block rim construction, each joint is covered on two sides with either adjacent blocks, or rim cap. By adding an inner and outer lamination, it creates reinforcement on all four sides of each block. Every glue joint is battened with an overlay. I don't know if it is equally strong as a straight multi-ply construction, but it is certainly strong enough. And I think it may be stiffer and less subject to distortion. But that's just speculation on my part. Of course, it does add a significant amount of glued surface to the rim, but I personally am not convinced that glue joints degrade the sound.
DD
Zachary Hoyt - Posted - 04/30/2017: 12:07:51
Rudy, I've been thinking about your rim building idea, and I realized there's one part I don't understand. How do you prepare the strips of wood to be steamed? I have read (and also found from experience) that when I am bending on a hot pipe I need to either sand the wood smooth or run it through the planer, because if there are any scratches across the grain it is more likely to break at those lines. Where the strips for your rim are to be steamed and then glued together would it be better to leave the surface a bit scuffed to give the glue a better bond, or does the moisture from the steam raise the grain enough so it holds? Thank you for posting all of these great ideas, I've learned about a lot of new methods and ways of doing things from reading your threads.
Zach
rudy - Posted - 04/30/2017: 15:19:15
Hi Zach,
I start with a piece of lumber somewhere around 48" long by 3" wide and whatever thickness I happen to have on hand. I take a light planing cut with the Wagner Safe-T-Planer then slice off a slightly thick lamination layer with the band saw. I re-plane the board to true up the band saw cut and repeat the re-saw operation until I have as many laminations as I need. All the laminations are then surfaced with the Safe-T-Planer to smooth out the remaining band sawn side of each lamination, and reducing it to the .1" that I'm going to use for the rim layers. The other VITAL function that the planer performs is creating a very flat and true surface. If a standard "table-top" planer is used and it happens to cut at a slight angle due to the table and cutter head not being parallel then a lamination will quickly spiral out of alignment when it's glued and clamped. It doesn't hurt to verify your lamination side-to-side thickness with a micrometer or digital vernier caliper.
I have a pretty good technique for using the Safe-T-Planer that leaves behind a level surface with light swirl marks on the surface. The marks are more cosmetic than texture, so they don't really need any further work before a quick steam and bending them in preparation for use. If you look very carefully at the photos you'll see the results of the planed surface.
Glue doesn't need any tooth added to the surface for proper adhesion, in fact that's generally considered less desirable for a sound structural joint.
The Wagner is a great tool, but the secret to it's success is keeping the cutters sharp and using good planing technique. Some of the laminations I'm using have some rather wild grain (again, visible if you look closely...) and the Safe-T-Planer makes it very easy to use this wood without a lot of worry about what it would look like running it through a conventional planer.
Here's a quick video of the planer being used to true up the band sawn surface before the next lamination is sliced off.
Edited by - rudy on 04/30/2017 15:27:15
Dan Drabek - Posted - 04/30/2017: 18:00:16
I think the only time you need "tooth" for a glue joint is if your joint isn't very tight, and you are using a gap fulling glue--like epoxy. Otherwise, a tight joint should be smooth-surfaced.
That said, back in the day when hot hide glue was de rigueur, it was common to use a special "toothing plane" to roughen the surface of glued joints. Ass far as I know, hide glue is not a good gap filler, so I don't see the logic, but the practice was common. The procedure may have had a valid reason, or may have simply been a commonly passed-on fallacy. In any case, with modern glues, smooth is the way to go, as the glue seeps in to millions of microscopic pores--which give the joint it's strength.
DD
Zachary Hoyt - Posted - 04/30/2017: 18:18:33
Thank you both for your explanations. I normally run things like guitar sides and backs through the thickness planer before bending them, both to get them smooth and uniform. My little planer is a middle-aged DeWalt 733 and last time I had it apart to work on it I got it so that the thickness is uniform from side to side within .005 or less, as long as the board I am using for a sled is also uniform. I think the drill press planer would make a good surface for gluing, I'll have to get mine set up for that. The thickness planer will make an extremely smooth surface on straight grained wood, or when it is planing downhill, but then I sometimes get rough patches if it's going up the grain and tears out. I have read different things about surfaces for gluing and am not sure what to think myself, so I appreciate your advice to make it smooth. When I make block rims I glue the end grain of the blocks right as they come off the saw, which is straight but not perfectly smooth, and then the top and bottom of the rings get sanded with a 50 grit belt, so again they're flat but have quite visible scratches.
Zach
blm10jn - Posted - 05/01/2017: 05:01:49
I run all my strips through a thickness sander. Seems to work the best for me. I was using a Delta 18" drum sander but now I also have a 15 " Grizzly wide belt sander. Either one works well. The advantage with the Grizzly is ease of changing grit.
Zachary Hoyt - Posted - 05/05/2017: 06:20:56
I've been hoping to acquire a thickness sander at some point, they look very handy. It seems like they would make a really good surface and I have a lot of trouble with tearout on things like curly maple. Do you have a preference between a wide-belt sander or a drum sander?
Zach
Ken LeVan - Posted - 05/18/2017: 16:45:56
quote:
Originally posted by rudy
quote:
Originally posted by Bart VeermanI've always wondered how "they" would make that overlap fit - thanks for killing the suspense
Fabulous work!
Hi Bart,
Most everyone pre-cuts the overlap to fit, but I've found this to be much easier. It wouldn't be able to be done with a typical 1/4" layer, but the .1" easily conforms to the starting ramped area.
The vertical oscillating spindle sander is just a great tool for this kind of thing. I sand the starting "ramp" with it, sand off the overhang after each layer is added, and do a quick cleanup of the inner wall to prepare for the next layer.
The rim shown here has 5 layers to produce a 1/2" wall rim, but it's obviously pretty easy to adjust to suit your preference.
Rudy,
After all I've said about butt joints, I have to say that I havenow started using scarf joints for the outer and inner plies on the grounds that it looks neater and probably has other advantages - I position them opposite one another. I still use butt joints for the inner ply or plies.
I find it's not too hard to do if you measure correctly. In fact, the tapered end is really flexible and goes into the mold much easier than a full-thickness straight cut-off. I had a little learning curve figuring out how much longer to make the slats
Thanks for posting this thread- it's hard to give up old habits.
Ken
rudy - Posted - 05/18/2017: 17:26:10
quote:
Originally posted by Ken LeVanquote:
Originally posted by rudy
quote:
Originally posted by Bart VeermanI've always wondered how "they" would make that overlap fit - thanks for killing the suspense
Fabulous work!
Hi Bart,
Most everyone pre-cuts the overlap to fit, but I've found this to be much easier. It wouldn't be able to be done with a typical 1/4" layer, but the .1" easily conforms to the starting ramped area.
The vertical oscillating spindle sander is just a great tool for this kind of thing. I sand the starting "ramp" with it, sand off the overhang after each layer is added, and do a quick cleanup of the inner wall to prepare for the next layer.
The rim shown here has 5 layers to produce a 1/2" wall rim, but it's obviously pretty easy to adjust to suit your preference.
Rudy,
After all I've said about butt joints, I have to say that I have now started using scarf joints for the outer and inner plies on the grounds that it looks neater and probably has other advantages - I position them opposite one another. I still use butt joints for the inner ply or plies.
I find it's not too hard to do if you measure correctly. In fact, the tapered end is really flexible and goes into the mold much easier than a full-thickness straight cut-off. I had a little learning curve figuring out how much longer to make the slats
Thanks for posting this thread- it's hard to give up old habits.
Ken
You're entirely welcome, Ken.
We all learn from each other and I'm always happy to pass along something like this that I just think makes our banjo-making lives easier. (I'm ALL about easy...)
SHBosch - Posted - 05/18/2017: 20:15:27
Yup. Using a scarf joint really does make it easier to fit into a mold. I've used both butt and scarf joints and find the most difficult part of the wood to bend neatly and evenly when using butt joins is the 2" to 3" either side of the butt join. That area on a scarf join is much more pliable.
Edited by - SHBosch on 05/18/2017 20:16:51
Terms of Use | Privacy Policy | Privacy Consent (EU/GDPR Only)
Copyright 2026 Banjo Hangout. All Rights Reserved.