
DVD-quality lessons (including tabs/sheet music) available for immediate viewing on any device.
Take your playing to the next level with the help of a local or online banjo teacher.
Weekly newsletter includes free lessons, favorite member content, banjo news and more.
Premier Sponsors


|
Please note this is an archived topic, so it is locked and unable to be replied to. You may, however, start a new topic and refer to this topic with a link: http://www.banjohangout.org/archive/320103
Leslie R - Posted - 06/30/2016: 14:11:30
I am thinking of making a notched tension hoop. It will be for a 12 inch rim, using brass.
This will be a first for me. To start, I would like to ask what type of brass to use, and how do you bend it uniformly.
Tom Berghan - Posted - 06/30/2016: 14:22:19
quote:
Originally posted by Leslie RI am thinking of making a notched tension hoop. It will be for a 12 inch rim, using brass.
This will be a first for me. To start, I would like to ask what type of brass to use, and how do you bend it uniformly.
I go to Bill Rickard' site and buy one!
store.rickardbanjos.com/12-inc...on-hoops/
Zachary Hoyt - Posted - 06/30/2016: 15:11:19
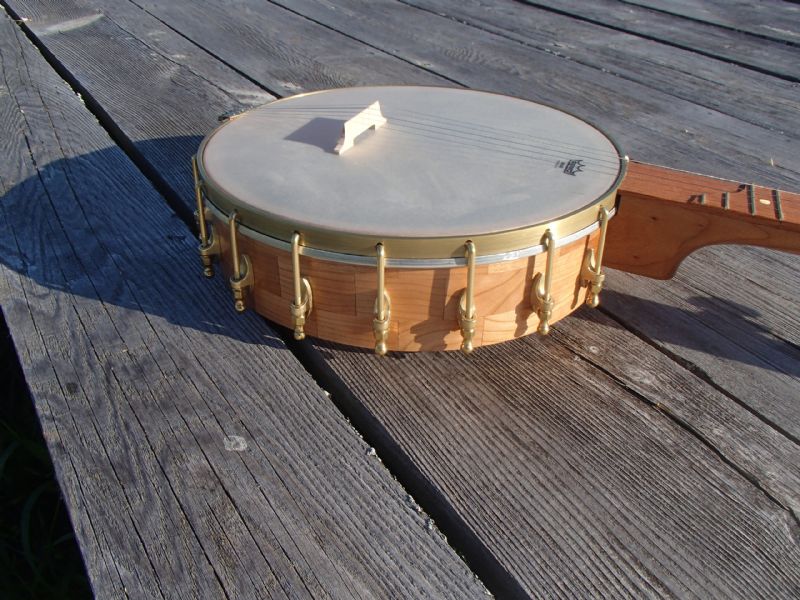
I use 360 brass from Speedy Metals and I bend it by hand, sometimes around a dowel held in a vise and sometimes in the air. I also have used 6061 aluminum.
Zach
 |
Leslie R - Posted - 06/30/2016: 15:25:01
quote:
Originally posted by Tom Berghan
quote:
Originally posted by Leslie RI am thinking of making a notched tension hoop. It will be for a 12 inch rim, using brass.
This will be a first for me. To start, I would like to ask what type of brass to use, and how do you bend it uniformly.
I go to Bill Rickard' site and buy one!
store.rickardbanjos.com/12-inc...on-hoops/
This is for a banjo with a wide heel.
Also, Thank You Zach.
jasper - Posted - 06/30/2016: 15:31:34
Buy a Ring Roller from Harbour Freight and learn to solder brass. It's fun, a little math for figuring out the notches for the pot size, a dremel tool and you're there!!
Dan Drabek - Posted - 06/30/2016: 16:00:14
How many $49 12" rings will you have to make to cover the cost of the ring roller, brazing torch, brass bar stock and your time at a nickel an hour?
These are American made, solid brass, and grooved to fit any number of brackets. If your fretboard is too wide, you can file the opening it to any size you like.
balsambanjoworks.com/product/t...-grooved/
Of course if you simply want the experience and pride of making your own--or plan to enter into mass production, then by all means, go for it.
DD
Leslie R - Posted - 06/30/2016: 16:21:25
I went to Rickard's sight and also to Balsam. They both have very fine products. Bill and I have been friends for several years. I would purchase one in a minute, but they do not carry what I'm looking for.
rudy - Posted - 06/30/2016: 16:28:27
Make it easy on yourself.
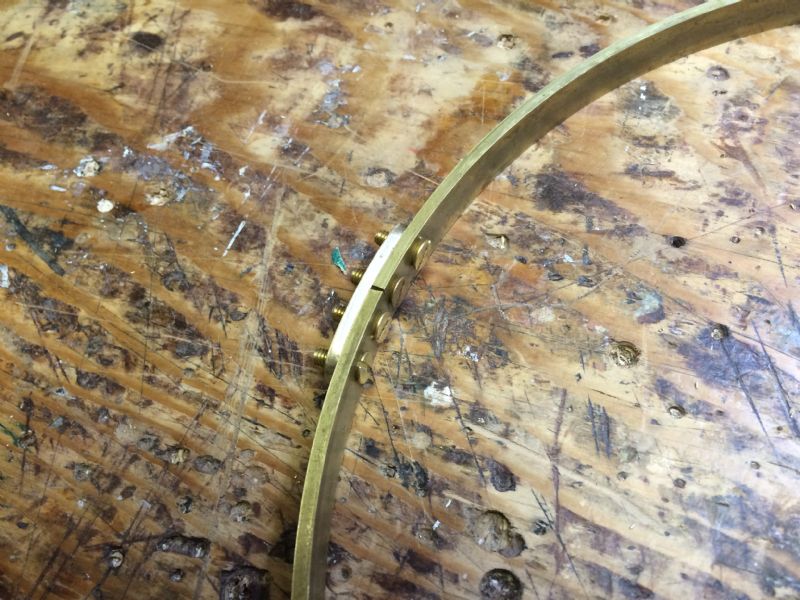
I've made dozens of very nice tension bands and I choose to join them with a short section of lapped brass by drilling and tapping the brass. It's incredibly easy, brazing comes with its own set of difficulties that there's no particular reason to put yourself through. I use 1/8" by 1/2" by 48" 360 brass and roll it with the ubiquitous Harbor Freight ring roller. Use 48" so you get nicely formed ends where they will be joined. Trying to use shorter stock will prove to be penny-wise and pound foolish.
Why 1/8"? Everybody else uses 3/16"...
I discovered long ago that 1/8" makes for a much more refined look for the tension band. Thicker 3/16" stock looks "industrial" and makes your banjo look more like a 4H project than the refined and beautiful instrument it should be.
Wrap your rolled ring around the rim, mark both ends where they overlap and cut off square adding 1/4" to add enough of a gap to accommodate the head thickness easily.

I pre-saw my notches with a band saw and true them up easily with a rough cut file. Part of the beauty of joining the band with screws, I can slip the tension band around my band saw blade and join it together with the screws to make the band saw notching quick and easy. Even if you want to cut the notches with a hacksaw it's really not that difficult.
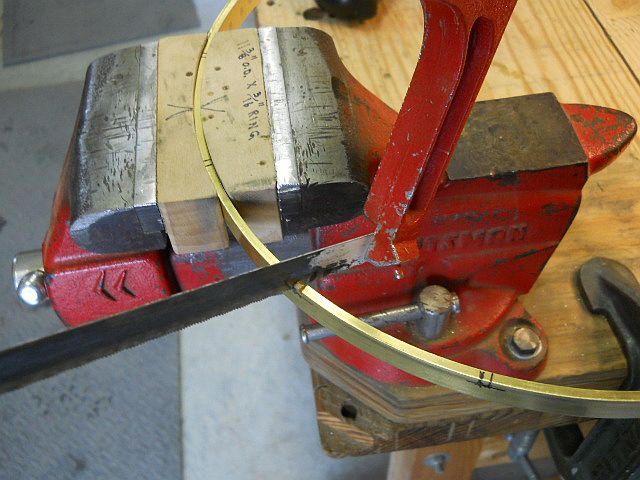
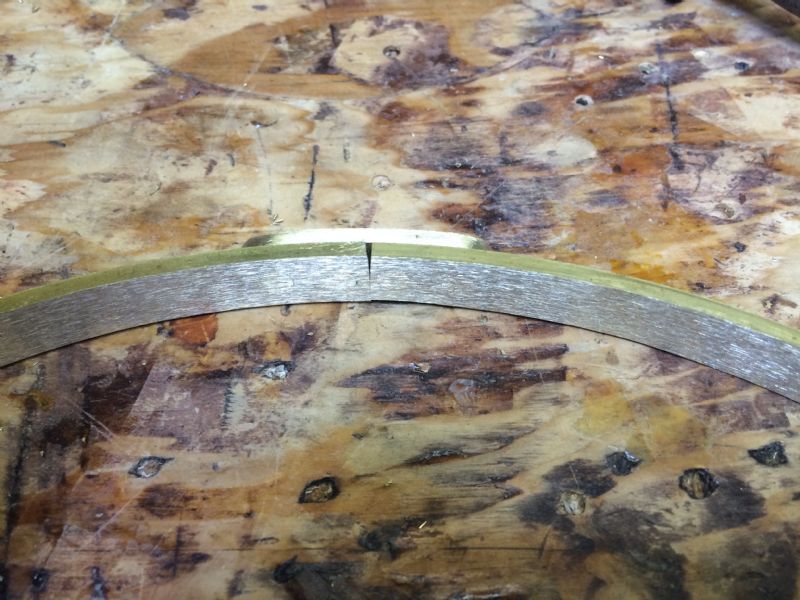
Cleaning up a notch with the rough cut file:
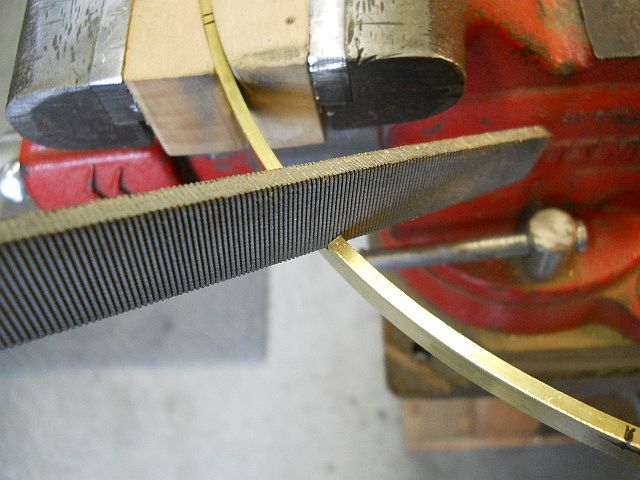
No need for a round bottom:
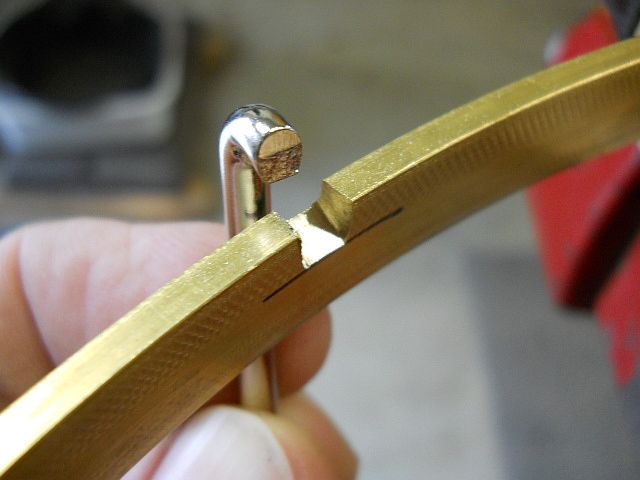
Polish the tension band and use chemical patina for a vintage look:
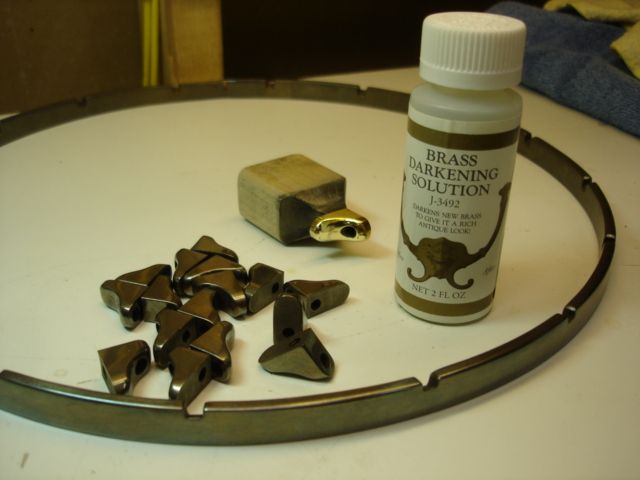
All of these photos (and a lot more) are from my home page photos here on the hangout. Please feel free to peruse them, as you'll pick up a lot of what I've learned over many years of making banjos. Most of the photos have captions; many have detailed explanations of what they represent.
Leslie R - Posted - 06/30/2016: 18:00:49
Rudy, that is first class. Just one question about the connection.
Does the connecting piece with the 4 screws get in the way of an adjustable tailpiece ?
Zachary Hoyt - Posted - 06/30/2016: 18:55:47
I use the Rudy method too, though mine are not as elegant as his. I had to buy a tap, at about $10, and the brass costs about $12-15 per hoop depending where you get it, including shipping. Then the screws cost another 50 cents or so per hoop. It takes me somewhere around 2 hours to go from unbent brass to completed hoop with either holes or notches, and I think that with practice I will be able to reduce that somewhat. I've only made 6 to date and have one more that I'll be finishing up next week. I used the Balsam hoop on a custom banjo before I began making my own and while it was nice I didn't like the way the hooks had to be tweaked so that they would look straight after tightening or the way the ends of the hooks stuck up above the top surface. These are both minor quibbles but I decided I'd rather learn to make my own and Rudy showed the way, as he so often does.
Zach
rudy - Posted - 06/30/2016: 19:24:43
quote:
Originally posted by Leslie RRudy, that is first class. Just one question about the connection.
Does the connecting piece with the 4 screws get in the way of an adjustable tailpiece ?
None that I've used, although I make my own fully adjustable tailpieces that accommodate loop or ball end steel or tied synthetic strings. You could use most any tailpiece, and I occasionally use something as simple as a no knot.
There's nothing that says the joint needs to be at the bottom center, and the lapped and screwed joint is attractive enough IMHO that you could face it to the side or position it under the armrest.
Zach's economics are true to form. In my case it's more like $3 for screws as I use stainless steel low profile button head screws that protrude minimally compared to a standard screw head. I just like the way they look.
I'm fortunate to have full sleeves of lots of taps in a all three configurations; taper. plug, and bottoming, so there's no cost associated with those. Paying myself a living wage I can still beat $49. (...and I ain't worth that!)
The Harbor Freight roller can be bought on sale for around $50 and if you amortize that cost out over the number of tension bands it can produce the economics aren't bad. If you're making a single instrument, not so much. Who can do that once you figure out you can have as many quality banjos as you want in virtually any configuration that you might want.
Edited by - rudy on 06/30/2016 19:38:26
rudy - Posted - 06/30/2016: 19:41:47
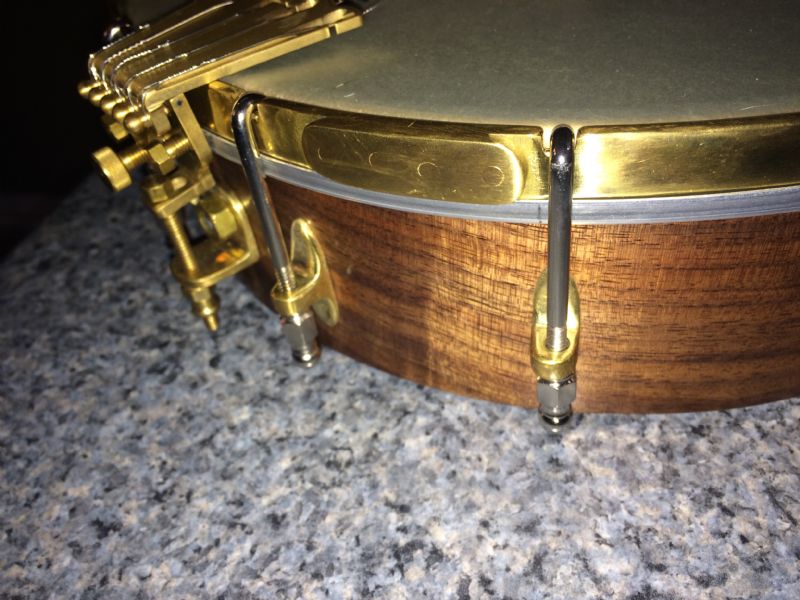
Here's an example to show how a tailpiece fits against the button head screws:
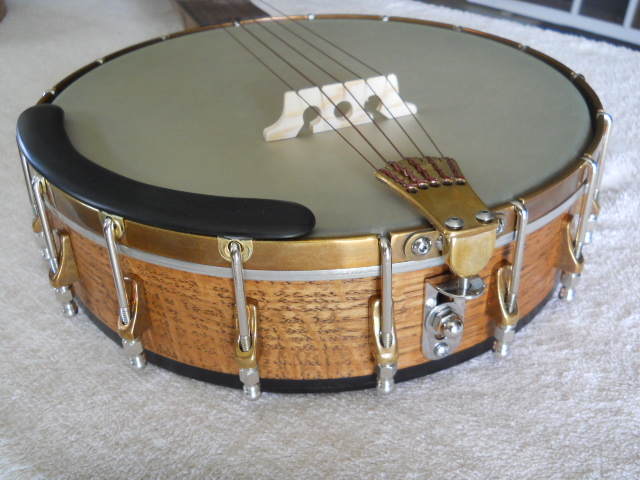
The screwed joint is quite strong and I've even done them using three screws and a long lap joint:
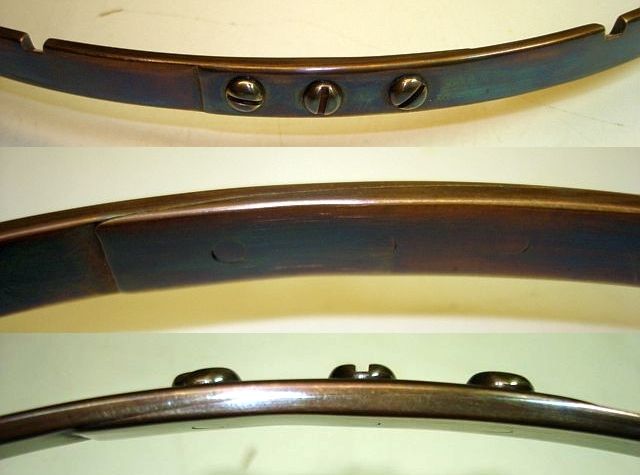
Also notice in Zach's photo he is using the Van Eps style rim with angled holes instead of notches. That's a nice example he has made.
Edited by - rudy on 06/30/2016 19:51:26
YWGbanjo - Posted - 06/30/2016: 19:57:34
quote:
Originally posted by rudy
quote:
Originally posted by Leslie RRudy, that is first class. Just one question about the connection.
Does the connecting piece with the 4 screws get in the way of an adjustable tailpiece ?
None that I've used, although I make my own fully adjustable tailpieces that accommodate loop or ball end steel or tied synthetic strings. You could use most any tailpiece, and I occasionally use something as simple as a no knot.
There's nothing that says the joint needs to be at the bottom center, and the lapped and screwed joint is attractive enough IMHO that you could face it to the side or position it under the armrest.
Zach's economics are true to form. In my case it's more like $3 for screws as I use stainless steel low profile button head screws that protrude minimally compared to a standard screw head. I just like the way they look.
I'm fortunate to have full sleeves of lots of taps in a all three configurations; taper. plug, and bottoming, so there's no cost associated with those. Paying myself a living wage I can still beat $49. (...and I ain't worth that!)
The Harbor Freight roller can be bought on sale for around $50 and if you amortize that cost out over the number of tension bands it can produce the economics aren't bad. If you're making a single instrument, not so much. Who can do that once you figure out you can have as many quality banjos as you want in virtually any configuration that you might want.
I position the joining plate adjacent to the tailpiece, not under it. I think it looks fine. I've adapted Rudy's fastening method a bit; I use countersunk brass screws with the screw head inside the tension hoop. Clearance holes are drilled in the tension hoop, and the holes in the joining plate are threaded. I only partially countersink the holes on the inside of the tension hoop. I tighten the screws down, then grind off the heads on the inside of the tension hoop and the tails which project through the jointing plate.
Doug
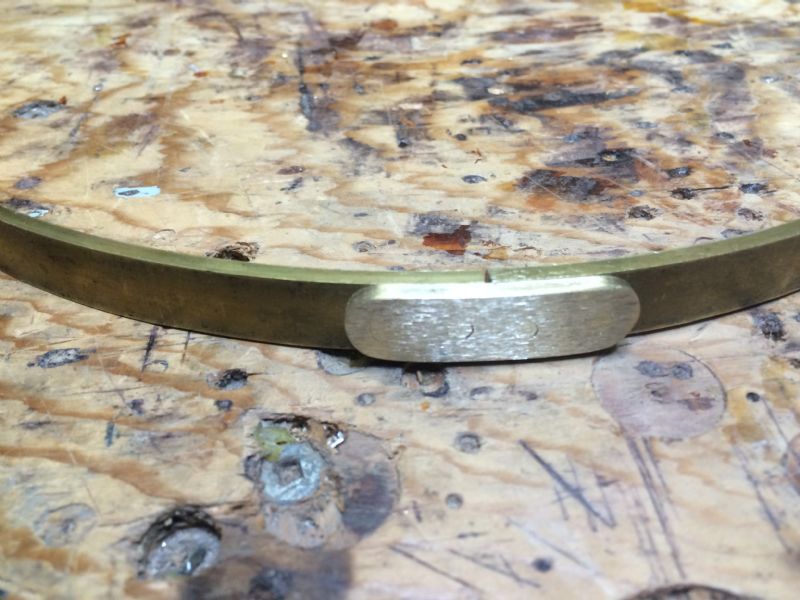 |  |  |  |
SHBosch - Posted - 07/01/2016: 02:39:20
Go for it! Make your own. Tension bands are incredibly expensive for what they are.
Leslie R - Posted - 07/01/2016: 04:30:44
I'm glad I started this topic. Mark Hickler is making a 6 string banjo for me. The heel is 2.25 inches. I did not want to use a grooved tension hook. No one had a notched tension hoop that would work. We had hit a hurdle for sure.
As it turns out, there is an easy solution. It is very feasible to make an elegant, sturdy tension hoop in any configuration you could want. And it's gonna look good as well.
Mr. Zachary Hoyt, is going to make one for me. So, again, Thank You Zach !
rudy - Posted - 07/01/2016: 05:13:19
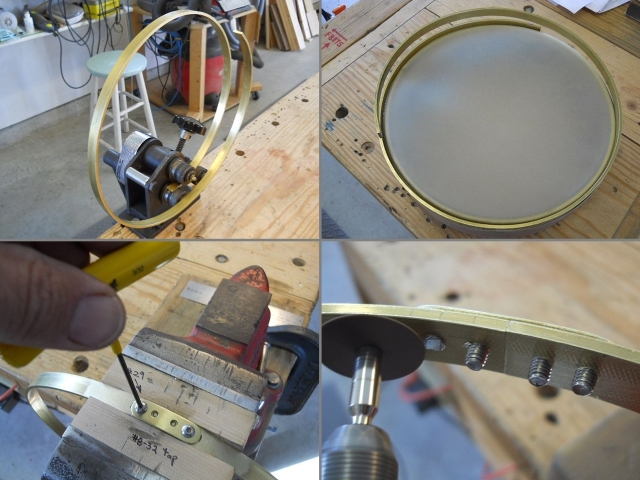
In closing, one more photo to help clarify tension band construction details for those interested.
Top left: The ubiquitous Harbor Freight ring roller
Top right: The rolled band can be placed over the head to check fit and mark overlap for trimming to exact length.
Bottom left: Adding the #8-32 stainless steel button head screws through the .062" (1/16") brass joining plate
Bottom right: Trimming excess screw length with a cut off wheel prior to final flush sanding to tension band inner surface.
Fathand - Posted - 07/01/2016: 05:15:48
You could buy an unplated hoop and widen the neck notch or use a hoop with no notch and set it lower than the height of the last fret like my old Gibson Ball Bearing.
bartmcneil - Posted - 07/01/2016: 07:01:11
Another method is to make the ring 3" too long and thin each end (1 1/2") to half its thickness. clamp the ends together and drill two 1/8" holes. Secure the ends with brass rod peened to flatness with a ball peen hammer. This makes an excellent joint without having to braise or weld the joint. And it will have no bumps. This is what I do and it works fine.
bartmcneil - Posted - 07/01/2016: 07:08:12
If you don't wan't to make the ring yourself your local blacksmith should be able to make you one as most have ring rollers and work in both brass and steel. Be sure to take in the pot and explain exactly what you need and the size of the inside dimension of the ring you need.
Helix - Posted - 07/01/2016: 08:54:12
As it turns out, there is an easy solution. It is very feasible to make an elegant, sturdy tension hoop in any configuration you could want. And it's gonna look good as well.
Mr. Zachary Hoyt, is going to make one for me. So, again, Thank You Zach !
Well done Rudy, your work looks like it is a century old. Clean round edges. Beautiful brass feather joint.
Zach, can't wait to see the solution.
And to other opinions, don't forget the fun factor, maybe that's why he wants to get this built. Mr. Hickler is pretty good.
Edited by - Helix on 07/01/2016 08:55:14
purevl - Posted - 07/01/2016: 14:50:16
I use a slip roll(er), 360 brass, and silver solder a straight butt joint; it's virtually invisible if fit up properly and stronger than the base metal. Laying out and adding notches or holes takes some time, but actually making the ring probably takes less than 10 minutes, I can squeeze one in at the end of a lunch break If I shake a leg. It usually takes me longer to find the regulators than to roll, trim, and braze a hoop.
*Disclaimer: I usually do these in the fabrication shop at work, I have all the same tools at home, but no space to set them up.
Leslie R - Posted - 07/01/2016: 15:22:31
There is some fun in this, though it was born of necessity. Mark is making a banjo for me, that's kind of unique. Getting parts for a standard banjo is not difficult. Get outside the box, and it becomes a different ball game. I had to learn how to make tension hooks, the kind I needed are not available. That took about a month of trial, error, bending, cutting with a hacksaw, threading and filing. But they are made, ready to go.
I learned a lot on this topic. I appreciate all of the replies. I hope more will follow.
The next project won't be as easy as the first two.
Ken LeVan - Posted - 07/01/2016: 17:21:32
I think we all have different ways of making them.
First off, the tension hoop is tone-producing, related to the tone ring (as are bracket bands), IMO, and add mass to the pot in different places. The tension hoop bears directly down on the flesh hoop of the head (which on a modern plastic head has a 3/16" seat).
The ones I make are based on the old standards, and I like the notched ones best because I like the round hooks and think the notching-in makes it look sturdy and "tailored". I think the grooved ones are cool-looking, but don't k like the flat hooks so much. To each his or her own.
I use the 360 brass as has been mentioned before because it's easier to file the notches and it has a nice tone. I use 3/16" stock, which has long been the standard size for Gibson, Vega, and many others. The most common height is 9/16", but many of the old Vegas were 5/8". It depends on how heavy you want it to be.
Like many others, I bend the brass stock with a ring roller that has filed-down rollers:

Then I silver solder the joint, which becomes invisible after you clean and polish it:

This makes an incredibly strong joint that can be twisted without breaking, and this is the way many of the old ones were made:

At this point, I do an "idiot check" to make sure it fits on the head - now's the time to check this. You can see how the 3/16" thickness is the same as the flesh hoop and the edges are flush:

After this, I mark the notches with a template, which is made specially for each notch spacing and diameter:

Then I notch them with a bandsaw and file:


It's a nice idea to round the sharp inside corner on the bottom so it doesn't break the head/flesh hoop joint.
Then you polish them:

At this point you can patina them leave them bright or have them nickel plated (BTW) the plated ones in the bottom pic are 5/8", the top plain brass ones and 9/16":

rudy - Posted - 07/01/2016: 18:57:31
Super nice photo essay, Ken.
Your band saw notching shot is nice. Having the ability to remove the screws and place the blade on the inside of the rim does allow me to hold the tension band upside down and angled so I don't have to angle the slot with the file. It makes the clean up work on the notches pretty minimal.
I'm not saying it's better, just two different approaches. The formed hooks I purchase are flat at the bottom of the bend so my square notches fit the hooks I use better.
Zachary Hoyt - Posted - 07/01/2016: 19:30:38
I only made a couple of notched hoops before I went to the Van Eps style but I notched them with the power miter saw. I put a block in so the head could only come down to a certain point. The 12" saw blade made a kerf that was just slightly too narrow, so I would clean it up with a file. It also left the bottom of the notch sloped, because the section of the blade that did the notching was headed back up, as it were.
Zach
Dan Drabek - Posted - 07/01/2016: 20:09:08
You've got to love the ingenuity of the instrument builders on this forum. Craftsmanship is only part of the equasion. Figuring out how to get the job done properly with equipment at hand is an equal challenge.
DD
Helix - Posted - 07/02/2016: 03:23:14
Photo essays are the strength, not critical here: You put a round hoop back in the rollers to take the picture. As always detail is superb.
Losing another foot or so of brass to scrap makes one ask what you do with all that extra brass, Rudy
34.55" is perfect for my 36" pieces, still can't wait to see Zach's solution, he has more activity than opinions.
Leslie, I'm really enjoying your enlisting other members of the hangout to do a cooperative project. We did one in 2009, still playing that banjo. Best of luck, please update as you go along.
Leslie R - Posted - 07/02/2016: 03:41:23
Helix, I always enjoy your posts. I am learning much, and having fun in the process.
The banjo that Mark is making is going to be unique, maybe even the first of it's kind. The photos Mark has sent during this process have been great. Mark is extremely thorough in what he does.
rudy - Posted - 07/02/2016: 04:52:23
quote:
Originally posted by Helix
Photo essays are the strength, not critical here: You put a round hoop back in the rollers to take the picture. As always detail is superb.
Losing another foot or so of brass to scrap makes one ask what you do with all that extra brass, Rudy
34.55" is perfect for my 36" pieces, still can't wait to see Zach's solution, he has more activity than opinions.
Leslie, I'm really enjoying your enlisting other members of the hangout to do a cooperative project. We did one in 2009, still playing that banjo. Best of luck, please update as you go along.
No ring roller produces a uniform curve at either end of the bar stock, so loosing a bit of length is part of the rolling process. 48" bar is a nice length to keep in stock; I don't have to keep a different length for a 12" tension band. I keep 48" lengths of round stock for tone rings, too.
As far as the extra brass, I throw it in a small bin and stop by the local scrap yard once in a while. They give me a nice check which I can then trade for a 6 pack of Lagunitas IPA.
Helix - Posted - 07/02/2016: 16:13:03
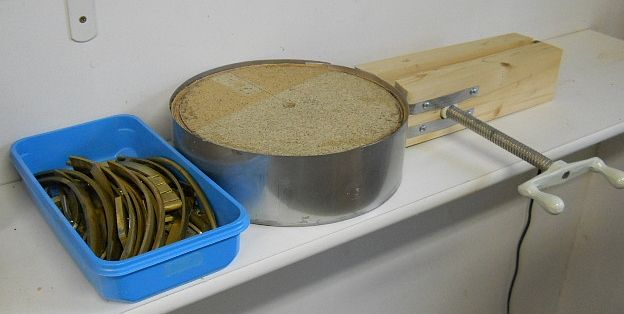
What I meant about the first photo is the rolled was put back in the roller for photo, it doesn't arrive that way, no problem.
Very cool, Rudy, I keep my scrap, too, but I keep finding uses.
As noted before, I have experience in the sheet metal trade rolling all kinds of BIG fan barrels and round crap, so the ENDs are my speciality, no pounding, no annealing.
I now buy my brass locally instead of online, I used to buy 7' pieces. But UPS won't deliver long pieces anymore.
So when I get older, I might try less hassle and buy 48" pieces, might save me some time.
Edited by - Helix on 07/02/2016 16:15:32
Terms of Use | Privacy Policy | Privacy Consent (EU/GDPR Only)
Copyright 2026 Banjo Hangout. All Rights Reserved.


