
DVD-quality lessons (including tabs/sheet music) available for immediate viewing on any device.
Take your playing to the next level with the help of a local or online banjo teacher.
Weekly newsletter includes free lessons, favorite member content, banjo news and more.
Premier Sponsors


|
Please note this is an archived topic, so it is locked and unable to be replied to. You may, however, start a new topic and refer to this topic with a link: http://www.banjohangout.org/archive/305112
Ken LeVan - Posted - 06/14/2015: 16:38:35
I have switched over to Rudy rods exclusively, except in the case of historic restoration, so I thought it would be interesting to share some pics -obviously, these are from different banjos, so you have to use your imagination.
Step 1: get rid of the old dowel stick

Step 2: plug the hole in the rim. I use a tapered plug epoxied in.

Now the hole is plugged.
Step 3: drill new holes:

Step 4:
Make the new dowel stick with a hole in the middle:
Now you have the hollow dowel, you make the rod that goes through the center with threaded ends:

You have to anchor the bolt in the heel, which is done with a threaded round or square rod that goes in through the heel:

This becomes the anchor for the rods - you can see how it works.


and here are the ends of the bolts which thread into the anchor, which has been inserted into the heel.
I use a "washer plate" which the dowel stick tightens against:

Here you can see how it works:

You have to cut the heel accurately, which I do with a 3 degree sled and a spindle sander.

This is not rocket science, and WAY too much energy is expended on making crazy jigs to do this. It's not that big a deal.
Tight fit:

SO,the whole thing gets assembled:
Aradobanjo - Posted - 06/14/2015: 16:43:20
Hello Ken,
Thank you for the explanation. This looks like a free-hand sanding job at 3 degrees. Skill has its advantages.
Ken LeVan - Posted - 06/14/2015: 16:58:57
quote:
Originally posted by Aradobanjo
Hello Ken,
Thank you for the explanation. This looks like a free-hand sanding job at 3 degrees. Skill has its advantages.
Yes, your observation is quite astute, and I am impressed!
the side-to side is somewhat freehand, but the heel angle is fixed. This has worked well for me as the "side to side" difference between the truss rod centerline and the third string centerline is about 1/2 degree. Since my neck/fingerboard width is variable according to the specific design, making an exact side to side jig would not work for me unless I made every neck the same width.
Ken
banjonz - Posted - 06/14/2015: 17:42:26
Ken, if you are drilling the dowel stick right through by hand, how to you keep the drill bit centered so it doesn't track off?
Ken LeVan - Posted - 06/14/2015: 18:06:35
quote:
Originally posted by banjonz
Ken, if you are drilling the dowel stick right through by hand, how to you keep the drill bit centered so it doesn't track off?
There are two ways:
(1) use a big piece of wood, drill the hole through with a long drill, then finish off the dowel so the hole is in the middle. This is easy if you have a big piece of wood
(2) make it in two halves, and run a dado with the tablesaw on each half, glue it together, then clean out the gap with a long drill. This is the best way to do it, especially if the dowel has a lamination in the middle.
Zachary Hoyt - Posted - 06/14/2015: 18:26:32
Your work and your photos are very impressive. I have been interested by the Rudy Rod which seems like an excellent way of attaching the neck, but for me it would be more work than a traditional dowel stick so I haven't tried it yet. Because of the way I make my necks from three pieces I can cut a square mortise in the center lamination and make the dowel stick out of a scrap from the same piece of wood. This makes the process of fitting the dowel stick very fast and easy for me but it wouldn't work with more intricate layerings of wood in the neck and dowel stick such as your banjos have. Someday I would like to diversify and experiment with different methods.
Zach
rudy - Posted - 06/14/2015: 18:33:34
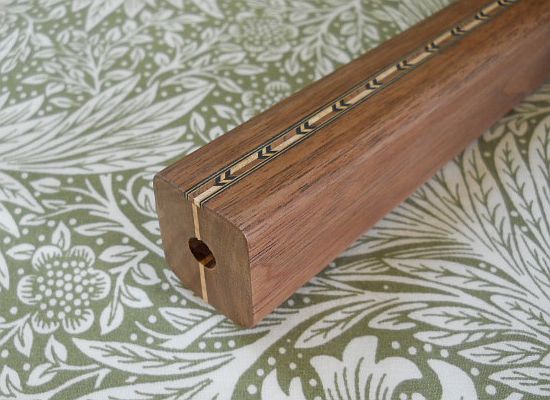
I usually make my channeled dowels rectangular and tapered. It's quite easy to create the circular channel by running the rectangular stock over a 5/16" core box bit in a table mounted router. You can use the opportunity to add a contrasting center lamination and even add purchased inlay strips over the center joint if you like.
Once the two halves have been passed over the core box bit I simply clamp them together over a length of all thread to hold them in alignment after glue is applied to the mating surfaces. As soon as the glue sets up a bit you can pull the rod out and push a bit of dampened paper towel through the "bore" to clean up any excess glue squeeze out inside the channeled dowel.
Edited by - rudy on 06/14/2015 18:35:51
Ken LeVan - Posted - 06/14/2015: 18:36:53
quote:
Originally posted by Zachary Hoyt
Your work and your photos are very impressive. I have been interested by the Rudy Rod which seems like an excellent way of attaching the neck, but for me it would be more work than a traditional dowel stick so I haven't tried it yet. Because of the way I make my necks from three pieces I can cut a square mortise in the center lamination and make the dowel stick out of a scrap from the same piece of wood. This makes the process of fitting the dowel stick very fast and easy for me but it wouldn't work with more intricate layerings of wood in the neck and dowel stick such as your banjos have. Someday I would like to diversify and experiment with different methods.
Zach
Zach,
I also make necks laminated in three or more pieces. I use the waste material in the middle to make the Rudy rod - same thing.
Dan Drabek - Posted - 06/14/2015: 18:52:49
Now that's what I call a tight plug! Pretty sharp Ken.
I agree that fitting the heel has become a more intimidating task than it warrants. Look at all the thousands of vintage banjos that were fit by hand and by eye using chisels and gouges. And that was factory work.
Of course, skilled hand labor costs a lot more these days.
DD
dpgetman - Posted - 06/14/2015: 20:54:47
Thanks for the write up, your and Rudy's posts on this are guiding my construction of a 'rudy rod' neck set up for my first build. Can you elaborate on the need for the washer plate?
DPG
rudy - Posted - 06/15/2015: 03:33:40
quote:
Originally posted by dpgetmanThanks for the write up, your and Rudy's posts on this are guiding my construction of a 'rudy rod' neck set up for my first build. Can you elaborate on the need for the washer plate?
DPG
David, If you wish further info on my method of use be sure to review the neck attachment section (HERE) on the "Open Back Design Primer" page at my website.
dpgetman - Posted - 06/15/2015: 05:43:19
Much obliged Rudy!
I've spent a good amount of time over at your website! I think the info put up by you, Ken, Mark Hickler, and others on this site is what convinced me to give construction a go, can't thank you all enough.
Do you also use a washer plate, as in Ken's write up? The plate would seem designed to keep the neck from rotating... is that the logic? I was not planning on using one, though I could work one up pretty quick.
DPG
rudy - Posted - 06/15/2015: 08:30:48
quote:
Originally posted by dpgetman
Much obliged Rudy!I've spent a good amount of time over at your website! I think the info put up by you, Ken, Mark Hickler, and others on this site is what convinced me to give construction a go, can't thank you all enough.
Do you also use a washer plate, as in Ken's write up? The plate would seem designed to keep the neck from rotating... is that the logic? I was not planning on using one, though I could work one up pretty quick.
DPG
No washer plate in my case.
As far as the neck rotating, if the heel is shaped to mate to the rim it forms an interlocking joint. If the neck is tight against the rim it would have to move away from the rim to rotate even a small amount. That can't happen unless you intentionally loosen the nut holding everything together.
Ken LeVan - Posted - 06/15/2015: 14:19:17
The reason I use the second attachment is NOT because of sideways rotation, it's because of up-and down rocking. I choose to stop that dead in it's tracks. I can insert a small slip of sandpaper as a shim, and easily shim the neck.
In my logic, two tightening points are twice as good as one, and very easy to do at the front end, extremely difficult to do thereafter. That's why I make anchors with two threaded holes - If I never need to use the second one - c'est la vie - I wasted 10 minutes drilling a hole and threading it . I am not a gambler and am an adherent of Murphy's Law.

Do I need to do this" maybe not? What if I do?(Murphy's law)
It's like an adjustable truss rod - costs $10 - I will probably never need to adjust the neck - what if I do?
Anyway, you cover up the anchor with a heel cap, and the threaded hole in the top of the anchor doubles is a way to pull it out if you ever need to.

That's my take FWIW, Gibson was smart to have two rods, and Vega did that later on. Build in redundant fixes.Triple redundancy is best, but double is twice as good as none.
jamesinkster - Posted - 06/15/2015: 17:01:27
Hey Ken,
In this photo it looks like you're using a round rim bracket shoe (i think that's what it's called -- the hook goes through it?!) on the end of your dowel rod...
Is this the case?
If so -- how do you snug it down? Ideally I'd like to do exactly this -- the bracket shoe could hold my no-knot tailpiece and look like the rest of the rim... But I can't seem to figure out how I'd secure it tightly like you can with an acorn nut (and still maintain vertical alignment for the hole).
Thoughts?!
Thanks :)
Ken LeVan - Posted - 06/15/2015: 17:23:34
quote:
Originally posted by jamesinkster
Hey Ken,
In this photo it looks like you're using a round rim bracket shoe (i think that's what it's called -- the hook goes through it?!) on the end of your dowel rod...
Is this the case?
If so -- how do you snug it down? Ideally I'd like to do exactly this -- the bracket shoe could hold my no-knot tailpiece and look like the rest of the rim... But I can't seem to figure out how I'd secure it tightly like you can with an acorn nut (and still maintain vertical alignment for the hole).
Thoughts?!
Thanks :)
That's right. It's a ball bracket shoe I got from Bill Rickard. I thread the tailpiece end of the tension rod just about 1/4", put flux on it, screw on the ball bracket tightly and sweat solder it with regular plumbing solder so it doesn't turn.
That way, I can use that bracket shoe-tension rod assembly to tighten the tension rod and it becomes the tailpiece lug -exactly like the ones used on Vega dowel sticks. Tighten it to the nearest half-turn that makes the hole line up properly, just like on the old Vega ones.
jamesinkster - Posted - 06/16/2015: 10:21:16
Last (hopefully quick) question...
With your little spindle sander + sled setup you're using for the heel profile, how do you cut the notch for the tension hoop?
I was playing around with a similar setup last night with a drum sander on my drill press and started making a mess. I think I'm going to step back and try to profile it with a rasp and some files, instead... the tension hoop notch is the hard part though :(
rudy - Posted - 06/16/2015: 11:37:56
quote:
Originally posted by jamesinksterLast (hopefully quick) question...
With your little spindle sander + sled setup you're using for the heel profile, how do you cut the notch for the tension hoop?
I was playing around with a similar setup last night with a drum sander on my drill press and started making a mess. I think I'm going to step back and try to profile it with a rasp and some files, instead... the tension hoop notch is the hard part though :(
If I may butt in...
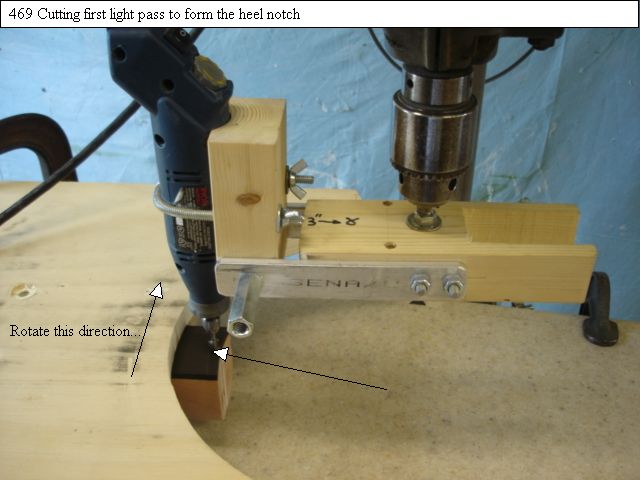
I do use a different setup for sanding the heel profile than Ken uses and I cut the tension band notch separately.
I've found nothing better than the following setup I use with a foot-controlled momentary switch to control the rotary hobby tool.
It can quickly be configured to match any radius I wish, and I take 1/16" light cuts advancing the cutter downward after each pass with the drill press quill feed. The cutter is a carbide tipped straight 1/8" shank router bit. Before I knew any better I used the ubiquitous Dremel #115 burr, which is next to useless for anything approaching serious work.
For self explanatory reasons the FIRST STEP in this setup is to UNPLUG the drill press and drape the plug over the quill feed where it's obvious.
Edited by - rudy on 06/16/2015 11:46:28
jamesinkster - Posted - 06/16/2015: 13:20:04
That's very cool, Rudy. In this entire process I forgot about my dremel...
I think I might need to learn how to use chisels :)
Crusty - Posted - 06/16/2015: 13:26:56
quote:
Originally posted by rudy...
For self explanatory reasons the FIRST STEP in this setup is to UNPLUG the drill press and drape the plug over the quill feed where it's obvious.
Very good safety advice that's often overlooked by home shop workers.
I tie wrap the router chuck wrench to the plug end of the power cord so that it forces me to unplug the router to change a bit. Still got all 10.
Ken LeVan - Posted - 06/16/2015: 14:23:07
One of the most wonderful things about the Rudy rod is the ability to tweak the neck-to-rim relationship easily without a dowel stick of lag bolts in the way. That's what I love about the Rudy rod so much.
Part of my setup is to "dry-fit" the neck to the fully assembled pot, determine the centerline using a mason's line, and then get it exactly right

If this is off by a gazillionth of a degree, it's not right. With the simple 3 degree sled, I can tweak it in a heartbeat- a pencil line on the neck, and I sand it to that. Much easier than chisels and gouges, which I did for 40 years. - yes, it's ugly and requires skill, but it gets you there.

Nowadays use a Dremel to fine-tune the "gap" where the fingerboard almost meets the tension hoop. I have made a number of jigs to cut the concave radius in the heel - you want to have gap where you can slip a piece of paper.

If your heel angle below the fingerboard is off by a little, you have to to tweak it, which I can do easily with the sled -pencil line- spindle dander-dry fit, etc. WAY SO MUCH EASIER than chisels and gouges, and infinitely adjustable by your eye alone.
I have never been able to make some cutting device that whacks them out perfectly one after one inasmuch as all my necks are a little different.
rudy - Posted - 06/16/2015: 15:31:46
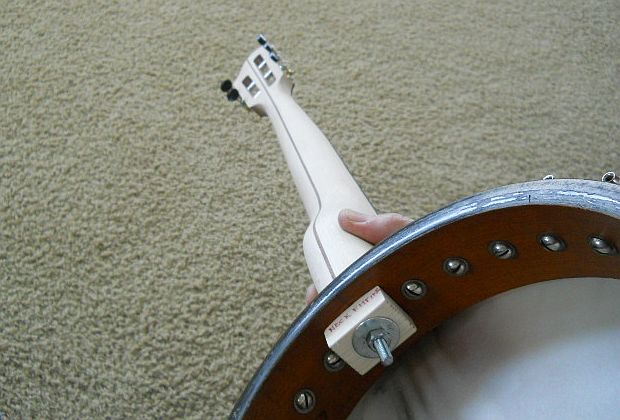
You can also temporarily bolt a neck to the rim to check the fit without the need to add the channeled dowel rod. Here's a shot of a replacement neck being fitted to an older rim, the neck fit can be adjusted easily by taking it off and on before committing to final assembly with a channeled dowel rod. in this case it can be removed and reinstalled in very short order with a 7/16" nut driver.
Dan Drabek - Posted - 06/16/2015: 19:23:23
I do the same thing but with a C clamp. Not as secure, but quicker to take on and off--which I sometimes have to do quite a few times. :->
DD
Terms of Use | Privacy Policy | Privacy Consent (EU/GDPR Only)
Copyright 2026 Banjo Hangout. All Rights Reserved.


