
DVD-quality lessons (including tabs/sheet music) available for immediate viewing on any device.
Take your playing to the next level with the help of a local or online banjo teacher.
Weekly newsletter includes free lessons, favorite member content, banjo news and more.
Premier Sponsors


|
Please note this is an archived topic, so it is locked and unable to be replied to. You may, however, start a new topic and refer to this topic with a link: http://www.banjohangout.org/archive/241544
Page: 1 2
Ken LeVan - Posted - 07/25/2012: 13:37:37
This thread, #18, is going to be about putting all the parts together, and setting it up.
Everyone is interested in setups.
After a few minutiae, I think the order will be:
(1) basic assembly
(2) head tension
(3) bridge position
(4) tailpiece
(5) string height/action
Maybe other stuff will come up.
And then, #19 will be about building a bridge. I am doing that one separately, because there is always so much interest in that subject, and so many great bridge builders out there
I guess #20 will be pictures and sound files. I have had a broken finger healing for 5 weeks now, so I haven’t been able to play or practice (great excuse, don’t you think?). Still trying to find someone near Shunk PA to do some clawhammer with them
Now that everything is finished (in terms of the "surface finish”), I will assemble the parts.
Remember when I was trying to make a magnetic armrest? It never worked out.
I couldn’t get enough magnetic force on the hooks, which don’t provide vary much area to stick anything to.
c’est la vie.
I decided to go the mechanical route:
I made some little plastic channels from high impact polystyrene, which is a lot like the PVC that plumbing pipes are made from, and what a lot of binding is made from nowadays.
I have some of it around the shop and use it for templates and other things.
I cut some strips, heated them with a heat gun, and bent them around a wooden form that is the same thickness as tension hooks. Then I trimmed them up:

I snapped them on to the two hooks that I wanted to attach the armrest to, coated them with epoxy, and stuck the armrest on. When the epoxy cured, the armrests were on tight, but I can still snap them on and off - Works very well. I think “in production”, I would use a more flexible material, like a urethane, and design them to have a wide surface area on the back side for gluing. In the meantime, this armrest ain't goin' nowhere, and doesn't buzz or rattle
If you look closely, you can see one of them by looking up through one of the flange openings - they hold on tight:

Now I am going to make sure the fingerboard is dead flat. I want a zero tolerance. These necks have been sitting in the shop for a while, and if they were going to dance, they would have done it by now. You remember the steps I went through to make sure the necks were stable.
The truss rods are neutral, and I rub the fretted surfaces on a dead flat surface to which 400 or 500 PSA sandpaper is attached, just to pick up any little high spots. If I had any high spots, I would keep up this rubbing until they were all even, then dress the ones that had been sanded with a fret file:

Then I polish all the frets with a piece of 600 sandpaper glued to a cork base that has a little channel in it. This cleans them all up.
I protect the fingerboard with a piece of mylar that has a slot cut out of it - I made mine from template material, but you can buy these from Stewmac.

Now I have a perfectly flat fingerboard, which is what I want - I don’t want no stinkin’ relief:

zero tolerance.

At this point, I will fit the necks onto the pots.
You might remember back when I made the brackets:
Now I will actually install them, and clamp on the necks. I have to drill a hole in the tailpiece end of the rim, and tap it with a 10-24 tap, then I put in a stainless steel allen screw - same as the one for the other end, and same allen size as the truss rod (to keep it simple) KISS:
Then I install the bracket at the neck end and tighten it up:


Now I am going to install the tuners.
I squeeze the 5th string tuners in with a clamp.
I DON”T WANT to put undue outward pressure into that hole - just seat the peg and allow the splines on the tapered shaft to dig in.
I have to use a reamer VERY CAREFULLY to clean the lacquer out of the holes - I don‘t want to chip the lacquer. I used to stick rolled up masking tape in the holes while spraying, to stop buildup, but the stringed instrument lacquer isn’t as brittle as the older stuff, so I don’t have to do that.
Nontheless - s l o w and c a r e f u l. Then tighten them up with a socket wrench NOT TOO TIGHTLY I don’t want to cause the lacquer to separate from the peghead veneer especially on the rosewood one - denser woods don’t have as secure a finish bond - you’ve probably seen ebony heel caps with the finish coming off.


Sign of the times - I am using a 10mm socket
Dave1climber - Posted - 07/25/2012: 13:53:17
Ken
I can't tell you how great it has been reading you post's and viewing your wonderful photos. I am also waiting for your book, which I am sure will become an instant classic. I would pay extra for a autographed copy. Yes i know, broken finger and writer's cramp could delay delivery, I can wait. 
interrobang - Posted - 07/25/2012: 14:37:27
These posts are always incredible. Thank you, uncle.fogey!
jwoods - Posted - 07/25/2012: 14:45:04
Very nice work Ken...clever way of mounting an armrest.
You may want to add... "we don't need no stinkin' co-rods" 
Ken LeVan - Posted - 07/25/2012: 14:47:38
quote:
Originally posted by jwoods
Very nice work Ken...clever way of mounting an armrest.
You may want to add... "we don't need no stinkin' co-rods"
THANKS!! Why didn't I think of that - we surely don't.
rudy - Posted - 07/25/2012: 14:50:18
Assembly is looking good!
I would comment that I personally would never place ANY clamping pressure against the fifth tuner shaft. It only takes a minute to remove the knob and slip a small block of wood with a hole drilled in it over the shaft. I can tell you from experience that sooner or later the internal shaft keeper pin or gear will be damaged, it's just not worth taking the shortcut.
Ken LeVan - Posted - 07/25/2012: 15:07:22
quote:
Originally posted by rudy
Assembly is looking good!
I would comment that I personally would never place ANY clamping pressure against the fifth tuner shaft. It only takes a minute to remove the knob and slip a small block of wood with a hole drilled in it over the shaft. I can tell you from experience that sooner or later the internal shaft keeper pin or gear will be damaged, it's just not worth taking the shortcut.
Rudy,
Thanks, I appreciate that, and you are right - I should have taken the knob off. This is, after all an educational forum. While I have never had one strip, that's no excuse.
I will revise that photo.
Ken
Spitfire-Smith - Posted - 07/25/2012: 15:49:37
Once again, I love these posts! Can;t wait for your book!
Gaby - Posted - 07/26/2012: 04:07:26
I'm thinking I want to make my own five string banjo too. Just to see for myself' ,you make it look easy.
dickinnorwich - Posted - 07/26/2012: 05:25:54
I don’t want no stinkin’ relief:
On the matter of neck relief, Ken and I come from the same school. Undoubtedly others will disagree and that's all part of the fun. I just loved the quote.
Ken LeVan - Posted - 07/26/2012: 06:07:58
quote:
Originally posted by dickinnorwich
I don’t want no stinkin’ relief:
On the matter of neck relief, Ken and I come from the same school. Undoubtedly others will disagree and that's all part of the fun. I just loved the quote.
Dick,
As I told you a couple of days ago, I was working on some charts to illustrate what actually happens when you bend the neck up, raise the nut, etc.
Someone posted a link on another thread that was to a website where someone has analyzed relief very thoroughly. He is talking about electric guitars, and has posted many charts. The measurements are miniscule and when he says "less relief", he is talking about an essentially flat neck. This ought to be required reading for everyone. Here's the link:
bryankimsey.com Go tu "lutherie", then "neck relief"
Here are some excerpts:
Thoughts on Neck Relief
How many times have you heard these statements: "Action’s too low? Just give it some neck relief", "Bluegrass players need some neck relief", "Action’s too high? Reduce the neck relief". Let’s examine some of these statements, but first let’s define "neck relief". Relief describes the bow of the neck.
Another term we should define right now is "action"- this is simply the clearance between the bottom of a string and a fret. A high action means you have to push the string down farther to contact the fret than on on a low action
Why do "bluegrass players need neck relief"? The presumption is usually that bluegrass players only play in 1st or 3rd positions. Since the maximum amplitude of vibration is at the halfway point, the idea is that adding some neck relief will allow a "pocket" of higher action, created by neck relief, in which the string will vibrate. While that may be true when playing at the 3rd fret, what happens when you use a capo, especially at the 4th fret? Suddenly, your bluegrass player is playing "up the neck"!
If you change neck relief and don’t touch the nut or saddle (bridge), the action at both the 1st and 12th frets will also change. Therefore, simply using neck relief to adjust action is not usually a good idea.
Notice that the mid-neck actions are quite a bit higher with greater neck relief. This is no big surprise, but it is surprising how fast the higher action comes into play- by the 1st fret and quite noticeably by the 3rd fret.
Notice that the greater relief does indeed give greater next fret clearance, but only for the lower frets. As you work up the neck, the next fret clearances get lower and lower, faster. With less neck relief, the next fret clearance is much more consistent and is considerably higher at the 9th and 12th frets. .003" may not seem like much, but it can mean the difference between buzzing or not.
Given the SAME 12th fret action, less neck relief will give equal or greater next fret clearance, equal or greater mid-way action, lower mid-neck action, and lower behind the fret action.
You have to lower the 12th fret action considerably to produce a mid-neck feel with greater relief that matches that of less relief. You can probably guess by now what’s going to happen to the next fret clearance:
It’s pretty clear that the guitar (banjo) with more relief is unplayable past the 9th fret.
This is even more dismal. The lesser neck relief gives far greater mid-way action at every step of the way.
Conclusion:
To achieve the same mid-neck action in a neck with greater relief, as compared to one with less relief, you’ll have to drop the saddle (as measured by the 12th fret action) quite a bit. Next fret clearance and mid-way action both suffer. The neck with less relief wins.
Overall conclusion and subjective discussion:
To me, the evidence is clear. Less neck relief is the winner all the way around. It’s also clear that you cannot simply adjust neck relief- you must also pay attention or be aware of what’s happening to the nut and saddle actions. It seems to me that the common rules "Bluegrass players need neck relief" and "You need neck relief to bend strings" are a myth. The figures show clearly that, given the same action (at any fret), that less neck relief produces a lower feel and a higher action midway from any given note to the saddle.
Feel wise, I’m a big fan of flatter necks, which is what led me to do all these measurements. The lower mid-range action of a flatter neck makes a huge difference to playing comfort for me, and even when the 12th fret action is higher, the action gets consistently higher. This is not true of a neck with greater relief- with those, the action gets stiffer in the mid-neck and then softer as you hit the higher frets. I especially notice this on mandolins where far more of the playing is done in the mid-neck area. Some electric guitar players like more relief when bending in the mid-neck area, but given the data on next-fret and mid-way clearances, I think they'd be better off putting that same action into a neck with less relief.
dickinnorwich - Posted - 07/26/2012: 06:56:24
My intent is not to steal the thread but simply to acknowledge that I always considered myself the odd ball (for lots of reasons unrelated to the banjo) when it came to neck relief. Because I never liked neck relief, until recently, when Ken got me to use the dual action single rod he uses, I always used the Martin non-adjustable rod. Why use an adjustable rod if there is no neck relief? At least that was the way I always viewed it. Just to close this off, I will offer that I never had a stability problem with any neck I ever built with those old Martin non-adjustable rods. For all of the reasons stated above, I'm just not a relief kind of guy. It never worked for me.
O.K., let's move on.
dougtape - Posted - 07/26/2012: 07:32:33
ken, Thank you so much for detailing the process for us. I cannot wait to buy your book to have it all in one place. Sure i bet we could figure a way out to get the info from the forums, but this is such high quality stuff I am waiting to pay for it!
When you look at making the book, would you consider doing a side chapter with any differences for making an open back by chance?
Thank you so much,
doug
Ken LeVan - Posted - 07/26/2012: 07:33:41
Thanks, Dick,
You're not hijacking the thread at all. One of the things I like about those truss rods that you and I use is that they are very stiff to begin with, so if the neck has ANY tendency to bend (how could it?), it will be a nice even bend, which can be corrected, AND, it won't twist. I think of them as a corrective device, not a deliberate action adjustment mechanism.
As concerns relief, I've been playing longnecks for 50 years, and NOBODY who plays longnecks, uses a capo, and switches keys a lot can have any interest in relief or raising the height of the nut, so that's the way I set up regular length banjos, too, and I have never had any trouble.
When I get on to the nut part, and actually string these up, it will be interesting.
Ken LeVan - Posted - 07/26/2012: 07:44:19
quote:
Originally posted by dougtape
ken, Thank you so much for detailing the process for us. I cannot wait to buy your book to have it all in one place. Sure i bet we could figure a way out to get the info from the forums, but this is such high quality stuff I am waiting to pay for it!
When you look at making the book, would you consider doing a side chapter with any differences for making an open back by chance?
Thank you so much,
doug
Doug,
Yes, I will cover all that, although probably not fretless banjos, at least this time around.
The two banjos I am making for these threads ARE openbacks when you take off the resonator and flange, and they are true openbacks, not just a Mastertone with the resonator off. This is the way I have always made openbacks, which sound great as BG banjos, too.
While the design is different, and I am experimenting with different tone rings, the basic concept is not that far off from a WL or tubaphone. I am trying not to fall into the trap that Gibson did when they made the RB180 openback in the 60s, which didn't work.
Ken
Dave1climber - Posted - 07/26/2012: 08:42:00
Ken and Dick
Thanks for your thoughts on neck relief, my next banjo will have no relief and when that is done I will reset my current one.
Ken
Please include a discussion of neck relief in your book. And once again thanks for all your hard work.
Dave
Jonnycake White - Posted - 07/26/2012: 09:17:25
I always learn another thing in these threads. I'd never thought of using a clamp to press in the 5th string peg, though I always used a block of wood with a hole in it over the shaft, as a drift to tap them in with a mallet. I used to have a small wooden spool for this purpose, I wonder what happened to it? Those are getting hard to find these days.
rudy - Posted - 07/26/2012: 10:12:09
Do be aware that if you're using Brian Kimsey's cited article as support for neck relief preferences that nowhere does he state that he prefers NO RELIEF. He even throws out his preference for neck relief on his acoustic guitar setup page as being .004" to .008", although that is much less than the usual recommendation here of somewhere in the neighborhood of .015".
I'm also a supporter of the less relief camp where banjos are concerned, but Brian's through evaluation does not support the idea of NO RELIEF, if we're to use his evaluation as support of our preferences.
dickinnorwich - Posted - 07/26/2012: 10:40:40
Rudy:
Let me just say that I have to work REALLY hard to get my fingerboard dead flat before I install the frets so that the no-relief system works and I don't get fret buzz. If I screw up and for whatever reason, the fingerboard isn't dead flat, I will get buzz. Turning this around (gulp), it always seemed to me that relief was the solution to eliminate fret buzz in a poorly trued neck.
Ken LeVan - Posted - 07/26/2012: 12:10:03
I have spent a couple of days making some very intricate drawings with the computer showing exactly what happens when you bend the neck. I thought that the relief article eliminated my need to continue on with that, but I guess I have to finish it. Pictures are worth a thousand words, any way.
The reason he doesn't talk about "no relief" is because he's dealing with electric guitars with extremely low actions, and on those, you can get "back buzz" . Electric guitars have endless sustain, and are notoriously unforgiving in terms of intonation, and bad action exacerbates that.
Maybe everyone gets "back buzz" with flat necks on banjos. I must be lucky because I don't. I have never had any problems with no relief - never even heard of it until several years ago, and thought it was silly then. If any of my strings buzzed, it was because of a problem like an errant fret or back bow, both of which I can fix if it happens.
If you have ONE fret JUST slightly up by one or 2 thousandths, you will get a buzz. Giving it a little relief is so darned convenient, just like raising the nut up a little because it's so tough to get the slots just right.
To each his own - you do relief, I'm flat. My banjos ain't broke, so I'm not going to fix 'em.
I play in third position a lot and don't like the higher action between the 5th and 12th frets caused by relief.
I use my truss rod strictly to keep the neck flat.
For me, there's no relief in sight.
Having said that,
Here's a picture of how I should have squeezed in the 5th peg - with a wood block against the body instead of pushing on the stem

Also, I forgot to post the picture of my name plate on the dowel stick:

dickinnorwich - Posted - 07/26/2012: 12:14:56
I love the name plate.....especially having driven through greater, downtown, Shunk in April and seeing it first hand.
Ken LeVan - Posted - 07/26/2012: 12:31:39
quote:
Originally posted by dickinnorwich
I love the name plate.....especially having driven through greater, downtown, Shunk in April and seeing it first hand.
Thanks, The name plate is bigger than the town
wuzapicker - Posted - 07/26/2012: 13:12:40
Great job Ken,
I looked Shunk, PA up on Google Maps. You have few neighbors, friend.
I like the way you relieved the tail bracket into the dowel. Overall, those are two very nice banjos you've built.
Regarding mounting 5th pegs a wise repair man once taught me to use a large wooden spool to press mine home with the button removed. I still have one labeled "Coats and Clark" I keep for that purpose. The luthier that made that Rosewood neck I ordered several years ago epoxied the 5th peg in. I had never seen that done before.
bnlholic - Posted - 07/26/2012: 14:03:34
Hi Ken.
Thanks. These Building a Banjo threads have been fascinating. Thanks for sharing all this wealth of information.
Dan Wheeler
Ken LeVan - Posted - 07/26/2012: 14:48:16
quote:
Originally posted by wuzapicker
Great job Ken,
I looked Shunk, PA up on Google Maps. You have few neighbors, friend.
I like the way you relieved the tail bracket into the dowel. Overall, those are two very nice banjos you've built.
Regarding mounting 5th pegs a wise repair man once taught me to use a large wooden spool to press mine home with the button removed. I still have one labeled "Coats and Clark" I keep for that purpose. The luthier that made that Rosewood neck I ordered several years ago epoxied the 5th peg in. I had never seen that done before.
VERY FEW NEIGHBORS! - you are right
A few facts about Shunk:
Sullivan county PA has a population of 6,500 - down from 12,000 in 1890, The population declines by 7% each census period.The county has one (very good) school system with a high teacher to student ratio, and no football team because of insurance issues - because of the high elevation, we kick everyone's butts in cross country. There is a resident from here who is on the Olympic team, going to London.
My township "Fox Township" named after George Fox, the founder of the Quaker Church in America, not the animal, has a population of about 300. The growth here is in people over 55, who want peace and quiet. There is a Friends Meeting nearby, that only has services in the warmer months.
The main enterprises in the county are logging (PA is the largest producer of hardwood lumber in the US, both in terms of quantity and value (we produce maple, cherry, oak, etc, which are more valuable) It's a world market. The best cherry in the US is from north of I-80 in PA., and tourism - and I mean hikers, hunters, and fishermen - no amusement parks here, but plenty of hiking trails, waterfalls and State Parks. about 60% of the county is state forest, parks, and game lands.
Our area has been listed by the Federal government as one of the two most rural counties on the eastern seaboard, which includes West Virginia), and we have the darkest nighttime sky in the east as well. We have ONE traffic light in the county, probably 35 miles from here, no police, other than the State Police, no crime other than some random hunting cabin break-ins by kids looking for booze and hunting rifles, or stealing copper plumbing, no air pollution, or water pollution (you can drink the water from the stream on our property. There are more bears than people here, and a problematic deer overpopulation.
Shunk, named after Francis Shunk, a Governor of PA was once a booming mill town with a lot of residents. Now there is a general store, a few houses, a Kaiser Frazer dealer, and that's about it.
A disk Jockey in Williamsport has made the place famous by convincing everyone that Shunk doesn't exist - Oh you're from "Blechville" - that must be near Shunk.
The General store, which makes great subs and sells bacon to die for, sells T-shirts that say "Shunk - conveniently located in the middle of nowhere" and postcards that are black and say "Shunk at night"
What a place to build banjos! I have had very few visitors here, but for no good reason.
wuzapicker - Posted - 07/26/2012: 15:17:05
Thanks Ken,
It sounds like my kind of place. Any muzzle loaders there?
Also, those Kaiser Frazer dealers are real rarities these days. Do you think they might take my order for a Darrin? ;-D
Ken LeVan - Posted - 07/26/2012: 15:56:16
quote:
Originally posted by wuzapicker
Thanks Ken,
It sounds like my kind of place. Any muzzle loaders there?
Also, those Kaiser Frazer dealers are real rarities these days. Do you think they might take my order for a Darrin? ;-D
Plenty of muzzle loaders - we have a special season for that, also, we have a deer season for the "atlatl", which is a neolithic spear throwing device. That may be unique to PA. We also have - a bowhunter's festival in Forksville, which gets more popular every year - we have crossbow season, wheelchair season, youthful hunter season, and still we have too many deer. They get killed on the road. I see 30 or 40 turkeys at a time, that you have to stop the car for, and they mysteriously disappear during turkey season.
Trout streams up the ying-yang, and a lot of fly fishermen.
On top of that, we have a 100 mile bicycle race- a "century ride", called the "Tour de Shunk", which has been rated by those who rate such things - the Federation of American Wheelmen, or something like that, as the "most challenging 100 mile bicycle race in the US. It goes up and down and up and down 1,000 - 1,500 feet at a time on bad roads for 100 miles.
People come from Australia to ride in it. It gets more popular every year.
I have run 7 marathons, several half-marathons, 3 triathlons, MANY 10 Ks, 20 Ks, 10 milers and a 50 mile mountain bicycle race , but I WOULD NOT do the Tour de Shunk. I live here - I know the roads - no way, no how
dickinnorwich - Posted - 07/27/2012: 06:41:59
Yeah, when my wife and I visited Ken a few months ago, we got caught in rush hour traffic in Shunk. It wasn't pretty.
Jonnycake White - Posted - 07/27/2012: 09:34:16
Man, you make me want to retire there. To paraphrase Hawkeye Pierce, "I grew up in the same small town in Colorado."
Ken LeVan - Posted - 07/30/2012: 15:12:32
There have been several threads about the gap between the end of the fingerboard and the tension hoop.
This is important because when you tune the head, the tension hoop has to be able to move up and down between the end of the fingerboard and the tone ring. If the fingerboard pushes against the tension hoop, there is a problem.
The relationship between the neck and the rim is fixed.

There ought to be a gap, at least wide enough to insert a piece of paper. One way to clean up the gap is by “kerfing” it with a piece of sandpaper:

You have to “rough-tune” the head to make sure the bridge is at the right height. I tuned both of these to an F or Gb - somewhere in between them. When you string it up and tune it, the head pitch will go up because of the pressure of the strings pushing the bridge against the head, and then you “fine-tune” it to whatever works for the sound.
You will remember that I rubbed parrafin on the rim of the tone ring to facilitate tuning. This is important if you want to be able to tune the head easily. Tympani players do this

Now that the head is roughly tuned, we can string it up.
First of all - make sure the neck is flat, or however you like it to be. I personally like it to be flat I have made some measurements and drawings which I will certainly include in my book.
To state it simply (and I want to be done with this):
If the neck is flat, the gap between the string and the fret increases at an even increment each fret, as you go up the fingerboard. If you fret a string, or put a capo on the neck, the increase, fret by fret, is the same, or follows the same geometrical increase.
If you bend the neck upward, to create “relief”, the gap between the string and the fret does NOT increase geometrically, but becomes much greater between the 4th and 10th frets, making the action higher there, increasing intonation problems - you are on your own - don’t say I didn’t tell you.
I will say no more - do what you want - "pop pop fizz fizz - oh what a relief it is" - I am going to take an Alka Seltzer.
Suffice it to say, For the sake of this project, I will have a gap between the top of the 12th fret and the bottom of the 1st string of
.125”, or 1/8”, and the neck is flat.
No relief in sight - hard to photograph this because of the depth of field of the lens:

I am using my “Iserta nut©” nuts on these, which is a “zero fret” inserted into a “nut” base, which is a spacing guide.
The “insert” (hence the name “inserta-nut”) can be MOP, bone, stainless steel, brass, abalone, ivory,ceramic, what have you. I am using nickel silver, same as the frets, because I want the nut to be “just another fret”, not being a believer in nut supremacy or exceptionalism.
I use a "fret height feeler gauge" to get the height right - for my frets it is .035”
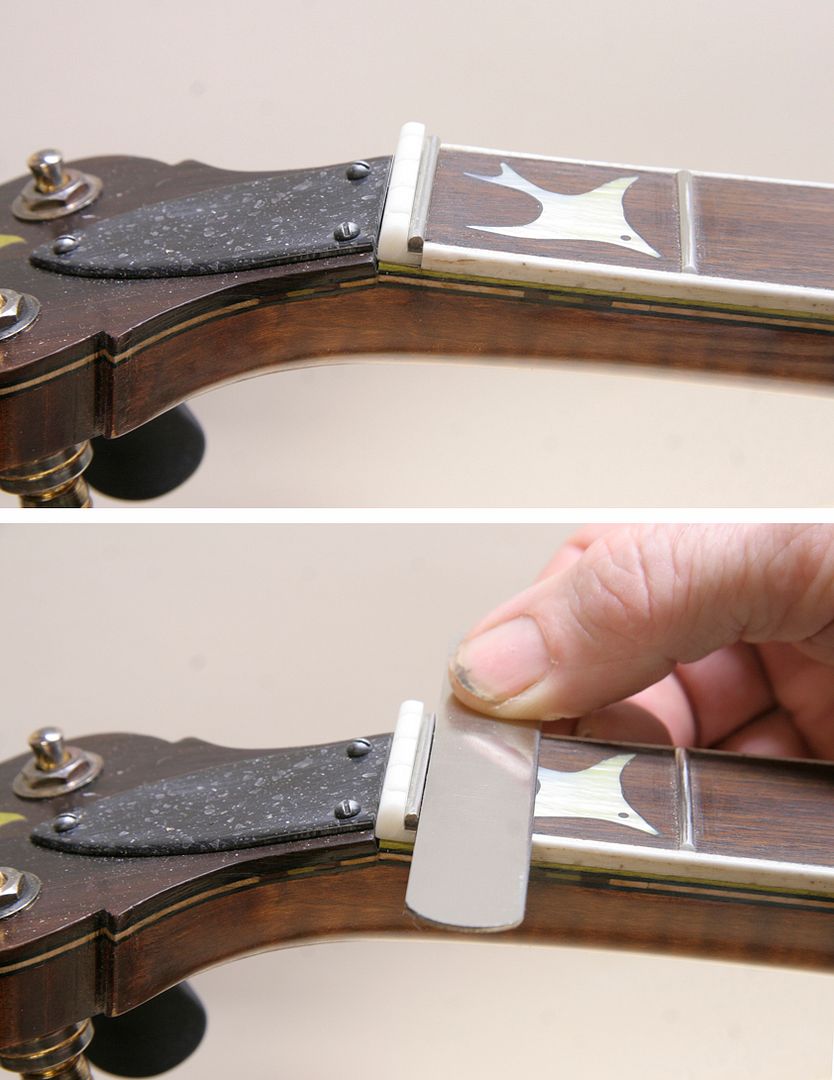
IF I wanted to make a conventional nut, and I’ll be very honest here, most of my customers want a conventional nut - they are the boss - the customer is always right, I would make it from bone or MOP. I like bone best - the zero fret is “brave new world” - I have them on all my banjos, but that’s me. I am an iconoclast.
Making a bone nut :
Step one -get a big dog
step two - give him marrow bones to chew on.
When he’s asleep, get one and cut sections out of it with the bandsaw, and sand it down - it will smell like you are getting your teeth drilled at the dentist - my wife came into the shop and said “WHAT ARE YOU DOING - are you OK? - smells like grinding teeth” :

Then you polish it up


When you string it up, you have to have the bridge in roughly the right position. The starting position is exactly twice the distance from the nut to the 12th fret (or the octave if the banjo is an odd scale):
It’s best to make a wooden template, and mark the intervals. You draw a pencil line on the head which can be erased later on:


You have to tweak the bridge height, which in this case is 11/16”, and this was determined early on by the neck angle.
There are two ways to tweak the action on a dowel stick banjo - adjusting the bridge height, and adjusting the neck angle
BOTH are done with sandpaper.
That’s about it for now
timmo_1949 - Posted - 07/30/2012: 16:13:16
Sorry, I'm an archaeologist and can't help myself. The atl-atl has been around since Paleolithic times. The word is from Nahuatl (the language spoken by the Aztec indians). It lengthens the moment arm of your arm (as does a tennis racquet) so you can throw atl-atl darts (smaller than a spear, bigger than an arrow) further.
Now back to our regularly scheduled program...
Ken LeVan - Posted - 07/30/2012: 17:34:28
quote:
Originally posted by timmo_1949
Sorry, I'm an archaeologist and can't help myself. The atl-atl has been around since Paleolithic times. The word is from Nahuatl (the language spoken by the Aztec indians). It lengthens the moment arm of your arm (as does a tennis racquet) so you can throw atl-atl darts (smaller than a spear, bigger than an arrow) further.
Now back to our regularly scheduled program...
There are a number of them in the State Museum in Harrisburg.
Anyway, I am not kidding, there is truly a deer hunting season in PA for them.
wuzapicker - Posted - 07/30/2012: 20:37:45
Okay Ken,
Why the big dog? Does the canine saliva have some maturing effect on the bone?
Michael
Ken LeVan - Posted - 07/31/2012: 04:30:30
quote:
Originally posted by wuzapicker
Okay Ken,
Why the big dog? Does the canine saliva have some maturing effect on the bone?
Michael
Just joking.
My German Shepherd can really grind them clean and get the marrow out of the inside. He has about 10 of them at any given time, which we keep putting into a basket with his toys, but he gets them all out again and spreads them around. When I want a bone, I have a nice selection of clean ones to choose from.
rudy - Posted - 07/31/2012: 04:58:30
Those of you who are interested in the process of making your own bone nut should enjoy the article found in the lessons section here on the Hangout on the proper cleaning and preparation of raw bone. It was written by Sean Barry and has been floating around the internet for many years. Sean updated the article and graciously posted it here on the Hangout a few years ago. Here's the link to a good read:
banjohangout.org/docs/lesson-files/171.txt
Ken LeVan - Posted - 07/31/2012: 05:53:47
Thanks, Rudy,
That's an interesting article. I have never "degreased them". After Hugo chews on them for several months, they become white, and when I cut them up, they are "dry as a bone" ha ha.
As a comparison, I have a few pieces of ivory in my toolbox from back when that was still legal. Of course I would never use it for anything other than a comparison. I had one banjo with a nut that was made from ivory, and I didn't like it. It's much softer and "duller" than the bone. In actual fact, my favorite nut material is Corian®.
rudy - Posted - 07/31/2012: 06:36:49
Corian is great stuff; I like it's uniformity and availability in a wide range of colors. It just doesn't have quite the intoxicating aroma of bone when it's sanded though...
Ken LeVan - Posted - 07/31/2012: 07:11:15
You're right about that! and MOP smells just as bad as bone.
Patrick Hanna - Posted - 07/31/2012: 15:43:13
Hey, Ken,
Regarding your flat fingerboard stance, I agree completely--and for the same reasons you state. I am not much of a banjo player...(nor for that matter am I much of a guitar player). But I do play rhythm guitar in a small jazz ensemble, and I like my fingerboard flat. I don't use a capo, either. My capo is my left hand first finger, as I move up and down the neck. With a flat board, the playing comfort is so much better for me. And I never play with enough force to rattle strings against frets. No neck relief for me.
I'm watching your generous threads here very closely because I'm building a tenor banjo which I will use for some older jazz tunes. My buddies are itching for me to get it finished. I assure you, it will have a flat board, too.
Thanks for all you have shared with us.
Patrick
rudy - Posted - 07/31/2012: 19:58:47
quote:
Originally posted by uncle.fogey
You're right about that! and MOP smells just as bad as bone.
I was so enthralled with the DIY ethic (plus being broke...) that I went down to the local creek and grabbed some mussel shells for my inlays. Band sawing the shell and sanding the chunks into usable flat pieces taught me a bit about the economics (as well as the general level of disgust) of doing your own MOP!
It did put a much happier perspective on changing diapers, though...
Patrick Hanna - Posted - 08/01/2012: 09:35:23
Re my previous post about flat fingerboards, I will clarify for any guitar players who stumbled across that: Of course, my fingerboards are all crowned. I should have correctly said that I like my fingerboards level--just like Ken.
rudy - Posted - 08/01/2012: 14:18:37
quote:
Originally posted by Patrick Hanna
Re my previous post about flat fingerboards, I will clarify for any guitar players who stumbled across that: Of course, my fingerboards are all crowned. I should have correctly said that I like my fingerboards level--just like Ken.
Patrick, I would never assume that a crowned firet board would go without saying. I was actually wondering myself about what you were referring to. Thanks for the clarification.
I don't think there's any consensus on crowned vs. flat boards. From what I've seen the lion's share of banjos are flat, but I'm mostly exposed to the old time players. Crowned boards seem to be much more popular for BG and melodic players from what I've seen. I've tried both and can't really say I have a preference one way or the other, so it's easier to do a flat board instead of tossing a coin.
Uncle.fogey, I know you've had thoughts on the merits of flat and crowned boards, any light to be shed from your perspective?
Ken LeVan - Posted - 08/01/2012: 16:37:59
Because I sand them all by hand with sandpaper blocks, then use fret wire that comes in pieces which have a radius, there is an inevitable "crowning" I think it must be something like a 60" radius. It's not concave, anyway.
Here's the fret wire:

Here's the fingerboard - it has a VERY slight radius, which you can see in this picture:

I wouldn't call it a radius, per se, but it's slightly convex. - better than concave, and I crown my bridges, so it works great.
Patrick Hanna - Posted - 08/01/2012: 20:43:35
Rudy, I was referring to my jazz guitar fret boards. They are crowned in width but level in length. My banjo will be as level as I can keep it in both axis. But this is Ken's thread and I didn't mean to derail it. My bad. I'll shut up for a while now. Ken, I sure appreciate what you are showing us.
Patrick
Ken LeVan - Posted - 08/05/2012: 14:16:11
I’m getting close to the end of this.
I have made some design changes relative to the resonator - to pot connection because my wife told me that you had to be able to remove the whole resonator/ flange assembly in one piece, and just having every other hole larger "didn't do it". We should all be lucky enough to have someone who can tell you are wrong without offending you - It's tough to tell someone they are full of s**t. She's been my partner in the design business for 25 years, so when she says I'm full of s**t, I listen, even if I really don't want to hear it.
I went back, and changed the design so that the nuts would fit through ALL the holes, like the Paramounts, and now the whole enchilada is attached to the pot via 4 lugs that extend upward and allow bolts to go into the bracket band. The flange is now attached to the resonator by 4 screws. I can take the whole thing off and change from a resonator banjo to an openback in about 2 minutes, maybe less.

I have given up on the magnets. Does anyone need any neodymium magnets? I have quite a few.
In terms of setup, I think I covered the neck angle and neck straightness, the bridge, and the nut.
If I missed something, please let me know. We are at the point of getting these banjos to work properly.
SO, strings.
In actual fact, I buy individual strings in bulk, and make my own sets
I am using a hybrid set, which you can’t buy.
It’s 10 - 12 - 13 - 22 (phosphor bronze) - 10
The closest sets are the GHS PF 145 and the GHS 150 Why the one with the 14 gauge 3rd string is “light” and the one with the 13 gauge 3rd string is “medium light” escapes me.
Why am I using this set?
First of all, heavier strings are not louder, but the heavier third string - 14 vs 13 is more problematic with intonation - the stiffer the string, the more variance from the “physics of strings” norm, which assumes a string with no stiffness - not possible in the real world.
Secondly, I like the phosphor bronze 4th strings better than the stainless steel ones because they are more “bassy” I want the 4th string to have a presence - BG players call it a “growl”. What’s the trade-off? The stainless steel ones last longer, and the phosphor bronze ones “die young”- small price to pay in my book. How much does a string cost?

I string it up - now that it is strung up, I have to adjust the head tension.
I do this by tightening the nuts, and listening to the sound until I like it. I realize this isnt for everyone. Steve Davis, a hangout member has developed a method of checking the tension by measuring the head deflection when the banjo is tuned up to pitch.
I call this the “Davis Gauge”, and here’s the way it works - you put a straightedge across the head then measure the deflection by inserting a coin under the straightedge next to the bridge. A quarter is a G#, a penny is an A, etc. Here’s what it looks like with feeler gauges instead of coins - same difference:


I tighened the heads, and checked them with the piano, which has been tuned and is spot on. Both heads were about a G, in other words, MY ear liked the head tuned 1/2 step lower than the normal G# - this isn’t much, and remember, I waxed the tone rings to get a good tuning “slide”. The Davis Gauge was within this range, so I think it’s a great way to check the tuning of a head to see if it’s in the right area. I know nothing about drum dials.
The heads are Elite Amber ones, which I like.
The tailpiece is pretty flat - neutral, I’d say

So that’s it for the basic setup.
These banjos are now finished. Here’s what they look like, and I will repeat these pictures, along with details and sound files on my next thread, which will be the final one. It’s been a long road:


aeroweenie - Posted - 08/05/2012: 15:03:52
I'm almost sorry to see the gorgeous banjos finished as I've really enjoyed, and learned a lot, from your long road. Thanks again!
Page: 1 2
Terms of Use | Privacy Policy | Privacy Consent (EU/GDPR Only)
Copyright 2026 Banjo Hangout. All Rights Reserved.


