
DVD-quality lessons (including tabs/sheet music) available for immediate viewing on any device.
Take your playing to the next level with the help of a local or online banjo teacher.
Weekly newsletter includes free lessons, favorite member content, banjo news and more.
Premier Sponsors


|
Please note this is an archived topic, so it is locked and unable to be replied to. You may, however, start a new topic and refer to this topic with a link: http://www.banjohangout.org/archive/239901
uncle.fogey - Posted - 07/03/2012: 15:55:44
The dowel stick is an extension of the neck into the pot, which transfers vibrations very efficiently and directly. of course, the neck heel has to fit firmly against the rim, and this is the essential element in the equation.
This is probably the most difficult part of banjo construction to get right - it’s unforgiving. The whole idea of coodinator rods was developed to get around this frustration, and pretend that you didn’t need to get the neck to fit properly, because you could “adjust” it - can you “adjust” the neck on a Stradivarius or D-45 - "I don’t think so" (thanks Fred Willard).
I think of co-rods as liquid shoe polish, which ought to work, but doesn’t. Doing it right is worth the effort, and few people do, it right. end of editorial.
If you want to do a dowel stick, here’s how to do it - first you have to sand the dowel stick down so it fits into the square hole in the rim, which we’ve already done, way back.
You mark the position of it outside the rim, then you put it on the lathe and turn down a tenon, which is 3/4” diameter, and 1 1/4”long

Now you can see these finished dowel sticks:

The next thing is to cut the arcs in the heel. For years and years, I did this with gouges like the old ones were done. It works great, and you have a lot more control.
Nowadays, because I have to make more necks, I do it with a sanding jig I made, that fits on the drill press. There are MANY MANY ways to do this with routers, gouges, etc, and perhaps this thread will enable us to see other creative methods.
This is just my way, not the only way. This shapes it very well, and I have to position the neck and trace the dowel hole onto it:

THEN, I screw the neck onto the pot temporarily using a kind of “caul”:

By doing this, I can tell if the alignment is correct in all directions. IF THE ALIGNMENT IS OFF , YOU ARE DEAD IN THE WATER.
I use a mason’s line stretched tight for this - the line runs from the third string slot in the nut to the tailpiece lug, in a straight like which goes down the center of the fingerboard from the 5th fret down:

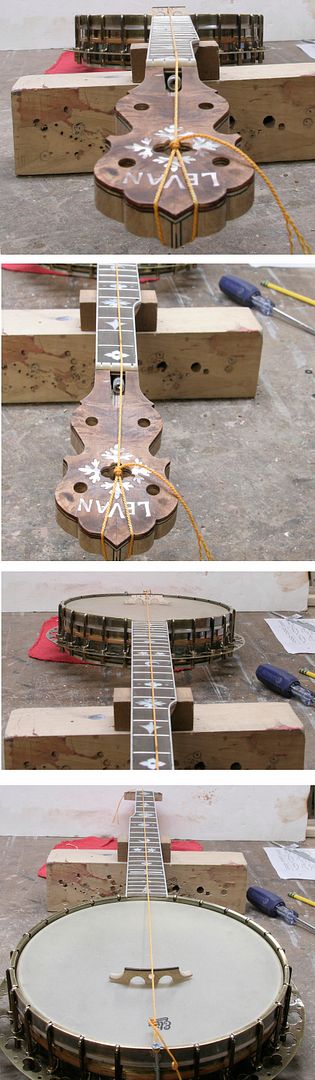
If it doesn’t line up, you have to fix it - just to put it into perspective, I tweaked my jig 3 times to get it right. Shim your jig while you are fitting the neck , not the neck after the fact - the neck should be right when you put the banjo together.
While you have the mason’s line on it, you can see if the action is going to be OK:

This makes a note - pretty scary, because mason’s line does not make a good banjo string - if this was what it was going to sound like, I'd stop right now..
wuzapicker - Posted - 07/03/2012: 21:32:57
Probably less craftsman like than you do Ken, but my first dowel stick installation I compensated. I installed it rectangular, planning to cut the taper to correct any misalignment before drilling the mounting holes. I fit the neck carefully with gouges after the stick was installed, checking with carbon paper. It took a whole day, but I got a good fit. The result is the stick angle was only just a little bit out so the stick taper is nearly aligned with the grain.
I like your way better. Thanks!
Bart Veerman - Posted - 07/04/2012: 08:13:34
Many thanks Ken for your amazing banjo building course!!!
uncle.fogey - Posted - 07/04/2012: 14:54:40
quote:
Originally posted by Bart Veerman
Many thanks Ken for your amazing banjo building course!!!
Thanks, Bart.
I can't tell you how much I appreciate that.
Ken
uncle.fogey - Posted - 07/04/2012: 15:16:37
I also aligned the maple neck, which looks fine.
I didn’t have to correct this one because I had made all the tweaks on the jig doing the cherry one, so this one was good right out of the gate
If you look at this picture,you can see the red cloth I had the pot sitting on - I have to figure out how to finish the inside of the resonator - later:

The angle I am using for these is 3 degrees, which comes out exactly right for an 11/16” bridge, which is what I’ll be using on these:

I have a 3 degree template, which I use a lot. I make templates out of acrylic or “Lexan ®” polycarbonate, which you can get at Lowes window department.
Now I have to drill the holes for the dowels, which should come straight off the heel, which means they should be drilled at a 3 degree angle.
I have made a jig for this which bolts onto the drill press table.
(1) it is at a 3 degree angle
(2) the centerline of it, which you see in the middle picture, is the THIRD STRING LINE, which is the “cosmic center” of a 5 string banjo neck - DO NOT align the dowel stick with the “truss-rod” centerline - they are VERY close, but different, You want the dowel stick to follow that “mason’s line” in the previous pictures. This is important.
(3) I use a 4 foot level to check the plumb of that centerline - if it’s not plumb, I would shim the jig (once again - shim your jigs so you don’t have to shim the neck):

Then I can drill the hole with a VERY SHARP 3/4” Forstner bit - here’s a good pic of that. Drill it a HAIR deeper than the dowel tenon. I call that “schnooly” - you always have to have a little schnooly.

Now, I can “dry-fit” the dowel stick. I can’t emphasize the importance of dry fitting enough - try everything first before you glue or braze it.
So it fits. You want the heel to fit tightly against the rim and the tailpiece end of the dowel stick to be centered in the rim. Later on, I will show how to make a bracket to give you a little “shcnooly” during assembly and set-up:

I now make the other one, and they are exactly the same, bug’s nuts:

Not that I would do that, but I could interchange these necks, and either one would fit perfectly on the other pot.
I DO intend to switch tone rings, as part of this project, but I think the difference between my red maple neck and the cherry one would be VERY subtle and probably undetectable compared to rims and tone rings.
There are a couple of design considerations I have to address - I am using “Elite Amber” heads, because I really like them, have tried one on my PW Granada, and feel they are wonderful for BG - snappy. KI don’t know where the “mellow” description of these came from - probably some marketing copywriter - they are not mellow - they just LOOK mellow.
ANYWAY - you can see through them a bit, which I like, so I have to think about what color to stain the inside of the resonator, because you'll see it.
Here's what the dark brown inside of my Granada looks like through the head - I think there are other colors that may work better - I'm thinking about it.

Finally, I have made laminated heel cap pieces, and I will be putting them on next, then final sanding the heels:

aeroweenie - Posted - 07/04/2012: 18:35:05
Very useful step-by-step of what you're doing and why - thanks! I know this thread is about the necks - but that rim is gorgeous.
uncle.fogey - Posted - 07/05/2012: 04:50:49
quote:
Originally posted by aeroweenie
Very useful step-by-step of what you're doing and why - thanks! I know this thread is about the necks - but that rim is gorgeous.
Thanks!
Because these 2 banjos are designed to be both openbacks and resonator banjos, I spent time detailing and finishing the insides of the pots, which you can't see with the resonator in place.
dickinnorwich - Posted - 07/05/2012: 06:39:27
Ken:
Getting back to the Mason's line photo, the problem I always have with dowel sticks is that I find the action under full string tension is always greater than the action indicated by the Mason's line. The obvious answer to this is to pre-set the neck under full tension using the caul. I'm gathering that you don't have this problem.
uncle.fogey - Posted - 07/05/2012: 07:37:25
Dick,
The neck is very rigidly set by the dowel stick and bracket, and if it moves up and down more than a tiny bit, there is some mechanical problem with the attachment.
One thing that DOES happen, is that the bridge pushes down against the head more with real strings than it does with a mason line, which will lower the action. If the neck moves up a tiny amount, they ought to cancel each other out.
Once I get it strung up for real, I see if I need to adjust the truss rod (which I usually don't), fine-tune the action with the bridge, and the sound with the head. There is a symbiotic relationship between the bridge height and head tension, as concerns the action, so when you are doing the final playing adjustments, you may have to adjust one, the other, or both.
geezr - Posted - 07/05/2012: 08:11:54
Ken
Back in the 60's when I was doing a lot more neck making I used a 3/4 inch plug cutter and a 3/4" Forstner bit with really good results. I had a Shopsmith then and I had jigs setup to cut the tenon and the hole. The alignment was dead on. I tapered the dowel stick equally on both sides and I cut the the taper on the top only.
With the hole cut parallel to the fingerboard, and the tenon cut parallel to the bottom of the stick I wound up with the correct angle on the stick.
One thing that I did was to key the jigs to the table with dowels so that the jig always lined up with the drill bit and plug cutter. If you try this it is best to make a drill jig for the alignment pins so that the holes in the jigs will line up with the holes in the table.
Jay
Edited by - geezr on 07/05/2012 08:23:45
dickinnorwich - Posted - 07/05/2012: 11:28:50
Jay:
I'm confused. Something doesn't sound right.
If the dowel is perpendicular (90 degrees) to the surface of the rim, then the hole in the heel has to be at a 3 degree angle, facing upward toward the fingerboard.
uncle.fogey - Posted - 07/05/2012: 12:57:59
quote:
Originally posted by dickinnorwich
Jay:
I'm confused. Something doesn't sound right.
If the dowel is perpendicular (90 degrees) to the surface of the rim, then the hole in the heel has to be at a 3 degree angle, facing upward toward the fingerboard.
Yes!
That's why you have to have a special jig to drill it
Vega, on some of their older banjos would drill the hole straight, and cut the tenon on the dowel at an angle. This seems bass-ackwards to me, but, I'm sure there was a reason why they did it:
Here's a 1930 stick from a Vegaphone:

If you are repairing one of these old ones, which were 2 degrees, and want to use the original dowel stick, but bring it up to modern 3-degree 5/8" - 11/16" bridge height, you have to make the dowel stick have a 1 degree angle.
geezr - Posted - 07/05/2012: 13:11:04
Dick
My memory seems to be going south at 76 years. You are right about the dowel stick angle. I have to do some thinking about this.
Jay
Edited by - geezr on 07/05/2012 13:12:45
geezr - Posted - 07/05/2012: 13:19:10
Ken
I am wondering if Vega cut the tenon first and then cut then tapers. If they used a horizontal drill press with the table parallel to the axis of the spindle it would be easy set the machine up for boring the hole in the neck and cutting the tenon with a plug cutter. This raises a question about the tenon- Is there a center hole in the end of †he tenon on Vega sticks?
Jay
Edited by - geezr on 07/05/2012 13:28:47
uncle.fogey - Posted - 07/05/2012: 13:33:18
I believe they cut the tenon into a piece of wood with a rectangular cross section, then cut the dowel to whatever angle they wanted. Vega was the "every banjo a custom model" company, and this would allow them to make any angle easily - keep in mind that the heels were cut with gouges (as were Gibsons), so this would require no standard setups. With Gibson, on the other hand, EVERYTHING was standard - I'm surprised they used gouges at all.
Vega did a lot of odd things.
wuzapicker - Posted - 07/05/2012: 15:01:39
quote:
Originally posted by uncle.fogey
I believe they cut the tenon into a piece of wood with a rectangular cross section, then cut the dowel to whatever angle they wanted. Vega was the "every banjo a custom model" company, and this would allow them to make any angle easily - keep in mind that the heels were cut with gouges (as were Gibsons)...
That is exactly what I did having never set a dowel stick before. That was the compensation I mentioned earlier. As it happened, the dowel turned out within 1/32" of center. So the result was satisfactory and I didn't bother tapering the dowel. The photo below shows the rectangular stick installation. The paper sticker hides my driver's license number.
Lange cut Orpheum and Paramount heels with gouges too. On some the fit is sloppy and on some quite sublime.
uncle.fogey - Posted - 07/05/2012: 15:39:49
I started to show the heel caps yesterday.
Today I finished them, and final-shaped the heels.
If you look, you can see that the pot end off the heel cap protrudes out a little, which covers the bracket band and looks neater. Some of the old makers did that.
SWCooper - Posted - 07/05/2012: 16:06:09
Ken, I don't know who's doing your photography, but it's really very good. I was just browsing the series for the beginning this morning.
I'm assuming this is all actual illustration for the book.
uncle.fogey - Posted - 07/05/2012: 16:28:36
Thanks!
I do the photography and drawings myself. I WILL use much of it in the book, but probably have to do a lot of new pictures, and rewrite a lot of text, as you can imagine - when you have to get it to fit on a page, it's different than a blog.
Here's a sample of the kind of layout I'm thinking about - mostly pictures with callouts. I know I will have to have some sections of purely text.
I have to lay out more than 150 pages, I'd imagine. A job for the winter.

Ken
SWCooper - Posted - 07/05/2012: 16:56:19
Then I'm really impressed. I spent 25 years in the art department of an engineering company (hired as an illustrator, but I did everything from tabletop photography to magazine layout to Photoshop), so I have the professional standing to tell you these are excellent.
uncle.fogey - Posted - 07/05/2012: 17:24:03
quote:
Originally posted by SWCooper
Then I'm really impressed. I spent 25 years in the art department of an engineering company (hired as an illustrator, but I did everything from tabletop photography to magazine layout to Photoshop), so I have the professional standing to tell you these are excellent.
Thank you very much! I really appreciate that. I somehow got the impression from things you wrote that you were involved in the visual arts.
LeVan Design levandesign.com primarily did industrial design, and we designed housewares and home furnishings products, but for years, we did packaging, designed catalogs, and did commercial photography. I have a Hasselblad, a Deardorff 8x10 view camera, and big strobes and soft boxes, but that equipment is now all but obsolete, so I just use a Canon digital camera, Adobe Illustrator and Photoshop.
I also designed historic architecture guidelines for various municipalities with historic districts, explaining how to treat different styles and types of buildings. That kind of technical manual is similar to what the banjo book will be, although with less text, and I won't have to have some State Historical Commission sign off on it -ha ha.
This banjo book will be a lot of work, as you well know.
Ken
XXXris - Posted - 07/05/2012: 18:35:13
This is really great, thanks for all the work!
Would anyone care to say a bit about the "gouge" method of fitting the heel / pot? (What sorts of gouges, what the basic process is.)
Chris
geezr - Posted - 07/06/2012: 05:51:30
The Vega necks I have seen were cut with a narrow flat chisel or a carving tool, not a gouge. If my memory serves me correctly the cuts were made crosswise parallel to the fingerboard. You have to use a really sharp chisel and use very light cuts
Jay
geezr - Posted - 07/06/2012: 06:19:10
Ken
I think you are right about Vega and tapering the dowel sticks after the tenon was cut. However this also lends itself to a standard setup for cutting the tenon, especially if they used a plug cutter. They were making some where around 300 banjos a week in their heyday and they would have had to have some standard production methods.
I think that they customized their banjos using standard parts such as rim blanks dowel stick blanks, neck blanks, tone rings, resonators, and hardware. They also had the tooling to make custom parts so that they could make any size pot, different scale lengths and any setup that you would want.
Jay
PS have you tried a plug cutter to cut the tenon? A really good one works like a charm and you get a really good tenon that has a no wiggle fit.
uncle.fogey - Posted - 07/06/2012: 06:27:13
What has worked best for me is a really sharp Japanese gouge that is pretty flat. You just keep shaving it little by little, working on the sides to a pencil line.
I can see the benefits of using a flat chisel across the heel, but I would use that at the end of the process to clean off high spots.

uncle.fogey - Posted - 07/06/2012: 06:28:59
quote:
Originally posted by geezr
Ken
I think you are right about Vega and tapering the dowel sticks after the tenon was cut. However this also lends itself to a standard setup for cutting the tenon, especially if they used a plug cutter. They were making some where around 300 banjos a week in their heyday and they would have had to have some standard production methods.
I think that they customized their banjos using standard parts such as rim blanks dowel stick blanks, neck blanks, tone rings, resonators, and hardware. They also had the tooling to make custom parts so that they could make any size pot, different scale lengths and any setup that you would want.
Jay
PS have you tried a plug cutter to cut the tenon? A really good one works like a charm and you get a really good tenon that has a no wiggle fit.
I have never tried a plug cutter, but that sounds like a good idea. I would have to make a drill press jig for it. I might give it a shot!
Thanks
geezr - Posted - 07/06/2012: 07:06:04
Ken
I just happened to think- a flat chisel cutting across the can be done with the dowel stick glued in. I am wondering if Vega cut the curve with a bandsaw first and cleaned up the heel with a chisel.
Jay
uncle.fogey - Posted - 07/06/2012: 13:19:50
Jay,
Here's a good close-up of a 1925 Vega heel cut. You can see the chisel marks and it looks as if they had to have been done BEFORE the dowel was put in.
It looks as if the heel cap was on BEFORE they chiseled and fitted the neck (not the way I do it) because you can see where they cleaned below it.
You can also see the cuts on the part of the heel that clears the tension hoop and flesh hoop - you could not do that with a bandsaw.
They might have rough cut it with a bandsaw to get it started, then glued on the heel cap, but I don't see any saw or sander marks on this heel - just looks like chisels to me:

Terms of Use | Privacy Policy | Privacy Consent (EU/GDPR Only)
Copyright 2026 Banjo Hangout. All Rights Reserved.


