
DVD-quality lessons (including tabs/sheet music) available for immediate viewing on any device.
Take your playing to the next level with the help of a local or online banjo teacher.
Weekly newsletter includes free lessons, favorite member content, banjo news and more.
Premier Sponsors


|
Please note this is an archived topic, so it is locked and unable to be replied to. You may, however, start a new topic and refer to this topic with a link: http://www.banjohangout.org/archive/234848
Ken LeVan - Posted - 04/28/2012: 10:12:12
This is going to be a long chapter, because, I have to turn the rims, glue on rim caps, install bindings, fit the metal parts, cut holes for the dowel stick, and make resonator flanges.
I'll start with the rims.
You remember, back in the beginning, I showed how to make finger-jointed rims and bent and laminated ones


So these are the two rims I'm going to develop. I'm going to show pictures that jump between the beech/cherry one and the maple one because I am doing them at the same time, more or less.
First you have to attach the blank to a faceplate and put it on the lathe. I glue a 1/8" thick band onto the rim to act as a decorative bead between the tone ring skirt and the bracket band:

Then you turn the top and bottom down to the diameter necessary for the tone ring and bracket band to fit. I'm using a diameter strip to measure the diameter as I turn it down.
Finally, you have to actually see if the bracket band fits. It has to be REALLY tight - like the hoop on a barrel. The tone-ring is a little looser:

You will have a lot of "exelsior" when you are finished with this if your tools are sharp:

Then I am going to make heel caps. For tha maple rim, I'm using curly maple and for the beech / cherry one, I'm using a reallo old piece of walnut that goes back to 1744. I have to use parts of the board that aren't worm-eaten:

So a rip a piece about 1/4" thick, and make a circle, with the grain all running in the same direction, which goes from the neck to the tailpiece.
I glue that on to the bottom. You can use clamps, or, as I did with the maple one, weight it down with cinderblocks:

Then I put it back on the face plate, back on the lathe, turn and sand the bottom, and using a router table, I rout rabbets for the binding:

I use a router for this because it's easier. I COULD just make the rabbets while the rim was on the lathe, but it's more measuring and work. The router is a no-brainer - here on the picture above, you can see the rabbet cut through the walnut heel cap.
Then, I make thin strips of Corian®, from scraps I buy from a kitchen cabinet maker. I make the strips .060, just like the nitro.
I glue it in to the rabbets with super glue and umpteen clamps, put it back on the lathe and sand it down flush with the surface:

You can see how nice it looks.
As an "idiot check" I make sure the metal parts fit properly.
NEVER get rid of your face plate orientation marks until EVERYTHING that has to be done on the lathe is done. In fact, I never get rid of them at all. I could take apart a banjo I made 2 years ago and still get it on the faceplate in perfect orientation.
Now I have 2 rims, which you can see here. They are different. We'll see what works best with what next:

GSCarson - Posted - 04/28/2012: 10:23:01
The parts and construction continue to look great and also a super sequence of photos, thanks for sharing with us. Glenn C.
Dave1climber - Posted - 04/28/2012: 11:05:21
Ken
Do my eyes deceive me or is that a resonator in the second photo of "umpteen clamps"?
Dave
Ken LeVan - Posted - 04/28/2012: 11:39:37
Yes Dave, that's a resonator - I should have mentioned it.
These banjos will have resonators, but will be "convertible" I have taken pains to make the insides and bottoms of the rims look nice because they will also be openbacks.
The bindings and wood on the resonators will match the rims and necks. Miles to go before I get to the resonators, but I had to make them because everything has to fit together, and I have to make flanges pretty soon.
Ken
Ken LeVan - Posted - 04/29/2012: 15:29:12
So now I have all of these parts, which I can put together in different combinations:

It's like when JS Bach wrote the Goldberg variations to show that with tempered tuning, you could play the harpsichord in any key. He was smart - now we have frets and can use tempered tuning. (editorial-be suspicious of banjo players who say they can play in untempered keys).
Nothing to do with Bach, but with "variations". I have 2 different rims of pretty different weights, maple, and cherry beech - they're really different and they "tap"at different pitches.
THEN I have different tone ring designs that weigh varying amounts, ring at different pitches and have different timbres. I posted the tone ring "ring-dings" I hope you listened to them - they are different.
So now, you put them together, and whatta ya got - 2 rims x 3 tone rings is 6 variations. Not as many as Bach's Goldberg variations, BUT, I also have another tone ring and a flathead Mastertone tonering is interchangeable with my "system" (I hate that word - it's like "signage")
SO I don't have a "system" I have a bunch of parts that fit together interchangeably:


We will get to hear all this in the end, but now I have to make a resonator flange.
Ken LeVan - Posted - 04/29/2012: 16:05:39
I should have mentioned the gap and overhang.
All of my banjo designs have been based on a floating inner edge of the tone ring, as opposed to the Gibson model where the tone ring sits firmly on the top of the rim.
I am thinking about two variables -the gap and the overhang.
Here's a drawing:

SO, the thinner the rim, the greater the overhang (or as I like to refer to it after a few beers - the hangover)
This is VERY difficult to photograph, but (maybe) you san see the relative hangover of the 1/2" maple rim vs the 5/8" cherry beech one It's hard to see in photographs:


aeroweenie - Posted - 04/29/2012: 20:17:21
Very informative, thanks. It will be a lot of work to systematically vary the gap and overhang, presumably a separate tone ring for each variation? Also, why do you use Corian for binding?
spoonfed - Posted - 04/30/2012: 02:23:51
This has been one of the best threads I have ever seen on the HO, fascinating stuff ! Wish you could make it into a DVD , I would order it today , great !
Ken LeVan - Posted - 04/30/2012: 05:34:09
quote:
Originally posted by aeroweenie
Very informative, thanks. It will be a lot of work to systematically vary the gap and overhang, presumably a separate tone ring for each variation? Also, why do you use Corian for binding?
Because my rim fit dimensions are standard to my design, I can alter the thickness and weight of the rim by reducing the inside diameter, and alter the tone ring in the same way, but they all fit with one another interchangeably.
In other words, If I took either one of the rims I'm showing here, and made a new tone ring that was wider or narrower, it would still fit on either rim. Likewise the bracket bands.
Old tone rings that I made years ago will fit on these new rims.
I don't know if I have answered your question.
As for the Corian, I'm experimenting with that because I see the day approaching when nitrocellulose (I like nitrocellulose) will either be banned or so severely restricted or hard to ship that it won't be economically feasible to use it. We live in a safety obsessed society and era.
Corian, on the other hand, is durable, decorative, comes in many colors suitable for banding and inlay, is inexpensive in the sizes you need for banjos, doesn't stink, isn't explosive, and is friendly to work with. The only downside is that when you cut it into strips, static electricity makes the sawdust stick to everything around it, a minor problem.
Ken LeVan - Posted - 04/30/2012: 15:02:51
I said this was going to be a long one.
Now that the pot parts are finished, or at least “kinda finished,
I have to make resonator flanges, or in this case, resonator flange ”plates”. These fit under the brackets on the bracket band. Since these banjos will have dowel sticks, the bracket band has to be one inch wide to accomodate the notch that must be cut into it. If I was using bolts or co-rods, the bracket band COULD be 1/2” wide.

in order to do this, I had to actually make a resonator, or at least good drawings for one, because I have to know what the outside diameter (OD) of the bracket band will be. The INSIDE diameter (ID) is 11” because that’s the OD of the bracket band’
So here’s my resonator drawing - If my goal is to make a resonator banjo, I have to make resonators - I made 3 1/2 of them to gear up for this project - so here's my drawing, showing the critical areas for resonator flange fit- I backed off from these dimensios by a couple of thousandths for a reasonable tolerance:

Using these dimensions, I make a template out of plastic - I am using sheets of the same kind of plastic that non-nitro bindings are made from - basically the same material as plumbing drain pipes - works great for templates. I have to make sure it fits on both the resonator, and pot, Then, I trace the hook holes onto it directly from the bracket band:

As you can see, while I like drawings, I like to make some kind of 3-dimensional model to see if it REALLY works. Don't ask me why I know that.
DESIGN: I am interested in using some kind of traditional (the banjo is a traditional instrument) motif for the holes in the flange, but one that I can cut or punch out easily. I like the simplicity and "in your face" graphic boldness of old medieval / Gothic / Romanesque motifs, back in the days when EVERYTHING was made by hand - I looked at Pugin, William Morris, the Grammar of Ornament, books about Heraldry, and decided to use the “quatrefoilfoil”, which is really 4 circles. I’m sure there is some symbolism with this motif, but I don’t know what it is (the "trefoil" probably symbolizes the trinity). I like the quatrefoil because it’s simple and graphic (and easy to cut out) PLUS, nobody else has used it on banjos, as far as I know, so it’s my own unique design:
I am seriously thinking of making a fingerboard with medieval grape-vine motifs and quatrefoils - I think these old motifs have an emotional quality that has lasted 800 years.
SO, NOW, having a "sort of" plan and a plastic template, I make a drawing of the flange on the computer that I will use as a pattern to cut it out:

It has a look of Gothic tracery - it’s graphic, and looks a little Celtic, too - I like it - maybe some Celtic player will get me to make them a custom banjo(?).
Now, I print the computer drawing out and paste it onto a piece of brass with super 77, cut the sections out with a bandsaw, sand the edges and punch out the designs with a metal punch.
!!! UNDER NO CIRCUMSTANCES SHOULD YOU TRY TO DO THIS WITH A DRILL PRESS!! You will seriously injure yourself when the drill press catches and spins the brass things around like a food processor blade. PLEASE.
I am violating every spec with this punch - too heavy gauge metal - using a cheater pipe on the handle, not using their base, etc. but none of this is dangerous to me - I will just ruin a $56 tool. So far it's paid for itself.

There are 136 holes in this. Every other hook hole is larger so that you can remove the flange by onbly removing half the hooks. I didn’t invent this, The old tube-and-plate Gibsons had that detail - It’s handy. Then you peel off the pattern and silver solder the pieces together. The brass I’m using has a protective plastic film, so it stays clean - Still, I have to polish it - remember, this will have a patina in the end:

There it is - Voila. It fits in the resonator and it fits around the pot. Of course, in the end, the resonator will be stained dark inside to give more visual contrast to the flange.

I think the other flange I make for this project will have “trefoils” instead of “quatrefoils” That will reduce the number of holes by 22. Maybe I’ll like that one better(?) It would still look graphic, Gothic and Celtic.

BNJOMAKR - Posted - 04/30/2012: 17:28:34
Ken
You are right about not drilling brass with a normal bit... it will jump up and grab ya! But, I grind the tip of a normal bit to from a brad tip bit. I use a dremel tool with a grinding disc to make the tip look like the picture below. The drill now acts like a mill and cuts through the brass plate. Works purty good!
I'm enjoying the posts... Thanks for posting all this work. I know it takes a lot of time!
Marvin


Dave1climber - Posted - 04/30/2012: 18:17:47
Ken
Once again I am impressed with your skills.
Marvin
Thanks for the useful tip.
And thanks to both of you for your excellent photos and descriptions.
Ken LeVan - Posted - 04/30/2012: 18:33:42
quote:
Originally posted by BNJOMAKR
Ken
You are right about not drilling brass with a normal bit... it will jump up and grab ya! But, I grind the tip of a normal bit to from a brad tip bit. I use a dremel tool with a grinding disc to make the tip look like the picture below. The drill now acts like a mill and cuts through the brass plate. Works purty good!
I'm enjoying the posts... Thanks for posting all this work. I know it takes a lot of time!
Marvin
Good for you Marvin - I am impressed!
BPorter - Posted - 05/01/2012: 04:56:39
Ken and Marvin, I need you folks to make a "flaming claw" flange for me...I made only one around 1975 or so and cut the 1/16 inch thick brass tone holes with a jewelers saw blade. I owned a large die set to cut the od/id ..I was a "glutin" for punishment I guess.
You folks are artists for sure friends.
Bill Porter
Ken LeVan - Posted - 05/01/2012: 05:19:08
quote:
Originally posted by BPorter
Ken and Marvin, I need you folks to make a "flaming claw" flange for me...I made only one around 1975 or so and cut the 1/16 inch thick brass tone holes with a jewelers saw blade. I owned a large die set to cut the od/id ..I was a "glutin" for punishment I guess.
You folks are artists for sure friends.
Bill Porter
Bill,
You are WAY better with a jeweler's saw than I am - You can cut out as many Gibson scroll logos with one blade as the number of blades I would break cutting out one logo. Maybe a scroll saw with a metal cutting blade?
I thought you had some buddies with a plasma cutter.
Anyway, what does a flaming claw flange look like?
By the way, Spring turkey season ended yesterday in PA, and they all disappear to some hiding place during hunting season, so they should be reappearing soon.
BPorter - Posted - 05/01/2012: 07:38:18
quote:
Originally posted by uncle.fogey
quote:
Originally posted by BPorter
Ken and Marvin, I need you folks to make a "flaming claw" flange for me...I made only one around 1975 or so and cut the 1/16 inch thick brass tone holes with a jewelers saw blade. I owned a large die set to cut the od/id ..I was a "glutin" for punishment I guess.
You folks are artists for sure friends.
Bill Porter
Bill,
You are WAY better with a jeweler's saw than I am - You can cut out as many Gibson scroll logos with one blade as the number of blades I would break cutting out one logo. Maybe a scroll saw with a metal cutting blade?
I thought you had some buddies with a plasma cutter.
Anyway, what does a flaming claw flange look like?
By the way, Spring turkey season ended yesterday in PA, and they all disappear to some hiding place during hunting season, so they should be reappearing soon.
Ken, we have a couple weeks left for our annual spring turkey hunting season....haven't had the opportunity to pull the trigger yet but have plenty of fun getting in the outdoors listening and observing what is going on....
Inserted is a pix of my "Flaming Claw" flange...it could probably be nibbled away using a punch with a small enough diameter punch for the radius portions.
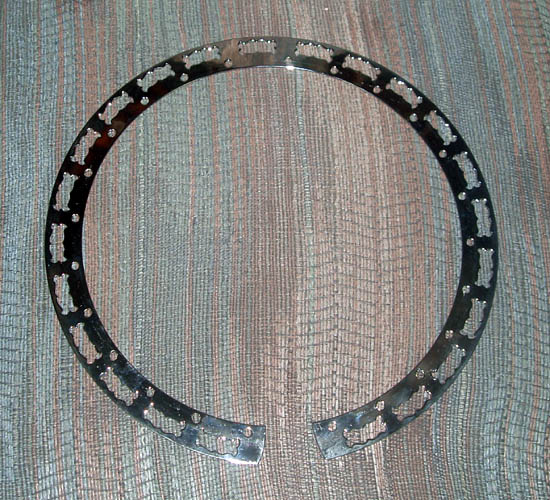
When I get around to taking my "banjer" apart, I will get the place to do a scan of it and get all the stuff in their plasma cutter program and see how one comes out in stainless steel versus semi-hard brass. The homemade axe is sounding better all the time and hate to mess with it at the moment. I have the pattern for the tone holes in aluminum around here somewhere since I scribed around the pattern onto the brass plate...nothing high tech....grin if you must...
Enjoying watching the process of your banjo from raw materials.
later,
Bill
Ken LeVan - Posted - 05/01/2012: 08:16:34
Bill,
You could definitely nibble it away with punches, or punch out some of the holes, and cut the scrolls with the jeweler's saw.
The smaller the holes, the easier they are to punch.
dickinnorwich - Posted - 05/01/2012: 08:54:01
O.K., folks, here's the deal.
Last Thursday, my wife and I packed up the car and headed out from eastern CT to rural central PA to visit with Ken. Ken and I have often joked that we were brothers born of the same mother and separated at birth. In finally meeting Ken face to face, nothing will ever dissuade me that this isn't still a valid assumption. The second we met, we locked in to each other. It was as if he could complete my sentences and vice versa.
Needless to say, we had a great visit. We stayed overnight and we could not have had a more generous host. It is probably not surprising that we spent a large amount of time in the shop going over all the processes you all are reading about on these pages.
If you haven't already figured it out, Ken is our resident genius. As my long lost brother, I can say without fear of contradiction that he got all the brains in the family. Let me assure each and every one of you that what you are witnessing, here, on this website is happening in real time. I know, because I witnessed it.
Ken is opening up doors for all of us. He has applied his extensive background in industrial design to the art of banjo construction in new and creative ways and we are all better because of it. We, and future generations, owe Ken an enormous expression of gratitude for his accomplishments and contributions to our industry, especially for those of us home craftsman who struggle to develop the skill sets to make the parts we all use. Ken not only does it all, he does it all well.
Edited by - dickinnorwich on 05/01/2012 09:01:46
 |
Ken LeVan - Posted - 05/01/2012: 10:03:31
Gee, Dick,
You're too kind! You're an architect, and I'm an industrial designer - between the two of us we ought to be able to make something that works (and looks good, too, I hope)!
I think we must have emailed each other 3 or 4 times every day for several weeks while trying to make the steam bending setup for the beech and cherry rims, and you actually set one up with an archtop.
Anyway, your visit was a lot of fun, and we got to disappear into the shop, bend pieces of metal, silver solder them together, look at boards, talk about bandsaws, and fun stuff like that. I was hoping you'd stop back so we could go down to Grizzly. I have to say that If my wife Hope hadn't been away on a trip, the food would have been a LOT better. Next time.
I would have stopped posting this stuff weeks ago (in fact I did), if you hadn't convinced me to keep it up, so those people out there who are interested in it really ought to thank YOU.
So, when are you coming to PA again?
Ken
Dave1climber - Posted - 05/01/2012: 10:30:14
Same nose, same ears, both wear glasses, must be brothers. By the way who's who in the photo?
Dave
dickinnorwich - Posted - 05/01/2012: 11:02:14
I should have added that nobody just casually drops in on Ken. Ken says he lives in Shunk, PA which, when you actually arrive there, is merely a rural crossroads. Shunk has added new meaning to the phrase "The middle of nowhere." I grew up in eastern PA but never realized how rural and undeveloped the state actually is. Many maps we consulted do not even show Shunk as a location. Arriving in Shunk means you're in the same Township where Ken lives but nowhere near where his house is actually located. Even with detailed instructions, his house was not easy to find. There was a point in time when my wife and I were so lost that we thought we might not find it. Cell phone service and GPS do not exist in this part of the world.
Ken lives on the edge of a huge state forest. I think his closest neighbors are bears. Ken's house, like everything else Ken does, is a uniquely creative, organic, mostly hand-crafted structure. He could just as easily have been an architect as an industrial designer. The house is not only beautiful to look at but environmentally functional and efficient. Large areas of glass allow sunlight to add natural warmth while the walls are filled with a sophisticated, injected, poly-type insulation that expands to fill every crack and restrict unwanted air infiltration. The concrete floor boasts a radiant, hot water heat system. In combination with sunlight washing the walls, in the main studio part of the house, the magnificent handmade truss structure he built creates a cathedral ceiling that imparts an almost religious feeling. His wife's paintings line the studio walls. They're affect is to welcome any visitor and bring them immediately into the family.
Now that I have made every wrong turn I could possibly make, I would love to return.
Dave, and others.
Ken is on the left so, by process of elimination, I'm the one on the right.
Edited by - dickinnorwich on 05/01/2012 11:09:14
Ken LeVan - Posted - 05/01/2012: 11:47:34
Dick,
Here's one of my neighbors looking in the shop window:

Down at the general store they sell sweatshirts that say "Shunk PA - conveniently located in the middle of nowhere"
Ken LeVan - Posted - 05/02/2012: 05:11:27
The idea of making "trefoils" instead of "quatrefoils" in order to cut down on the number of holes didn't work out. I fooled with it and fooled with it, and couldn't get it to look right.
They either looked like Mickey Mouse or old Ballantine beer logos - purity, body, and flavor.
SO, I made the parts for the second flange pretty much like the first - 130 holes:

BY the way,
After Dick Guggenheim referred to me as the "resident genius" I just discovered this morning that I have been cuttiing out all these brass parts with the bandsaw blade upside down:

I'm pretty sure the pointy parts of the teeth are supposed to point down.
Strange thing is that it worked just fine.
I'm going to have to slow down the pace of these posts - it's getting to be warmer and I have to work outside on the house and garden, now, so I won't be able to work on the banjos as much, plus I have a neck-building project for a 12 string guitar I have been neglecting.
I still have to do: resonators, necks, fingerboards, pegheads, armrest, tailpiece, hooks & nuts (maybe) assembly, bridges, and maybe more,
So it may be a while.
BNJOMAKR - Posted - 05/02/2012: 05:43:29
I just discovered this morning that I have been cutting out all these brass parts with the bandsaw blade upside down:
I'm pretty sure the pointy parts of the teeth are supposed to point down.
I find that I do similar things like this since ever since I started needing bifocals!

Brooklynbanjoboy - Posted - 05/02/2012: 06:20:32
Well, they do point down at some juncture in the band's cycle. Maybe not the cutting part of that cycle, but whatever...
All this has made me want to get back to those earlier discussions of a tailor made banjo, Ken.
Take care,
Lew
Dave1climber - Posted - 05/02/2012: 06:57:29
Ken
I have cut sheet steel for pole barns with the non metal blade on a "skill" saw reversed for years, causes less tearing. If it works why change? Or install a fine tooth metal cutting blade.
Dave
rudy - Posted - 05/02/2012: 07:22:32
quote:
Originally posted by uncle.fogey
The idea of making "trefoils" instead of "quatrefoils" in order to cut down on the number of holes didn't work out. I fooled with it and fooled with it, and couldn't get it to look right.
They either looked like Mickey Mouse or old Ballantine beer logos - purity, body, and flavor.
SO, I made the parts for the second flange pretty much like the first - 130 holes:
BY the way,
After Dick Guggenheim referred to me as the "resident genius" I just discovered this morning that I have been cuttiing out all these brass parts with the bandsaw blade upside down:
I'm pretty sure the pointy parts of the teeth are supposed to point down.
Strange thing is that it worked just fine.
I'm going to have to slow down the pace of these posts - it's getting to be warmer and I have to work outside on the house and garden, now, so I won't be able to work on the banjos as much, plus I have a neck-building project for a 12 string guitar I have been neglecting.
I still have to do: resonators, necks, fingerboards, pegheads, armrest, tailpiece, hooks & nuts (maybe) assembly, bridges, and maybe more,
So it may be a while.
Great job on the essay so far Ken!
As a side note, I often invert the tooth direction on my band saw for safe sawing of thin brass and aluminum, as well as easily cutting rolls of "select a size" paper towel rolls in half. This gives me instant access to 1/4 sheets for glue cleanup and the like.
 Bench Organizer |
Ken LeVan - Posted - 05/03/2012: 15:19:41
I just lost about 1/2 hour of information I was trying to post, which just disappeared - poof!
This F***ing website is so unfriendly - it takes 2 browsers to post images, and you can't check facts without losing the post -I just lost a long involved post with umpteen images, trying to navigate between the two browsers . SO, should I spend another hour of my time trying to provide free infomation? Think Fred Willard - "I don't think so"
If I was sending private emails, I could just attach anything I wanted - bang-zoom.
I'm losing my patience and willingness to waste my time.
Dave1climber - Posted - 05/03/2012: 16:09:27
Ken
I so totally understand your frustration. Write the book, and I will be glad to pay your price for it
dickinnorwich - Posted - 05/04/2012: 06:57:57
quote:
Originally posted by uncle.fogey
I just lost about 1/2 hour of information I was trying to post, which just disappeared - poof!
This F***ing website is so unfriendly - it takes 2 browsers to post images, and you can't check facts without losing the post -I just lost a long involved post with umpteen images, trying to navigate between the two browsers . SO, should I spend another hour of my time trying to provide free infomation? Think Fred Willard - "I don't think so"
If I was sending private emails, I could just attach anything I wanted - bang-zoom.
I'm losing my patience and willingness to waste my time.
And I thought i was the only one who was being victimized by this website. Sometimes, I'll be working and whole paragraphs will just evaporate. Very frustrating. When that happens, I'll either give up or work something up in a Word document and then cut and paste it.
Bleche.
Ken LeVan - Posted - 05/05/2012: 09:41:18
You're right, Dick.
It's frustrating. Anything complex, I have to write into an illustrator document , with the urls for the pictures as part of the document, then paste it into the hangout post, and switch all the urls to the picture posting method of the hangout.
If I was sending you an email, I write the email, attach whatever images I want, paste in links to other sites - bang-zoom!
Anyway,
I got a new polishing gizmo at Grizzly, which is an arbor that takes buffing wheels with any size holes, and you chuck it into a Jacobs chuck on the lathe or drill press. It works like a charm!!
I got a stiff wheel that cuts right through the corrosion:

That brings me to the next subject , which is that I am getting my unfinished rims filthy from the black polishing stuff, so I have to at least partially finish them in order to protect them from becoming permanantly stained.
The first thing I have to do is to cut the holes for the dowel sticks, which I do by drilling holes in the 4 corners, and using a Dremel or Fein multi-tool with a 3/4" saw, I cut out the square hole.
This takes bout 1 1/2 minutes to do, so it's not worth building some kind of jig:

After the holes are cut I file them out and make sure a dowel stick will fit right:

There is no need to get compulsive about this - the hole will not be visible from inside or out once the neck is installed - it just has to be straight and in the right location.
Then I stain the parts of the maple rim that will be visible:
The only part of the rim visible on the outside is the little bead between the tone ring and tension hoop:

The inside is visible on the openback setup

I mask off the parts I don't want finish on.
The cherry doesn't get any stain at all - it will darken to a mahogany like color all by itself.
I try to minimize sealing too much on rims, and I don't use polymerizing penetrating finishes, preferring surface finishes.
At the end, I will put final coats on these, after the danger of dinging them up had passed.
The resonators will be the LAST things I finish.
banjonutter - Posted - 05/05/2012: 12:51:27
If it helps you feel better about your effort just know I find your post on building a banjo immensely enjoyable and helpful. Looking forward to a book.
Ken LeVan - Posted - 05/05/2012: 13:14:47
I made a couple of mistakes on my earlier post above:
(1) I said "The only part of the rim visible on the outside is the little bead between the tone ring and tension hoop"
I've made this mistake before. It's the little bead between the tone ring and the BRACKET BAND. Sorry!
(2) I didn't really explain the staining method.
In the end, I want to have the parts you can see stained and/or lacquered. Finishing a rim, I think that "less is more" These rims are very lively and that's what I want. I don't want to deaden the rim and kill it with heavy coats of finish or oil based finishes that penetrate into the wood and polymerize within the grain structure.
I just want to protect it from getting dirty, and the vulnerable places is the bottom of the rim, the cap, and the bead between the tone ring and the bracket band (there, I said it right).
I use alcohol based aniline dye to stain wood parts, in several thin coats. Behlen "Solar Lux is great, and I can mix that with any of umpteen JD Moser alcohol aniline dye colors - thinned down, numerous coats- less is more.
What I want in the end is a finish that looks hand rubbed because it IS hand rubbed.

So here's my protocol for rim finish (keep in mind this picture only shows stain, no finish lacquer):

In a perfect banjo, we wouldn't have to finish the rim at all.
Ken LeVan - Posted - 05/05/2012: 13:28:08
quote:
Originally posted by banjonutter
If it helps you feel better about your effort just know I find your post on building a banjo immensely enjoyable and helpful. Looking forward to a book.
Thank you very much!
Dave1climber - Posted - 05/05/2012: 14:35:59
Many thanks for continuing this topic, I have picked up many useful tips from your posts.
Dave
aeroweenie - Posted - 05/06/2012: 10:18:27
Thanks for the tutoring - I hadn't thought about finishing (or not) the rim under the bracket band. Your approach makes good sense. The stained/lacquered maple is gorgeous!
namcm91 - Posted - 05/06/2012: 13:54:28
Quick question. What do you gain from using the dowel stick, instead of the rods?
I'm in school majoring in fine woodworking. I love making furniture (and that's what i am doing in class now) but my ultimate goal is to get get my master-craftsmen in Luthiery. Try to get the tools and space for a shop has been hell for me. I also wanted know know how long it took you to get your shop(s) together? Keep in mind i'm starting from nothing and all i've got now is fat set of chisels, a few hand planes, a router, and a Japanese handsaw.
hskrfn - Posted - 05/06/2012: 17:25:40
Ken
Thanks for taking the time to share with us. As you can see from the thread there are a whole bunch of folks appreciating your artistry. I really enjoy the posts and your site. They are a tremendous help to a novice builder.
Bill
Ken LeVan - Posted - 05/06/2012: 17:47:52
quote:
Originally posted by namcm91
Quick question. What do you gain from using the dowel stick, instead of the rods?
I'm in school majoring in fine woodworking. I love making furniture (and that's what i am doing in class now) but my ultimate goal is to get get my master-craftsmen in Luthiery. Try to get the tools and space for a shop has been hell for me. I also wanted know know how long it took you to get your shop(s) together? Keep in mind i'm starting from nothing and all i've got now is fat set of chisels, a few hand planes, a router, and a Japanese handsaw.
Nate,
I have made banjos with bolts, coordinator rods, and dowel sticks. I like the dowel stick for 3 reasons:
(1) I think it makes a better connection between the pot and the neck, in terms of allowing the entire banjo to work as a whole.
(2) Because dowel sticks are not really adjustable, that construction forces the builder to be more precise about that neck-to pot connection - coordinator rods invite making a loose connection by using them to correct the action - dowel sticks "keep you honest".
(3) I am developing a banjo design that will be a bluegrass banjo as well as an openback, and dowel sticks are almost never used for bluegrass banjos, mostly because the Gibson design model has become the bluegrass standard, so I want to demonstrate that dowel sticks will work for bluegrass banjos through this project.
Actually, I think dowel sticks will work better for bluegrass banjos than coordinator rods will for openbacks.
I have slowly built up my shop since the mid 1960s - many of my tools are ones I bought from used machinery dealers, second-hand or made myself. It has always been primarily a "model shop" for my industrial design business and later a woodworking shop for historic architectural restoration and cabinet making, although I have always made musical instruments as well. For many years I didn't have a table saw. I have no machine lathe, milling machine, or any of that kind of equipment.
namcm91 - Posted - 05/07/2012: 22:32:02
So how do you four square your wood, with a joint plane and table saw?
But thank you so much for the info. Luckily i go to a great school and i can use the shop almost when ever i want.
And with the dowel stick how do you go about making adjustments to the action. Because i have always adjusted my rods to raise or lower the action when i do my tune ups?
Ken LeVan - Posted - 05/08/2012: 04:41:48
quote:
Originally posted by namcm91
So how do you four square your wood, with a joint plane and table saw?
But thank you so much for the info. Luckily i go to a great school and i can use the shop almost when ever i want.
And with the dowel stick how do you go about making adjustments to the action. Because i have always adjusted my rods to raise or lower the action when i do my tune ups?
I surface the rough boards with a planer, then cut the edges square with a table saw. once pieces are cut out to some rough shape with a band saw, I use a disc sander, rarely a jointer.
With a dowel stick, there is only a tiny bit of adjustment possible. I make a bracket that fits on the tailpiece end of it, that allows some fine tuning, but really, you just have to know in advance what height bridge you want, and cut the neck to the proper angle. 3 degrees comes out to an 11/16" bridge for me.
There have been various dowel-stick adjusters made over the years, but to use them for any real adjustment, you wind up having to shim the neck, and it's no better than coordinator rods.
bnlholic - Posted - 05/08/2012: 15:03:48
Ken. I'm not a builder but have been fascinated by your descriptions and photos so far. At work I daydream of doing what you're doing. As far as adjusting action, I've been playing a 1925 Gibson ball bearing since 1975. The springs maintain the tension on the head. In order to raise the action, you loosen the bracket hook nuts. To lower the action you tighten the nuts. You never need touch the coordinator rods to adjust action. Just a thought.
Thanks.
Dan
Edited by - bnlholic on 05/08/2012 15:05:41
Ken LeVan - Posted - 05/08/2012: 15:15:25
quote:
Originally posted by bnlholic
Ken. I'm not a builder but have been fascinated by your descriptions and photos so far. At work I daydream of doing what you're doing. As far as adjusting action, I've been playing a 1925 Gibson ball bearing since 1975. The springs maintain the tension on the head. In order to raise the action, you loosen the bracket hook nuts. To lower the action you tighten the nuts. You never need touch the coordinator rods to adjust action. Just a thought.
Thanks.
Dan
Dan,
do the springs actually maintain tension? I always thought they were supposed to, but there is a lot of skepticism about that nowadays and I am getting beaten up. Your experience would be helpful to many, myself included.
Normally, I would think that loosening the head would change the sound - you might be on to something of interest to all of us.
Ken
bnlholic - Posted - 05/08/2012: 15:54:22
Hi Ken.
I read elsewhere on the hangout that a ball bearing rim should be adjusted so that a nickel can be inserted between the tone ring and the rim. Mine is about that distance. The tone ring is supported entirely by the ball bearings. The tone ring does not touch the wood. So the springs must maintain the tension. I believe that Dickinnorwich can confirm this. He built a rim utilizing ball bearing rim parts last year.
Dan
Edited by - bnlholic on 05/08/2012 15:59:16
Ken LeVan - Posted - 05/08/2012: 16:19:26
quote:
Originally posted by bnlholic
Hi Ken.
I read elsewhere on the hangout that a ball bearing rim should be adjusted so that a nickel can be inserted between the tone ring and the rim. Mine is about that distance. The tone ring is supported entirely by the ball bearings. The tone ring does not touch the wood. So the springs must maintain the tension. I believe that Dickinnorwich can confirm this. He built a rim utilizing ball bearing rim parts last year.
Dan
Yes, Dick knows all about this - he is the real expert on archtops. The "nickel thing you are referring to is Steve Davis' head tension system, which works great. I'm not sure which coin works with an archtop, but a BB falls into the archtop category.
For what it's worth, old-timers who marched in Mummer's parades, and smart guys alike told me MANY years ago that the BB was supposed to maintain the tension on skin heads in damp weather. I always accepted that as true - makes sense, but now, there are naysayers who say it ain't so, because Gibson never mentioned it in their literature. So whether it's true or not is up for discussion. If you have some experience about it, it would be a great thing to share.
Harreec - Posted - 07/26/2012: 06:09:46
quote:
Originally posted by uncle.fogey
quote:
Originally posted by namcm91
So how do you four square your wood, with a joint plane and table saw?
But thank you so much for the info. Luckily i go to a great school and i can use the shop almost when ever i want.
And with the dowel stick how do you go about making adjustments to the action. Because i have always adjusted my rods to raise or lower the action when i do my tune ups?
I surface the rough boards with a planer, then cut the edges square with a table saw. once pieces are cut out to some rough shape with a band saw, I use a disc sander, rarely a jointer.
With a dowel stick, there is only a tiny bit of adjustment possible. I make a bracket that fits on the tailpiece end of it, that allows some fine tuning, but really, you just have to know in advance what height bridge you want, and cut the neck to the proper angle. 3 degrees comes out to an 11/16" bridge for me.
There have been various dowel-stick adjusters made over the years, but to use them for any real adjustment, you wind up having to shim the neck, and it's no better than coordinator rods.
Terms of Use | Privacy Policy | Privacy Consent (EU/GDPR Only)
Copyright 2026 Banjo Hangout. All Rights Reserved.


