
DVD-quality lessons (including tabs/sheet music) available for immediate viewing on any device.
Take your playing to the next level with the help of a local or online banjo teacher.
Weekly newsletter includes free lessons, favorite member content, banjo news and more.
Premier Sponsors


|
Please note this is an archived topic, so it is locked and unable to be replied to. You may, however, start a new topic and refer to this topic with a link: http://www.banjohangout.org/archive/265388
rudy - Posted - 06/21/2013: 07:22:31
Hi All,
Here’s a new banjo I recently finished up that was held up a bit by “more pressing issues”.

Here’s a rundown of the specifics and some photos that might inspire you to try some of the details as presented here:
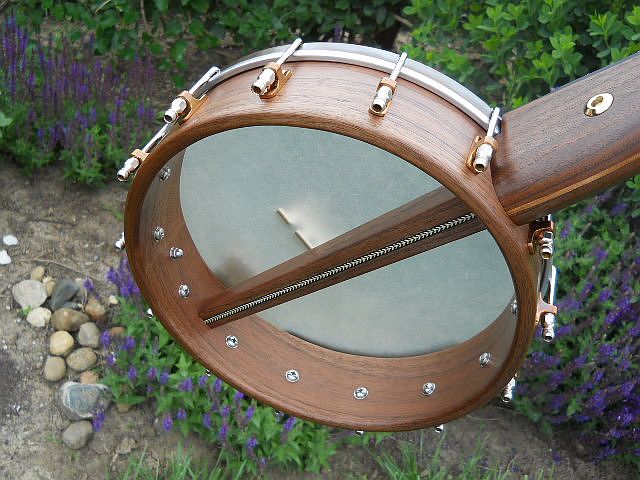
Walnut four layer 11” by 2-3/4” by 7/16” rim
3/8” by 3/16” raw brass tone ring
11” high crown Remo Renaissance head
1/2” by 1/8” Patina finished raw brass tension band
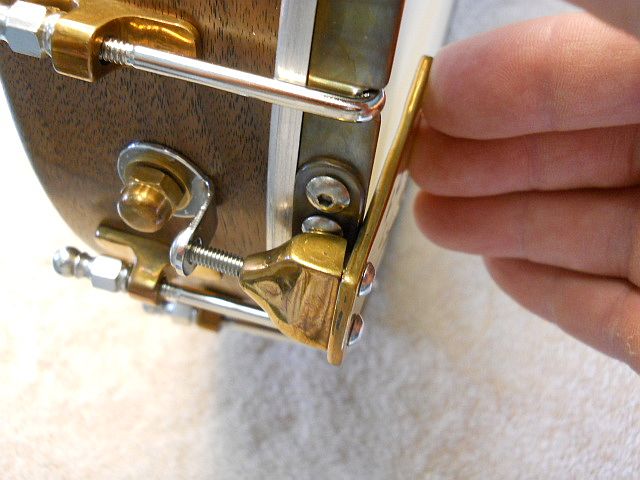
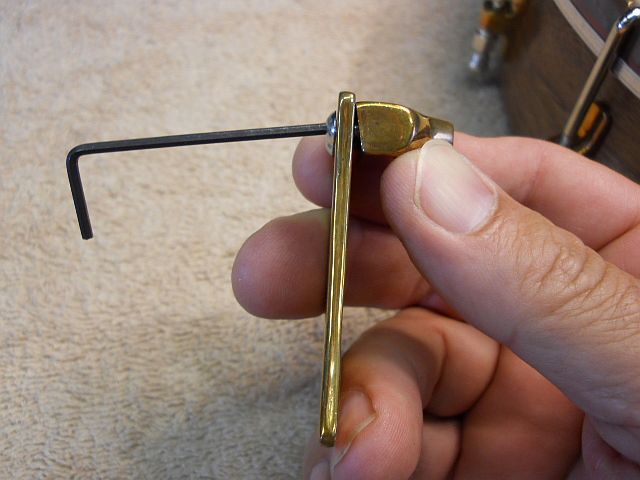
14 patina finished raw brass shoes
14 nickel plated hooks and Vega style nuts
Walnut 3 piece laminated neck with 1/8" cherry center stripe
Neck reinforced with 2024-T4 aircraft aluminum bar
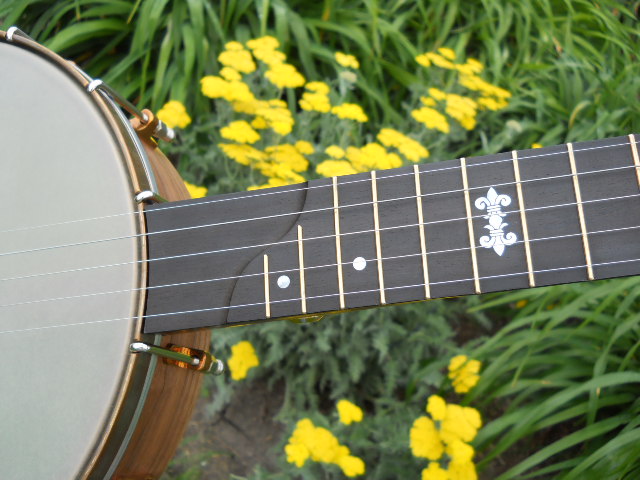
24" scale length 12” radius ebony fret board
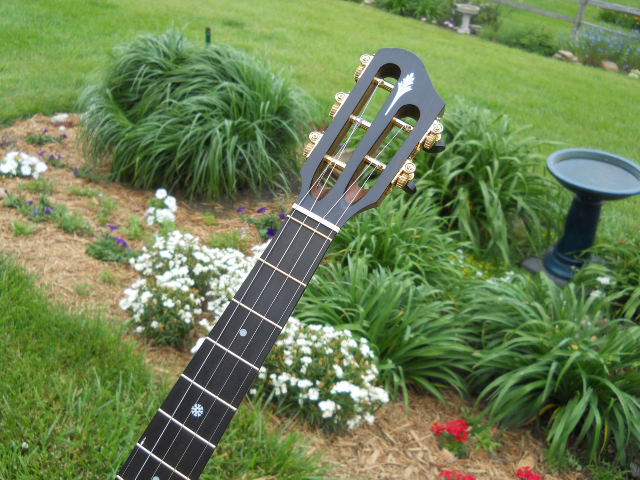
Ebony peg head overlay with mother of pearl torch inlay
Five 3/16” pearl fret board position markers
3/8” mother of pearl snowflake inlay at 5th fret
Custom 12th fret engraved inlay
Small position markers at side of fret board
Tunneled fifth string housed in stainless steel micro tubing
17 medium EVO gold frets plus two partial frets across ogee scoop at heel
Zero fret with 1/8” bone string spacer
Grover Sta-tite gold tuners with ebony buttons arranged in 3+2 configuration
Dobson-style neck heel with embedded 1/4” by 20 by 1-1/4” long barrel nut
Neck attached with 1/4” x 20 threaded rod and brass acorn nut at end of pot
Channeled 1” to 3/4” tapered square dowel stick
Raw brass adjustable tension tailpiece with stainless steel end bracket
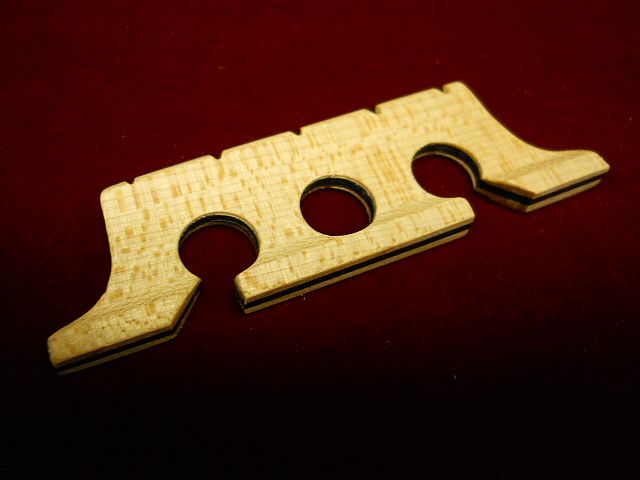
Laminated bridge, 2 quarter sawn violin grade maple faces over ebony center
More info and additional photos available here:
bluestemstrings.com/pageWPBanjo1.html
 |  |  Bridge | 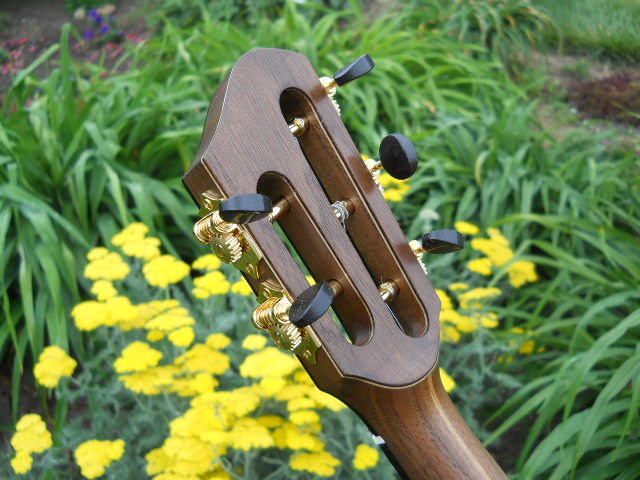 |
 |  |  | 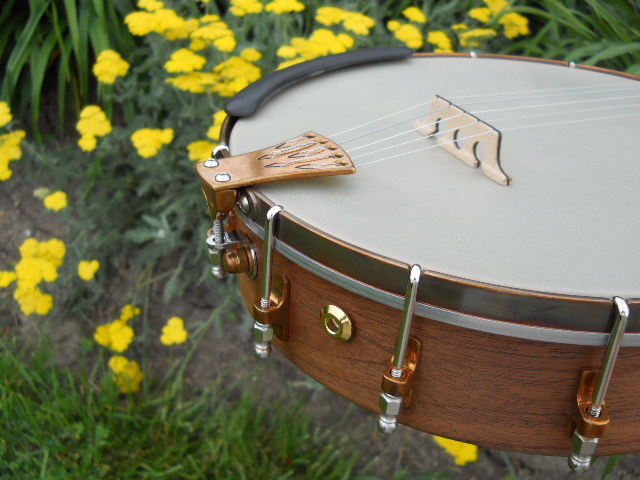 |
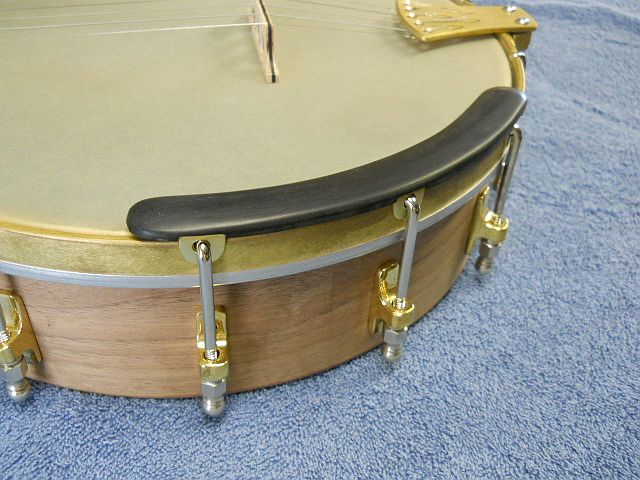 Phenolic armrest | 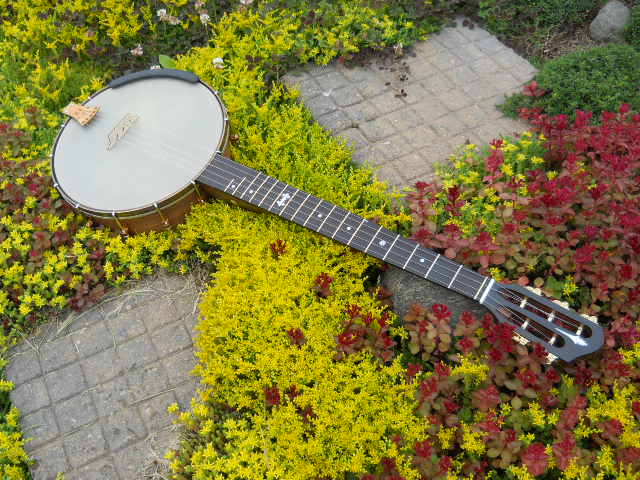 |
dickinnorwich - Posted - 06/21/2013: 07:30:18
Randy:
That is gorgeous!! Of course, I don't expect any less from you.....a real work of art.
Jonnycake White - Posted - 06/21/2013: 08:07:53
That is one nice looking banjo. I like the simple elegance of the tailpiece - I may be forced (by my own brain) to copy the adjustment mechanism on my current two "art" banjos, though I will need to do something different for the string attachments so as to leave room for some artwork on the tailpiece. For a non-pictorial tailpiece, I really like the string holes and slots of your design and I'm curious what tools and techniques you used to cut the little V-slots for the string loops.
I'm also interested in the bridge - what advantages do you see (or hear) with the ebony lamination going the full height of the bridge rather than just using an ebony cap?
Todd Treadway - Posted - 06/21/2013: 08:08:42
WOW. BEAUTIFUL! I now have a real appreciation for the kind of craftsmanship and work that goes into something like that, Rudy. "Workingpersons" indeed! Question: On the pic showing the rear of the pot, in the side of the neck is what looks like an allen-headed bolt or something, and another one in the next pic on the rim. What are those?
Edited by - Todd Treadway on 06/21/2013 08:12:08
d13design - Posted - 06/21/2013: 08:24:23
I agree with everyone else here - that looks fantastic.
I'm nearing the final stretches of my banjo based on some of your earlier plans and am excited about my next venture - bluestemstrings.com/ has been a permanent bookmark in my browser for the past 18 months and an invaluable source of tips and advice.
rudy - Posted - 06/21/2013: 08:56:25
quote:
Originally posted by Todd Treadway
WOW. BEAUTIFUL! I now have a real appreciation for the kind of craftsmanship and work that goes into something like that, Rudy. "Workingpersons" indeed! Question: On the pic showing the rear of the pot, in the side of the neck is what looks like an allen-headed bolt or something, and another one in the next pic on the rim. What are those?
Thanks, Todd. I appreciate all the nice comments from everyone. I think only folks that build can really grasp a true appreciation for what goes into creating a nice instrument.
As far as what you're seeing goes, I usually install recessed Strap-locs on my players so I can attach straps securely while retaining the option to take them off instantly if I desire. They work really well, and you can sling a banjo on and walk around with it all day without any concern of it falling off. Here's a shot with a strap attached at the pot end.
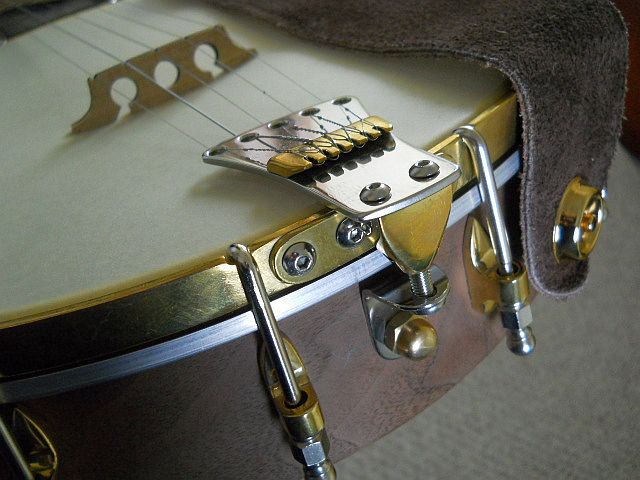
Here's both ends shown with a jo over the shoulder...
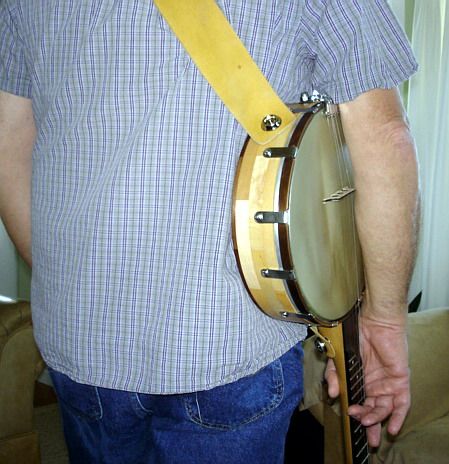
Hope that explains it!
Edited by - rudy on 06/21/2013 08:59:24
Todd Treadway - Posted - 06/21/2013: 09:06:24
Bingo! Got it. Say, this must be a different banjo, 'cause it's a different tailpiece. Love 'em both! This one looks particularly sweet to me with the contrasting silver/brass. I thought about making my own No-Knot type tailpiece, but was too anxious to put my banjo together, and knew that many hours lay ahead if I did. Beautiful work on both those tailpieces!
rudy - Posted - 06/21/2013: 09:12:33
Thanks Todd. Yes, different animal. I like the contrast of the brass and stainless steel but you can't age the stainless as readily. I already had the contrast down with the tension band, hook, shoe, and nut combinations. There is something that appeals to be both from an esthetic and practical sense with using both raw brass and nickel plated features. I was also looking for a little sleeker design, hence the single brass tailpiece top.
Edited by - rudy on 06/21/2013 09:16:51
rudy - Posted - 06/21/2013: 09:28:16
quote:
Originally posted by Jonnycake WhiteThat is one nice looking banjo. I like the simple elegance of the tailpiece - I may be forced (by my own brain) to copy the adjustment mechanism on my current two "art" banjos, though I will need to do something different for the string attachments so as to leave room for some artwork on the tailpiece. For a non-pictorial tailpiece, I really like the string holes and slots of your design and I'm curious what tools and techniques you used to cut the little V-slots for the string loops.
I'm also interested in the bridge - what advantages do you see (or hear) with the ebony lamination going the full height of the bridge rather than just using an ebony cap?
The tailpiece top is 1/8" thick brass, but it's relieved to half-thickness by removing a portion with a 3/4" 50 grit sanding drum where the string slots were cut. That's both to make it easier to cut as well as making it very easy to hook the string loops over the cut out areas. I used an Olson #0 46 tpi spiral cut plain end blade, and it was really quite easy to cut the slots.

Advantages to the bridge?
I don't think it's a huge benefit sound-wise, but a few of my clawhammer-playing friends think they significantly improve the tone of MOST of their open backs over several store-bought. Maybe it's cause they're free...
I think the significant improvement is more about making them really strong for the cross-sectional profile of the bridge, since they actually could be considered a plywood. The other advantage is the ebony center gives a good bearing point for the strings. I use a bit different philosophy for string "slots" and file two opposing 45 degree notches at each string location. The string rests at the center of the bridge and the wood breaks cleanly away in all directions to eliminate problems I used to have with the occasional string buzz in a bridge slot.

Edited by - rudy on 06/21/2013 09:32:40
Shawn Hoover - Posted - 06/21/2013: 10:31:07
Sweet 'jo, rudy! It's been fun seeing the various pieces of this one surface as you progressed. Congrats on pulling it all together, complete with web page and construction guide. I'll be snatching up a copy of that guide for sure to get the full lowdown on your rim lamination procedure and all the rest.
Dan Drabek - Posted - 06/21/2013: 11:11:33
Rudy, that's a classic banjo. Restrained and elegant. And as usual, the fit and finish is beautiful. Everything appears to be extremely well thought out.
I still love those understated inlays.
DD
Nuts - Posted - 06/21/2013: 14:54:01
Very nice craftsmanship on this one Randy, it's lovely. The hardware appointments really pull this design together for me visually, great job!
Lyndon Smith - Posted - 06/21/2013: 16:09:57
Really excellent, Rudy. So many innovative features, it's a real credit to you...
aeroweenie - Posted - 06/21/2013: 18:11:17
Very handsome banjo Randy! I agree with the others above, a lot of atypical (but practical) features. A sound file would be nice if you have the time. I really appreciate you (and the other skilled builders who post regularly) showing us what you're up to. It truly is inspirational for us less experienced builders.
rudy - Posted - 06/21/2013: 18:51:54
quote:
Originally posted by aeroweenieVery handsome banjo Randy! I agree with the others above, a lot of atypical (but practical) features. A sound file would be nice if you have the time. I really appreciate you (and the other skilled builders who post regularly) showing us what you're up to. It truly is inspirational for us less experienced builders.
Hi Paul, I appreciate the comments.
As far as a sound file goes, this banjo was the subject of an entire topic about the birthing process. You can find a video of this one being played "in the white" in the first post of the "First Light" topic:
Feel free to post on that topic if you wish. Sound-wise, it's no surprise that it's very close to what it sounded like then. The only thing is it's perhaps a bit brighter from additional head tension, but I'm expecting that to go back a bit when the Ren head settles a bit.
Ken LeVan - Posted - 06/22/2013: 07:14:35
Rudy,
I am working on 2 banjos right now, and I'm going to try a "Rudy Rod" instead of a regular dowel stick I have every reason to think it will work fantastically well. I have had to make a few modifications in order to accommodate my own construction methods, but it will be very similar to your idea.
I'll be posting pics of it sometime in the future when I get these banjos playing.
One thing that has occurred to me is that your "first light" birthing and subsequent neck fit tweaking is much more easily possible with a Rudy Rod than with a conventional dowel. That alone is a great benefit of your system
Ken
rudy - Posted - 06/22/2013: 08:48:50
quote:
Originally posted by Ken LeVanRudy,
I am working on 2 banjos right now, and I'm going to try a "Rudy Rod" instead of a regular dowel stick I have every reason to think it will work fantastically well. I have had to make a few modifications in order to accommodate my own construction methods, but it will be very similar to your idea.
I'll be posting pics of it sometime in the future when I get these banjos playing.
One thing that has occurred to me is that your "first light" birthing and subsequent neck fit tweaking is much more easily possible with a Rudy Rod than with a conventional dowel. That alone is a great benefit of your system
Ken
Keep us posted on your experience, Ken. Once you start playing around with the possibilities it's hard to ever think about doing it any other way, at least for me.
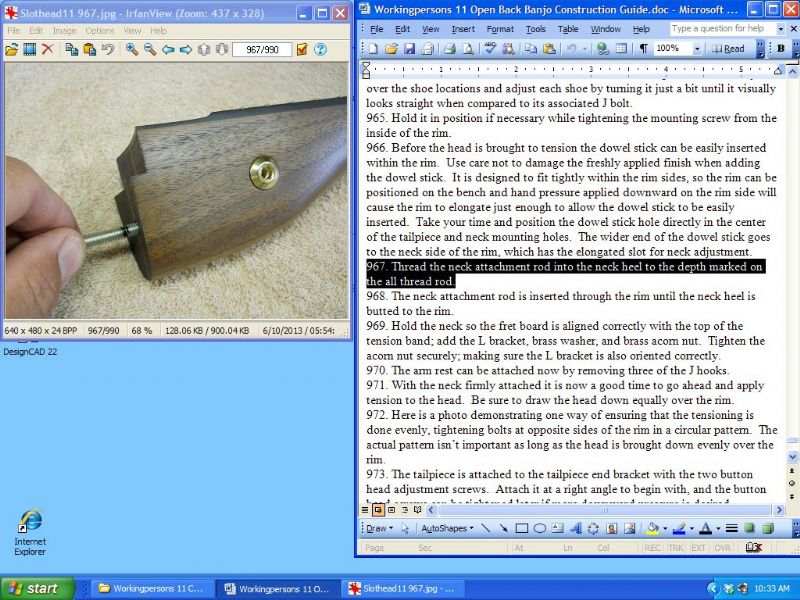
The ease of working on a heel after initial assembly is one of the huge advantages the system has going for it. Once you throw a capo on, loosen the strings, and pull the screw out that retains the tail piece it takes less than 60 seconds to remove the acorn nut, pull the neck off, and unscrew the all thread so you have a totally unencumbered heel to work with. Here's a screen shot of the building guide showing one of the steps to join the neck to the pot, but the opposite procedure is just as simple. (The full size image is in the Workingpersons 11 photo folder here on my Hangout home page if you need a closer look.)
Will1717 - Posted - 06/22/2013: 22:22:31
Rudy:
You've out done yourself one more time! A beautiful job!
Bill Rickard
stigandr5 - Posted - 06/23/2013: 07:00:37
Randy,
That's so beautiful! What's the scale length (sorry if I missed it in the specs list)?
-Nathan
hhunter44 - Posted - 06/23/2013: 11:11:04
That's amazing work and a very innovative method of neck attachment.
Hugh
rudy - Posted - 06/23/2013: 20:11:36
quote:
Originally posted by stigandr5
Randy,
That's so beautiful! What's the scale length (sorry if I missed it in the specs list)?
-Nathan
Thanks Nathan. The specs above list the 24" scale length. The nice thing about building for yourself is you can have anything you want!
I prefer A scale jos, but I also use 25-1/2" a fair amount.
rudy - Posted - 06/23/2013: 20:19:50
quote:
Originally posted by hhunter44
That's amazing work and a very innovative method of neck attachment.Hugh
Thanks, Hugh. Outside the norm, probably. I'm just applying the simple mechanical principals I'm familiar with so I can build quality instruments without dealing with the standard dowel stick problems. After I had a few jos under my belt I felt that there HAD to be a better way of dealing with neck geometry and fitting.
I've always felt like if some of the stuff we have available to us today would have been around when the first factory banjos were being sorted out that things would have evolved along a whole different line.
rudy - Posted - 06/23/2013: 20:28:37
quote:
Originally posted by Will1717Rudy:
You've out done yourself one more time! A beautiful job!
Bill Rickard
Thanks, Bill.
Sometimes I consider it an interesting challenge to overcome working in a minimalist shop (by choice). As an example I thought initially that I'd have to resort to EDM for the string loop slots, but that's just not my style! I like to demonstrate to folks what they can accomplish with a simple shop and some carefully thought out shop practices.
Terms of Use | Privacy Policy | Privacy Consent (EU/GDPR Only)
Copyright 2026 Banjo Hangout. All Rights Reserved.


