DVD-quality lessons (including tabs/sheet music) available for immediate viewing on any device.
Take your playing to the next level with the help of a local or online banjo teacher.
Weekly newsletter includes free lessons, favorite member content, banjo news and more.
Premier Sponsors


|
Please note this is an archived topic, so it is locked and unable to be replied to. You may, however, start a new topic and refer to this topic with a link: http://www.banjohangout.org/archive/257015
colorado hick - Posted - 02/24/2013: 16:26:55
I have a neck that i have built from scratch and i am wondering the best way to shape the heel to attach to a rim that i have put together, open-back with a reproduction white ladye tone ring. I know the angle that i want, what i do not know is how to cut the circle shape. For the first banjo i built i free-handed it on a spindle sander and was not happy with the result (although in retrospect it was not as bad as one would think).
I was thinking about building a MDF template with the same profile as the rim. I could sand the template so that it has a 3 degree slope, and then if i used a flush-cut router bit then it would leave everything at the correct angle. Then I could slide the template back a little and cut the channel for the tension hoop and head.
I'd still like to figure out a way to rough it in, so i am just cleaning it up with the router. Any suggestions? I was thinking of cutting it at 87 degrees with a chop saw, and then cutting some stepped up slots on the table saw into the heel.
Perhaps a previous thread i should check out?
thanks!
beegee - Posted - 02/24/2013: 16:34:17
Make a jig that swings the neck in the correct arc for your rim size and use a drum sander on a drill press. Make an elevating device on you jig to set the neck angle. Google images for banjo heel jig and you'll get several ideas.
rudy - Posted - 02/24/2013: 18:23:19
There's a couple of jigs on my website here:
bluestemstrings.com/pageBanjoC...ips1.html
Scroll down to "Profiling Neck Heel, Two Methods"
colorado hick - Posted - 02/24/2013: 19:05:28
I can see how such a jig would insure the correct angle. Is 3 degrees what most people use?
And how do I get it so it is aligned right to left? I was thinking of putting in the middle tuner and attaching a string, and then setting the rim on the heel and making sure the string is in the middle of the neck and goes down the middle of the rim, and then tracing the pot profile on to the bottom of the heel with a sharp pencil, and then i could sand to that pencil mark. that is what i did not get right on the first one i built.
beegee - Posted - 02/24/2013: 19:54:00
Use a centerline on your jig and draw a centerline on the neck blank using the center of the 3rd string and the center of the heel. Line up the marks to the center of your cutter/sander.
grm405 - Posted - 02/25/2013: 05:18:08
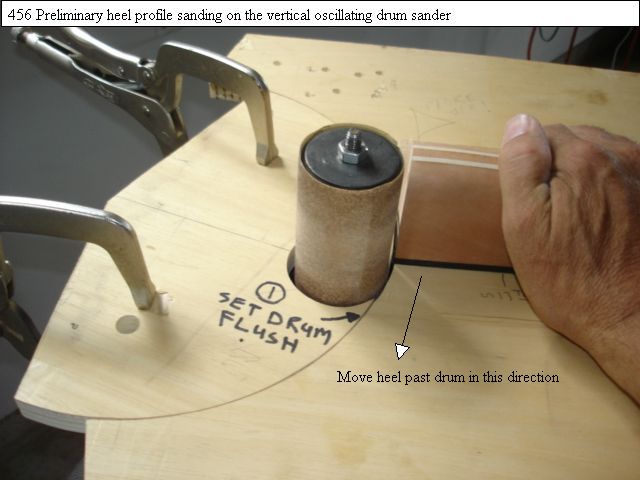
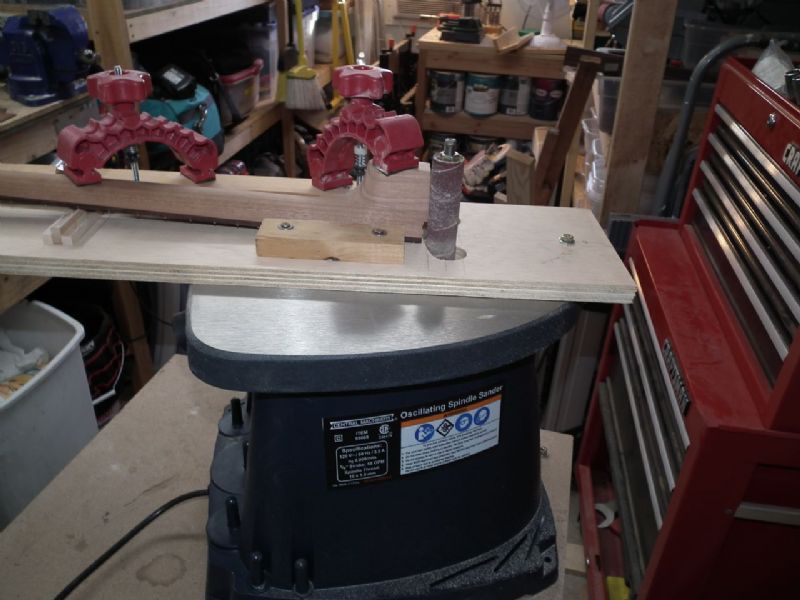
Here are a couple of photos of the swinging attachment I made for my spindle sander. I drilled/tapped a hole in the top of the sander 5.5" from the face of the sanding drum (1.5" drum if I remember) and bolted on a piece of plywood. Draw a centerline on the board and clamp the neck down with the third string line on that. I shimmed the fingerboard to get my 3 degree angle (use a protractor). It works very well and cuts a flawless heel in about a minute.
I use a 2" sanding drum in a drill press to cut the tension hoop recess by hand, after drawing the appropriate circle segment on the end of the fingerboard.
Gerry
 Cutting a Saga neck heel | 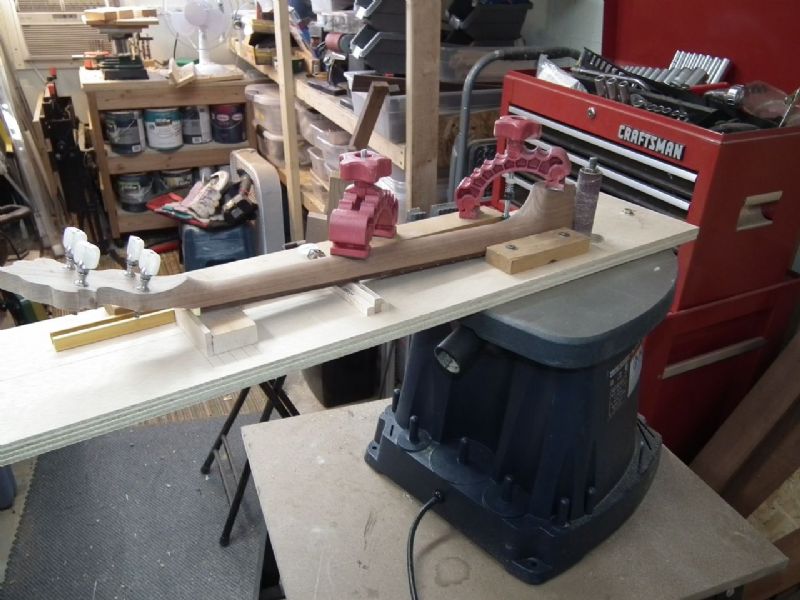 Heel cutting jig on spindle sander |
bill t - Posted - 02/25/2013: 06:50:24
I've been reading the "A Luthiers Life" thread that Dan Knowles is currently posting. If you look at page 15 of that thread,
he shows how he makes a heel cut.
Fathand - Posted - 02/25/2013: 07:06:10
I marked an 11" circle on the neck and cut it with a bandsaw with table tilted to 3 degrees. If I remember right, I cut the tension hoop notch with a dremel tool with router attachment.
Helix - Posted - 02/25/2013: 09:07:18
An MDF template would be great, remember to use two different radii, one 5.5" for the rim and the other for the radius at the fingerboard. I just flip mine around.
The reason you have to swing the arc with the sanding drum, is because that way, you will center the neck.
I like Gerry's jig, it's simple, I use a neck sled that I made with cello clamps, it does about five different things for me. Always sand to 90 degrees, I've seen a 3 degree jig, but I didn't like the regimentation.
My mentor is grumpy, I went to his house the other day and he was just finishing up cutting the arc AND the angle at the same time with a tilted table. Very trick, scary.
Skill = speed x accuracy. Rudy has made selfless information available to anyone.
Welcome to the hangout. I also use 50 grit belt sander to make my own 50 grit drums, I superglue the seam, underneath it is a 100 grit cushion. I go slow, no problems, might exceed the 5 minutes.
I see a lot of good responses here. Let us know what worked for you.
Ken LeVan - Posted - 02/25/2013: 14:02:32
You have to have the right centerline. That's a whole subject I don't even want to get within 10 feet of at this point.
It sounds like you have made one neck and want to fit it. I would recommend some sharp chisels, which will come in handy for lots of other stuff, plus you will learn something. Chisels are slow, machine driven cutters are all too fast.
Since you asked this question, you will probably be overwhelmed with pictures of sanding and routing jigs . I have some of those myself (but I use them again and again)

The old Fairbanks Vegas, and Gibsons (probably all the vintage banjos) had the necks fitted and fine-tuned by hand with chisels and gouges.
Wyatt Fawley, in his "how to spot fake Mastertones" treatise points out that the real ones were fitted with chisels and gouges.
I did them by hand for about 45 years before making jigs because I had to make more necks. It works!
Whichever way you do it, you have to "dry fit" the neck, and check the alignment with a mason's line.

Ken
Banjophobic - Posted - 02/25/2013: 15:47:15
quote:
Originally posted by grm405
Here are a couple of photos of the swinging attachment I made for my spindle sander. I drilled/tapped a hole in the top of the sander 5.5" from the face of the sanding drum (1.5" drum if I remember) and bolted on a piece of plywood. Draw a centerline on the board and clamp the neck down with the third string line on that. I shimmed the fingerboard to get my 3 degree angle (use a protractor). It works very well and cuts a flawless heel in about a minute.
I use a 2" sanding drum in a drill press to cut the tension hoop recess by hand, after drawing the appropriate circle segment on the end of the fingerboard.
Gerry
Nice jig Jerry. If you use a 5.5 inch drum you can make that cut all at once, and its done. 
grm405 - Posted - 02/25/2013: 17:44:21
You mean an 11" drum. Those are pretty big and hard to swing on a 10" drill press like I have. I watched Arthur Hatfield cut a heel for me on his 11" sanding wheel. It took a lot of eyeballing and fiddling to get everything aligned and angled. I like a jig with lines and clamps and lots of time to measure twice (or 3 or 4 times) before I make that cut. Works fine for a straight cut but for a flange it would not. That is where that 11" drum becomes handy.
Gerry
Todd Treadway - Posted - 02/25/2013: 17:52:05
"If you use a 5.5 inch drum you can make that cut all at once" -- I think you mean an 11" drum, Banjophobic, unless you mean radius (vs. diameter), which is the direction I may be about to try (although in my case, 10") ... " "
CO Hick, I'm at exactly that point with a neck I've made. FWIW, I tried the 2" sanding drum in a drill press, with the neck held in a jig, with poor results. Partly, I think, because the drum didn't want to spin accurately (I could see wobble in the sanding surface even though the center of it turned perfectly), and partly because the drum isn't deep enough, so you have to move the drill press up & down while rotating the jig.
After that experience, I'm also thinking that a jig needs to be devised that allows you to gradually approach the sanding surface rather than trying to sand through the neck heel in a single pass. Gerry, does yours allow that? I can't tell.
This one of Rudy's (below) looks good to me, too, if I'm understanding it correctly. It appears that the board holding the neck is completely unattached from the one around the sanding drum, so you could gradually sand the profile until the two pieces meet, at which point, the heel would be perfectly shaped. I'm still thinking about how to cut the perfectly smooth radii into the boards...

Edited by - Todd Treadway on 02/25/2013 17:59:33
MidMo - Posted - 02/25/2013: 18:56:31
Wouldn't an 11" sanding drum mounted like the smaller ones make for more accuracy ? Or would that much surface be too much at once? How about the speed of the sanders? Thanks for all the expertise !!! PJW
Todd Treadway - Posted - 02/25/2013: 19:03:09
YES! Thanks, Rudy! Now to figure out how to cut the radii into the boards; I think it'll have to be done with a router (my little 3-wheel bandsaw couldn't do it in a million years). That, and setting up an electric motor to work like a (non-oscillating) spindle sander...
Helix - Posted - 02/25/2013: 21:22:35
Hey thanks, Ken let's be more friendly, that's the purpose here, no one is poking fun at you. A museum piece is no joke, very clean work, it's also a full moon,
An 11" sanding drum is a monster. I made one, but I know longer use it, i use my neck sled, a 24" drill press and a 2" sanding drum. Bamboo flooring for a jig frame, slippery.
What Ken is showing is how simple hand work can be, and how accurate. Factories buzz necks with shaper blades all the time.
When I first started doing this in 2006, I went back and learned how to turn with hand chisels, how to hog necks with a rasp, scrapers and other s***.
Someone also used a little 5.5" arm chucked up in the drill press with a bolt shaft, so the Dremel could be mounted on the end of that little arm, if a guy had only that, one could still do a great job in more time, no problem with patience, and a sack of those 60 grit sleeves.
I see somebody asking all the right questions, Dan Pennington uses a cross-slide and mounts the neck so he can crank it into the spiinning drum, working simple is hard. He shows pictures of it,
 |
colorado hick - Posted - 02/25/2013: 22:25:31
I made a jig, using 3/4 plywood, and a 3/8" tall shim 7" from the edge of the circle. Instead of making the other part of the jig i pulled up the sandpaper on the drum sander 3/4 of an inch. It worked o.k, but it was easy to push the jig into the rubber or the drum sander and i cut a little deep. I am going to go ahead and figure out something better to hold the jig against.
 |  |
grm405 - Posted - 02/26/2013: 05:13:01
Todd,
I have to unclamp and move the neck forward to change the depth (location) of the cut. However, since that is an oscillating spindle sander (goes up and down in addition to around) I can make a rather deep cut (1/8" or so removed from whole heel) at a single setting. What happens with a deep cut is that the spindle flexes away from the heel so I run it past the drum about a half-dozen times until it stops cutting (sawdust doesn't appear.
If the cut is really deep you just feed it slowly and it may take 30 seconds to cut across the heel. Additional passes only take 5-10 seconds. I feed it in the same direction as Rudy's picture for the initial cut, then just back and forth until I am satisfied.
I have cut 2 heels with this setup and it works very accurately and easily. Its main limitation is that it is limited to straight heels. Since the next neck will be for a bracket band pot I have to think about how to do this. I may have to use a short drum for part of the cut.
The advantage is that the sander only cost me $80 at Harbor Freight and is useful for SO many other things.
Gerry
rudy - Posted - 02/26/2013: 05:26:52
quote:
Originally posted by colorado hick
I made a jig, using 3/4 plywood, and a 3/8" tall shim 7" from the edge of the circle. Instead of making the other part of the jig i pulled up the sandpaper on the drum sander 3/4 of an inch. It worked o.k, but it was easy to push the jig into the rubber or the drum sander and i cut a little deep.
I am going to go ahead and figure out something better to hold the jig against.
If you were going to continue using that setup it might be good to investigate a bearing-guided drum like Stu-Mac's Robo-sander".
stewmac.com/shop/Tools/Sanding...nder.html
The greatest obstacle when using any sanding drum method that doesn't oscillate is that it doesn't do a very good job of removing material efficiently. That leads to inconsistent results as the drum clogs in some spots and continues to cut in others. That's why the $100-$200 oscillating spindle sander is a good tool to use for such endeavors.
Edited by - rudy on 02/26/2013 05:32:41
rudy - Posted - 02/26/2013: 05:50:28
quote:
Originally posted by Todd Treadway
YES! Thanks, Rudy! Now to figure out how to cut the radii into the boards; I think it'll have to be done with a router (my little 3-wheel bandsaw couldn't do it in a million years). That, and setting up an electric motor to work like a (non-oscillating) spindle sander...
Todd, Gerry's post above outlines my procedure exactly. I take shallower cuts and don't hog off as much as 1/8", though. His post is excellent at conveying the workings of this type of setup.
The match for the radii isn't as critical as you would think, as long as you are consistent all the little variations even themselves out over the length of the arc. You can cut the concave portion with a jig saw and clean it up carefully with the largest sanding drum.
Place to concave portion over the material you'll use for the convex portion and mark it carefully with a sharp pencil. Cut that one out and finish up the edge with whatever your available tools will dictate. I clean up outside cuts like that most often on a small disk sander.
A non-oscillating sanding drum will not work very well (if at all...) for this type of work. A non-oscillating drum will clog, burn, and produce inconsistent results in this case, particularly because you're sanding end grain hardwood. I purchased my first oscillating spindle sander on a whim many years ago and wondered at the time if this would be one of those things that gather a lot more dust than they make. It proved to be a very wise investment, and it's on my personal favorite tools list.
Dan Pennington - Posted - 02/26/2013: 06:07:55
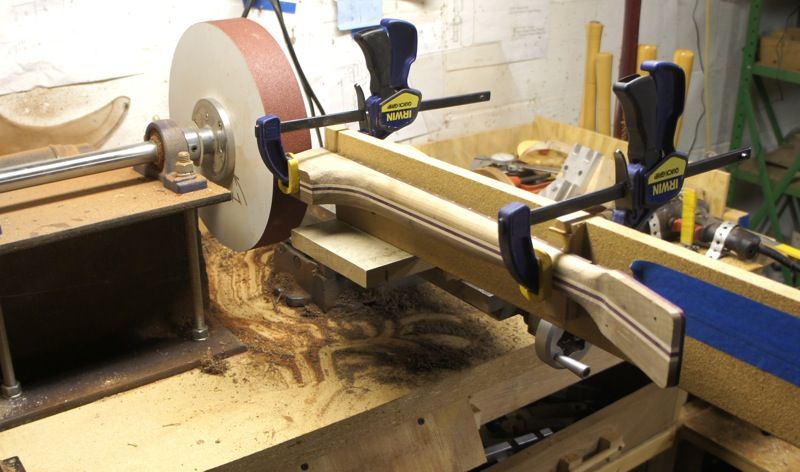
Here's my take on a heel sander. I use my rim lathe for the job. (Doesn't everybody have a rim lathe?) A section of an 11 inch rim still glued to the face plate with a strip of sanding belt from my drum sander.

The neck is clamped to a jig that bolts to my cross slide table. The table allows the neck to be cranked straight into the sanding drum. Then I can crank it way over to the left to do the tension hoop notch.
rudy - Posted - 02/26/2013: 06:09:49
quote:
Originally posted by MidMo
Wouldn't an 11" sanding drum mounted like the smaller ones make for more accuracy ? Or would that much surface be too much at once? How about the speed of the sanders? Thanks for all the expertise !!! PJW
An 11" drum is a MONSTER amount of mass and needs to be used on a machine with solid shaft bearing with no flex. You most often see the large drum setups used with lathe faceplates. Some have drill press large drums, but it's less than ideal. Part of the formula for efficient work with a sanding drum is the oscillation process. You can't mount an 11" drum on a spindle sander.
As a side note, while everyone talks about using an 11" drum, in real life you'll find you want to target the heel radius to be slightly smaller than the rim outside diameter. A smaller radius will fit tight to the outer edges of the neck when the neck attachment is tightened. That's exactly what you want to prevent ANY side to side movement of the neck on the rim.
If you DO make an 11" drum and add sandpaper you'll be starting with a sure way of making the heel radius larger than your rim size. Think about the actual OD of your drum INCLUDING sandpaper. It's not much, but you have to factor it in.
If someone is just starting out with experimenting with heel fitting the natural thing to do is to try and make a perfectly fitting 11" heel and rim matchup. If you configure your machine to cut a 5-1/2" radius you'll most likely end up with a heel that fits very close, but it's very easy to end up with a slight amount of unacceptable neck movement. As a newbie you'll end up having to do additional fitting be removing a bit of the center portion of heel hood. If you make the heel cut just a bit smaller in radius you'll already be ahead of the game and you'll know one of banjo making's dirty little secrets.
rudy - Posted - 02/26/2013: 06:18:05
Dan, Thanks for the cool shots.
It emphasizes my statement about needing a SOLID mount for that large of a drum. I do my tension band notch with a different setup than my heel profiling because I find the notch needs a larger radius to look right next to the tension band, since the diameter of the tension band is larger than the rim diameter. It's not a lot, but it's noticeable if you use the same diameter that you use for heel profiling.
colorado hick - Posted - 02/26/2013: 07:49:57
how fast and far to the osculating sanders go up and down? I am wondering if i can use one of my kids to wiggle the handle on the drill press. Tool budget (and real estate in the shop) is a little tight right now.
Dan Pennington - Posted - 02/26/2013: 08:35:22
colorado
It doesn't have to osculate. My first setup was on a drill press and a jig like Rudy's.
Todd Treadway - Posted - 02/26/2013: 10:21:27
I've pored over archived threads on this topic, and just want to say thanks to all you guys who've contributed in the past and aren't too sick & tired of it to do it again. It's a topic that'll no doubt continue to come up as new builders confront this neck-to-rim dilemma. This is the first time it's really beginning to click for me.
Say, CO Hick, in your first pic, it appears that you're trying to locate the center line on the rear of the neck with a string from the 3rd string tuner hole. If that's the case, I think you're going to end up with an off-center fit. The center line should follow the 3rd string path on the front of the neck, from the nut slot to center of the heel. (Correct, everybody?)
Dan P. -- "Doesn't everybody have a rim lathe"? Sure, all my neighbors have rim lathes, and my wife has two, but she doesn't let me use them 
Ken LeVan - Posted - 02/26/2013: 10:37:38
I have one that's like the lathe one except flopped 90 degrees and works on a drill press with a "sled" that controls the angle.

Works like a charm, but for one neck, it takes about 3 times longer to set up and zero in than just using chisels. I almost always tweak the heel a little during the set-up anyway.
Dave1climber - Posted - 02/26/2013: 11:12:04
I started with a pooryly thought out drill press jig and neck holder which I promptly scraped.
This is what i wound up with, PM me if you want to arrange to use it.
Edited by - Dave1climber on 02/26/2013 11:14:20
 |
Dave1climber - Posted - 02/26/2013: 11:43:44
Dan
Dan the base is the bottom part of an old horizontal mill that I got for free, the remainder was machined on a friends' vertical mill and my lathe. The largest expense was my time. The router is one of several that I have collected over the years.
Edited by - Dave1climber on 02/26/2013 11:44:58
Todd Treadway - Posted - 02/26/2013: 12:11:03
Say, Ken, would it be possible for you to give us some procedural tips on using chisels for this? I'd written it off as a practical impossibility for me to attempt, i.e., getting a correct radius, as well as proper angle. I just wouldn't have known where to begin!
Richard Brown - Posted - 02/26/2013: 12:16:26
Mine are cut on the table saw using a 10" blade for both 10" and 11" rims, an 8" blade for 8" rims and a 7 1/4" for my ukulele necks which attach to a round body. The pictures are of my original set up using a sled which I have since abandoned and now only use the melamine base with the adjustable fence to make the cuts. This must be done in several light passes with the final cut being predetermined so that the heel cut is centered. The rim cut is made with the blade raised to the proper height again in several passes taking light cuts as saw blades are not designed to cut from the side. To cut for the rim a block is inserted to stop the cut for the depth of the head and tension hoop, the fence must also be adjusted to assure the radius is centered as the blade on the table saw does not rise in a straight axis. On a five string, before cutting this profile the heel is cut on a compound angle both for the neck angle and what would be square to the centerline of a five string neck, with a four or six string , only the neck angle need be cut. All of this is done while the neck blanks have square sides!
I also have a jig I designed and built for the spindle sander to further justify the heel fit, it is infinitely adjustable for any rim size from 8" to 12" but could be made to any dimension. I built this one a while back but have not yet taken any pictures of it.
I would advise caution to those who use the drill press for this procedure, the bearings are not designed to withstand the amount of side thrust that this method imposes, will likely damage the quill.


Helix - Posted - 02/26/2013: 15:57:19
Rudy is right, 5.25" is a good radius to fit snugly.
Richard Brown, come on downtown, saweet.
Todd Treadway - Posted - 02/26/2013: 20:07:08
Hey, Richard -- Any pix of the spindle sander jig that's "infinitely adjustable for any rim size from 8" to 12"? Intriguing! ???
colorado hick - Posted - 02/27/2013: 08:18:57
Richard-
I did not understand your set up, but i am very interested. Are you using the radius of the saw blade to cut the circle by moving the neck perpendicular to the blade? Do you have more pictures of your jig? I could see that working well when the necks are still square to rough things in, and then doing the final touchup on a drill press once the tuning pegs and the nut are set up.
And how come nobody uses flush-cut router bits?
Todd- point well taken. I figured out that my center line was off because i was going from the 3rd string peg and not the nut slot. Next time i will draw a centerline on the fingerboard and use that to line things up.
rudy - Posted - 02/27/2013: 08:54:26
quote:
Originally posted by colorado hick
And how come nobody uses flush-cut router bits?
I use them, but not for profiling a neck heel. How are you going to profile a 3" heel with a flush cut router bit? All my bearing guided flush cut bits have about a 1" long maximum cut.
If you look at Richard's home page you'll see more neck jig photos.
Edited by - rudy on 02/27/2013 08:59:03
Terms of Use | Privacy Policy | Privacy Consent (EU/GDPR Only)
Copyright 2026 Banjo Hangout. All Rights Reserved.