
DVD-quality lessons (including tabs/sheet music) available for immediate viewing on any device.
Take your playing to the next level with the help of a local or online banjo teacher.
Weekly newsletter includes free lessons, favorite member content, banjo news and more.
Premier Sponsors


|
Please note this is an archived topic, so it is locked and unable to be replied to. You may, however, start a new topic and refer to this topic with a link: http://www.banjohangout.org/archive/307074
Hawgfiddle65 - Posted - 07/30/2015: 05:34:30
Hi
I'm quite taken with recent the buzz regarding beeswax( pun intended) .I'd like to give i a go. I like the organic approach and its immediacy and ease of use.Plus my neighbors have hives !! What better than using a product created 100 yards from home. Zero carbon footprint and all that!
Are there any woods that may be a problem dressing ,ie oily woods like rosewood?
Can you use over a stain eg a spirit stain or an oil stain?
Jim
GMB - Posted - 07/30/2015: 05:48:59
Search "bluestem bee banjo" in the top right search box to see Rudy's beautiful beeswax finished openback. I'm sure if you contacted him he could help you.
Hawgfiddle65 - Posted - 07/30/2015: 06:19:42
Hi GMB
Rudy as usual is the catalyst for this! I was chomping thru some honey with Greek yoghurt and bananas- my favorite dessert last night and that really made me click that I should give it a go.
Jim
wizofos - Posted - 07/30/2015: 06:34:09
There are 2 threads that talk about this technique and when I found them I was trying to decide how to finish a wooden head banjo I have been working on for a while. With a few notes back and forth to Rudy he sent me this definitive way to do it. I don't think you can use it over any other kind of finish, the idea is that the wax soaks into the wood and seals it. I did try to put some over natural Danish wiping stain and it did not make the difference it made over the raw wood. One thing, like all finishes you have to have a good base, bees wax is not going to fix a bad sanding job.
I love the job it did on my banjo, it feels good and I also put it on the walnut fret board and it brought out the grain a bit but did not make it 'sticky'. Rudy talks about polishing it up with 0000 steel wool but just an old cotton t-shirt did the job. I am not a fan of steel wool, don't like the steel slivers it leaves so you might want to consider something like Scotchbrite pads and here is a link to compare the different colored pads to steel wool and sand paper grits. By the way the green pads you can get in the grocery store in the cleaning section are about 600 grit.
woodcentral.com/woodworking/fo...-ratings/
Don't use steel wool or anything else until you have 'wiped' the hot wax off, it has cooled and you have polished it up a bit with a cloth. The whole process took me about 30 minutes and I was able to assemble and play it immediately. No drying time.
Now how much, I got some bees wax from a local beekeeper and paid $4.25 for half a pound and don't think I used more than 2 tablespoons for the whole instrument.
This is going to be my go to finish on a lot of projects.
Rudy's response to my question is below. Thanks again Rudy.
1. Heat the wood just to the point where the wax is liquified as
hits the surface. Don't be concerned how ugly this is.
2. You'll now have thick wax-covered areas and areas that are not as
heavily covered. Go over the surfaces again to the point where the wax
liquifies and wipe off the excess with a absorbant cotten rag. (An old
mostly cotton tee or even socks work fine.) The object is to remove
excess wax, and it's easier if you use a rag instead of the steel wool
when removing the excess wax.
3. You can polish the surface a bit with 0000 steel wool, but the
finish may be to your liking with just the cotton buffing.
I wouldn't be too concerned about heat effecting your glue joints;
consider that you're only warming the surface and the heat doesn't go
through the wood to the point of heating the glue. It cools as soon as
you move to a new area, also.
After you get comfortable with the process and do a few instruments it's
very easy and quick to do. I was sitting on our back screen porch
tonight after dinner and playing a banjo. I thought to myself as I was
playing, man this is a great finish! It feels like a "speed neck", but
with an obvious protective finish.
rudy - Posted - 07/30/2015: 06:40:35
Hi, Jim.
My best advice would be to try it on a scrap of whatever you want to use it on. I've used it on a number of native woods here and it's worked beautifully for me. I used it on a Pau Ferro fingerboard which is similar to rosewood and it worked fine.
I was playing a walnut jo yesterday and I was again reminded of how much I like this treatment. The neck feels like nothing else I've done in the past; the surface has a nice matt finish from the wax and it has none of the "stickiness" associated with most of the other finishes I've worked with. It feels like what most refer to as a "speed neck", but the wood has a much more substantial "finish" than what a penetrating oil would produce. The heated wood draws the wax into the pores and the wood absorbs the liquefied wax. Once the excess wax is buffed off the surface with a soft cotton rag what remains is a durable polished wax that has penetrated sub-surface and is therefore not subject to being rubbed off from contact.
I don't see any problem with application over an oil stain that has soaked in with any excess being wiped off well. I'd hive the stain a few days to dry thoroughly so there are no volatiles remaining.
I've got a banjo on the bench with a spalted maple rim that will have an oil stain applied followed by beeswax finish and don't anticipate any problems with doing that.
rudy - Posted - 07/30/2015: 06:52:12
Glen, Thanks so much for posting that!
While I was typing my response I was thinking I wish I had a copy of the e-mail that I sent you to just copy and paste here!
I'm glad others are willing to give this a go as I'm so pleased with the finish it produces with so little effort. You make a good point with the admonition for the need for proper surface preparation; here's golden rule #1 for finish work:
As with any other finish, the results will only be as good as the surface it's applied to. Just as finish will highlight the beauty of the wood surface, it will also highlight imperfections. That's why it's so important to check your surface for imperfections in good lighting prior to application of any finish. If there is any flaw it will be more apparant after finish is applied.
wizofos - Posted - 07/30/2015: 07:20:46
A few more thoughts while my mind is fresh, one thing that works is that if you have a 'gotcha' and you get a little scratch or 'bugger' it up a bit all you have to do is reheat the wax, wipe and polish. Easiest finish patch you have ever done. Totally disappears. Don't ask how I know.
By the way, I heated the wood and wax with a heat gun on low. A blow dryer might work as well.
If you ask about the comment in the e-mail about the glue joints, in my original question to Rudy I noted that Tightbond II and bees wax melt at close to the same temp, around 145f. But since you are only heating the surface for the wax the amount if heat you need to melt the wax is not enough to break a glue joint.
I used it on hard maple, walnut and baltic birch plywood.
Building a back packer guitar now and this is going to be the finish.
bartmcneil - Posted - 07/30/2015: 08:33:14
Pure bees wax has always been a simple and effective wood finish for interior use. Its advantage over oil based varnish is that it can easily be removed and re-vitalized by applying a new coat. You never have issues like checking and peeling as you have with varnish finishes. Beeswax never becomes rock hard. It can be applied without heating. It can be rubbed on the surface directly and polished with a cotton cloth. Plenty of info on beeswax and its uses on the internet.
Edited by - bartmcneil on 07/30/2015 09:00:37
bartmcneil - Posted - 07/30/2015: 09:17:48
Beeswax can be removed or thinned using turpentine or "paint thinner".
Edited by - bartmcneil on 07/30/2015 09:23:31
rudy - Posted - 07/30/2015: 11:15:15
quote:
Originally posted by bartmcneilPure bees wax has always been a simple and effective wood finish for interior use. Its advantage over oil based varnish is that it can easily be removed and re-vitalized by applying a new coat. You never have issues like checking and peeling as you have with varnish finishes. Beeswax never becomes rock hard. It can be applied without heating. It can be rubbed on the surface directly and polished with a cotton cloth. Plenty of info on beeswax and its uses on the internet.
Waxes and oils can certainly be applied topically and I've done a bunch of that in the past.
Heating the wood makes the pure wax finish an entirely different ballgame as the wax actually permeates the surface and embeds itself in the sub-surface wood. If you haven't tried this I'd recommend you experiment with it a bit before relegating it to just another topical oil or wax application technique.
I wouldn't personally recommend that it be thinned with an aromatic or other softening agent and applied as it then becomes just another topically applied temporary protective finish (IMHO).
Dan Drabek - Posted - 07/30/2015: 11:29:26
Has anyone tried melting paste floor wax (carnuba) and applying it to wood?
DD
rudy - Posted - 07/30/2015: 12:20:38
quote:
Originally posted by Dan Drabek
Has anyone tried melting paste floor wax (carnuba) and applying it to wood?
DD
Dan, I haven't tried paste waxes, but since they already contain softening agents I think it would reduce the effectiveness of the wax permeating the wood surface in it's more solid form.
The process of warming the wood to the melting point of the solid wax is what seems to make the process better than topical oils or soft waxes.
My very first attempts with this was to apply wax that was heated to its melting point, but applying it that way resulted in wax that solidified on the surface without the penetration that I obtained with the heated wood surface. It's interesting to watch the wax liquefy and draw into the wood surface when the proper temperature is reached. Once you get a feel for using the heat gun it's a very quick and easy process.
Edited by - rudy on 07/30/2015 12:25:01
Jonnycake White - Posted - 07/30/2015: 12:36:45
I just got back from three days at Scout camp last night. While there I assembled and played a simple banjo I'd finished with beeswax. Actually I used its rim as a demo project for our local luthier's group to demonstrate the beeswax finish, and several different builders applied the wax to small areas of the mahogany rim. I can't tell any difference or where one started and another ended - but I know that at least one of the builders simply rubbed on the wax and then used the heat gun to melt it into the wood. I also did this while finishing the neck. Randy, have you ever tried it that way? It seems a little easier than preheating the wood.
There were spots where I had to add wax to get a uniform finish, which I did while still applying heat also.
BTW I sat playing the banjo in direct sunlight for an hour or so, during part of the day. It didn't seem to affect the finish at all.
EDIT: reading Rudy's post above, I realize I never have tried heating the wood surface to the wax melting point. I don't think I have a good enough heat gun for that. However, I am pretty happy with the finish I did obtain by rubbing on the wax "cold" and then heating it to melting point.
Edited by - Jonnycake White on 07/30/2015 12:40:10
rudy - Posted - 07/30/2015: 12:56:27
quote:
Originally posted by Jonnycake White
I just got back from three days at Scout camp last night. While there I assembled and played a simple banjo I'd finished with beeswax. Actually I used its rim as a demo project for our local luthier's group to demonstrate the beeswax finish, and several different builders applied the wax to small areas of the mahogany rim. I can't tell any difference or where one started and another ended - but I know that at least one of the builders simply rubbed on the wax and then used the heat gun to melt it into the wood. I also did this while finishing the neck. Randy, have you ever tried it that way? It seems a little easier than preheating the wood.
There were spots where I had to add wax to get a uniform finish, which I did while still applying heat also.
BTW I sat playing the banjo in direct sunlight for an hour or so, during part of the day. It didn't seem to affect the finish at all.
EDIT: reading Rudy's post above, I realize I never have tried heating the wood surface to the wax melting point. I don't think I have a good enough heat gun for that. However, I am pretty happy with the finish I did obtain by rubbing on the wax "cold" and then heating it to melting point.
Jon, Yes, I have done it that way but I felt warming to wood to the point where the wax started to melt into the surface resulted in a superior finish. There would be nothing wrong with rubbing wax on and heating it to the melting point, but when I did it that way I could tell there were areas that would have taken up more wax if it was globbed on a little thicker initially.
I don't think that my way is vastly superior to other methods, but it yields the best results from the little I've experimented with it over the last year. I can tell you that I'm deeply in love with the look and feel of it, though.
The last walnut banjo I did I purposefully left open pored with no filler. I think that any attempt to pore fill the walnut would have prevented the wax from imfusing into the wood as well. The result was the grain is almost totally filled with only minor surface tewxture remaining and feels fantastic under hand.
Ken LeVan - Posted - 07/30/2015: 13:31:21
I have used wax finishes on furniture for many many years, and Briwax is my favorite (they make a version with beeswax). If you are a furniture maker, you can mix dirt in with the wax in order to create an antique finish, and it fills in cracks and indents just like hundreds of years of age.
It's wonderful stuff and I love buffing wax finishes up. It's a dream to use on the lathe. I have only ever used it on one banjo, and the potential problem it has with banjos (in my opinion) is that it is not very durable. If your idea is to periodically rewax the banjo like your car or dining room table, then it's the way to go. If you want to be "once and done", it's not. The banjo I waxed (actually a complicated multi step process) looks as if it has no finish, which, I think is the real charm of it (IMO). It depends on your expectation. There are a couple of quotations that I have used as guiding lights in my life over the years: one is "Don't eat yellow snow", another is "There is no free lunch", and the one I think bears on this is "liquid shoe polish doesn't work".
Here's a couple of paragraphs I copied from a woodworker's forum:
"Many woodworkers turn to wax finishes for their first attempt at finishing, and for good reason. They are easy to apply, give almost foolproof results, require no applicators beyond a rag and leave wood looking both rich and natural. Turners especially love them because they adapt perfectly to finishing wood still turning on the lathe.
If there is one Achilles’ heel these popular finishes suffer from, it is their lack of durability. You would probably not choose a simple wax finish for a bar top or kitchen table that will be assaulted with scratches, hot coffeepots or strong solvents, but they are perfect for bookcases, jewelry boxes, turnings, picture frames, blanket chests and a host of similar objects. While a wax finish can go on any type of wood, avoid putting oil (or Danish oil) on aromatic cedar or any of the dalbergia woods (rosewood, cocobolo, tulipwood). These woods contain an antioxidant that will prevent the oil from curing.
wax finishes
Sold in liquid, paste, and solid stick forms, waxes are formulated in a host of colors. You’ll find them in clear, amber, a range of wood tones and even white. Some waxes are softer, some are harder, but even the hardest waxes are softer than lacquers and varnishes. The fact that they are soft means they offer very little protection against scratches and wear. Waxes are derived from a variety of mineral, vegetable and animal sources. As a finish, waxes don’t penetrate wood, but rather sit atop it. They will prevent it from oxidizing (turning gray) but don’t particularly enhance the wood. In other words, once a coat of clear wax dries on the wood, it will look like freshly cut, but unfinished, wood.
Liquid or paste wax typically contains some solvent, and the wax “cures” as the solvent evaporates. Virtually all waxes will dissolve in mineral spirits or naphtha, which is handy to know should you ever need to remove wax, either from wood or on top of a finish. Most waxes melt at very low temperatures, so they don’t offer much in the way of heat resistance. However, they do shed water, which helps them resist food and drink spills. You can apply wax over any other finish and it will give the surface a soft sheen and smooth feel, but don’t put other finishes over wax. To apply liquid or paste wax, simply rub it on and wipe it off. A Scotchbrite™ pad or fine steel wool makes a good applicator; then wipe with paper shop towels. If you wipe the wax off immediately, it will leave a dull sheen as it dries. For more shine, let it dry, then buff it with a soft cloth."
rudy - Posted - 07/30/2015: 13:58:21
quote:
Originally posted by Ken LeVan
I have used wax finishes on furniture for many many years, and Briwax is my favorite (they make a version with beeswax). If you are a furniture maker, you can mix dirt in with the wax in order to create an antique finish, and it fills in cracks and indents just like hundreds of years of age.
It's wonderful stuff and I love buffing wax finishes up. It's a dream to use on the lathe. I have only ever used it on one banjo, and the potential problem it has with banjos (in my opinion) is that it is not very durable. If your idea is to periodically rewax the banjo like your car or dining room table, then it's the way to go. If you want to be "once and done", it's not. The banjo I waxed (actually a complicated multi step process) looks as if it has no finish, which, I think is the real charm of it (IMO). It depends on your expectation. There are a couple of quotations that I have used as guiding lights in my life over the years: one is "Don't eat yellow snow", another is "There is no free lunch", and the one I think bears on this is "liquid shoe polish doesn't work".
Here's a couple of paragraphs I copied from a woodworker's forum:
"Many woodworkers turn to wax finishes for their first attempt at finishing, and for good reason. They are easy to apply, give almost foolproof results, require no applicators beyond a rag and leave wood looking both rich and natural. Turners especially love them because they adapt perfectly to finishing wood still turning on the lathe.
If there is one Achilles’ heel these popular finishes suffer from, it is their lack of durability. You would probably not choose a simple wax finish for a bar top or kitchen table that will be assaulted with scratches, hot coffeepots or strong solvents, but they are perfect for bookcases, jewelry boxes, turnings, picture frames, blanket chests and a host of similar objects. While a wax finish can go on any type of wood, avoid putting oil (or Danish oil) on aromatic cedar or any of the dalbergia woods (rosewood, cocobolo, tulipwood). These woods contain an antioxidant that will prevent the oil from curing.
wax finishes
Sold in liquid, paste, and solid stick forms, waxes are formulated in a host of colors. You’ll find them in clear, amber, a range of wood tones and even white. Some waxes are softer, some are harder, but even the hardest waxes are softer than lacquers and varnishes. The fact that they are soft means they offer very little protection against scratches and wear. Waxes are derived from a variety of mineral, vegetable and animal sources.
As a finish, waxes don’t penetrate wood, but rather sit atop it.
They will prevent it from oxidizing (turning gray) but don’t particularly enhance the wood. In other words, once a coat of clear wax dries on the wood, it will look like freshly cut, but unfinished, wood.
Liquid or paste wax typically contains some solvent, and the wax “cures” as the solvent evaporates. Virtually all waxes will dissolve in mineral spirits or naphtha, which is handy to know should you ever need to remove wax, either from wood or on top of a finish. Most waxes melt at very low temperatures, so they don’t offer much in the way of heat resistance. However, they do shed water, which helps them resist food and drink spills. You can apply wax over any other finish and it will give the surface a soft sheen and smooth feel, but don’t put other finishes over wax. To apply liquid or paste wax, simply rub it on and wipe it off. A Scotchbrite™ pad or fine steel wool makes a good applicator; then wipe with paper shop towels. If you wipe the wax off immediately, it will leave a dull sheen as it dries. For more shine, let it dry, then buff it with a soft cloth."
Hi Ken, Thanks for your input.
I would disagree with the statement about the waxes not penetrating, I've observed quite the opposite as long as the wood is warmed to the wax's melting point.
It's true that no wax finish will provide the type of protection that a varnish, lacquer, or catyalized resin finish would provide. I'm reasonably careful with my instruments, but I don't object to putting a few Velveteen Rabbit touches on them, either.  The redeeming quality of the wax is, of course, it's dead easy to sand out a small scratch and heal the finish.
Most of my instruments that I've had for a long time have a few dents and dings in them, and the type of finish made no difference in me doing it. I'd have to over-spray my banjos with that pickup bed liner stuff to prevent that. 
Ken LeVan - Posted - 07/30/2015: 14:33:02
Normally, I don't want finishes on banjo parts to penetrate, but rather to sit on the surface so they are reversible. Maybe I don't think my finish is the last word, and want to be able to refinish it later on. I have two banjos like that right now
I think this is an important discussion that has been brought up many times. In shorthand, it is "lacquer vs tru-oil" - "surface vs penetrating" two opposite camps. I am clearly in the "surface" camp but 100% respectful of the "penetrating" camp. It's all about your expectations.
rudy - Posted - 07/30/2015: 14:57:49
quote:
Originally posted by Ken LeVan
Normally, I don't want finishes on banjo parts to penetrate, but rather to sit on the surface so they are reversible. Maybe I don't think my finish is the last word, and want to be able to refinish it later on. I have two banjos like that right now
I think this is an important discussion that has been brought up many times. In shorthand, it is "lacquer vs tru-oil" - "surface vs penetrating" two opposite camps. I am clearly in the "surface" camp but 100% respectful of the "penetrating" camp. It's all about your expectations.
I'm in total agreement. Normally wax finishes will be sitting on the wood's surface, but I'm doing the heat thing so the solid wax becomes a penetrating finish. As you say, the varnishes and lacquers we use are quite the opposite, and they are more easily reversible. Most think of those finishes as soaking in much more than they actually do; the volatiles soak in, slowly evaporate, and leave the surface finish (solids) behind.
The beeswax finish (as well as any oil) is for the most part irreversible so you have to be pretty certain it's what you want before you do it. On the other hand, it's just a a banjo and it's OK to change your mind. It's also permissible to have multiples.
I figure If I change my mind about what I desire in a finish I can always make more .
wizofos - Posted - 07/31/2015: 07:39:46
Ohhhh So many finishes and so few banjos.
To paraphrase the sage of Slippsen Falls, Wisconsin
"Kid, It's your banjo, finish it any damn way you want."
and as Rudy says, you can always make more.
Edited by - wizofos on 07/31/2015 07:41:55
jamesinkster - Posted - 07/31/2015: 08:41:41
So, as I'm about to start finishing my first build... Would anyone care to give a summary of tru oil (which previously appeared to be the holy grail) vs bees wax?
I suspect tru oil will be glossier and take longer to apply, whereas wax is quicker (and cheaper!) and easier and reversible?
Thanks!
​
rudy - Posted - 07/31/2015: 10:36:21
quote:
Originally posted by jamesinksterSo, as I'm about to start finishing my first build... Would anyone care to give a summary of tru oil (which previously appeared to be the holy grail) vs bees wax?
I suspect tru oil will be glossier and take longer to apply, whereas wax is quicker (and cheaper!) and easier and reversible?
Thanks!
A fair summation, but waxing isn't easily "reversible".
Tru Oil has it's advocates, but I've never been happy with less than about 15 coats as the build is so slow. I'm not a fan of high-gloss, and even if you dull the finish the areas where there is contact will develop a high gloss over time. I'm not that patient and it just takes too long to apply correctly IMHO.
I switched to Minwax wipe-on satin finish poly and felt it was a vast improvement over Tru Oil. I've finished a LOT of instruments using the poly, but I prefer the beeswax finish for a number of reasons.
nathane - Posted - 07/31/2015: 12:25:19
having only just started working with wood I read rudy's posts on beeswax and decided to give it a go with my rosewood pot zebrano neck build. I have to say that it is a wonderful finish. I used a heat gun to warm the wood and dripped liquid wax onto the surface. Excess was polished off with a cloth.
The finish is not at all tacky, feels super smooth (the neck feels amazing) and obviously not high gloss, but the figure on he rosewood pot is nicely highlighted.
I have now bought a big bag of the stuff and expect to use it lots going forwards.
rudy - Posted - 07/31/2015: 13:28:50
quote:
Originally posted by nathaneHaving only just started working with wood I read rudy's posts on beeswax and decided to give it a go with my rosewood pot zebrano neck build. I have to say that it is a wonderful finish. I used a heat gun to warm the wood and dripped liquid wax onto the surface. Excess was polished off with a cloth.
The finish is not at all tacky, feels super smooth (the neck feels amazing) and obviously not high gloss, but the figure on he rosewood pot is nicely highlighted.
I have now bought a big bag of the stuff and expect to use it lots going forwards.
Hi Nathan,
Glad you had a positive experience with your finish. Rosewood is usually so permiated with its own oils that I wouldn't have guessed it would have been as nice as that.
I believe I first posted the beeswax finish instructions in the "Banjo Building 101" topic, scroll down to step and photo #74 and #75 for the wax finish instructions.
banjohangout.org/topic/300493/2
I wanted to post it for new and first-time builders to eliminate the occasional problem with sticky, non-drying, or unsatisfactory finish jobs that are so commonly experianced. It's very frustrating for someone new to luthiery to put all that work in an instrument and then not be able to enjoy it.
When someone comes to the proverbial fork in the road I'm all for folks taking the easy route. I don't care if it's less traveled; when it comes to finishing it's all about the result.
Dan Drabek - Posted - 07/31/2015: 14:36:51
I realize that many of the skilled builders on this forum have their personal preferences for finishes, and this is usually the result of achieving satisfying results with it.
For those who are fairly new to banjo building--or even woodworking, for that matter--it will always pay to follow the advice of those who have learned by trial and error, as it tends to reduce the error part. However, there are still variables. You can follow a tried and true formula and find it doesn't work well in your particular climate or season of the year, or with your particular brand of finish, or with your particular piece of wood.
So I believe it's still wise to complete the trial part. Every piece of wood will be just a bit different in how it takes the stain; how well and quickly the finish will dry; what combinations of stain, sealer and finish work together, if they work at all.
Once an instrument is nearing completion, it's always tempting to rush into giving it a finish, but the finish is one of the most important parts of the final quality of the piece. Rushing to finish is always a bad idea, and can sometimes be disastrous. At best, by the time you're done, there may have been something you wished you had done differently.
My procedure is to do my finish testing at the beginning. As soon as I get the wood I plan to build with, I cut a couple of scraps off the wood and use them to test my planned finish. Two small pieces of wood gives me at least four surfaces to test the stain, sealer and finish combinations. And it allows me to pick the one that looks the best, before diving into the actual instrument. Since I do the finish testing at the time I'm starting the project, I have no feeling of impatience to get it done, or rush the drying time. On some projects I've done eight or ten test swatches before I found a finish combination that hit the spot. And if there is any problem with drying, etc. I find out quickly and try something else.
I'm pretty sure that most of the experienced builders do finish swatches when building with a new type of wood, or a different type of finish. Finishing is not a religion. You don't have to do it based on faith. Take the time to test your ideas, or suggested ideas. It's simply the smart thing to do.
DD
Ken LeVan - Posted - 07/31/2015: 15:06:00
What Dan says is absolutely right - You can't just listen to what someone like me says, then act on it, you have to try it out and see if it works.
Before I would try anything on an actual banjo, I would make a test swatch - called a "maquette".
You can use that to test anything from neck profile "feel" to finishes.

I would never just try something based on what someone like me tells you to do- I would test it out on a scrap or, better yet, a "maquette".
Don't commit yourself until you know what you are doing.
rudy - Posted - 07/31/2015: 15:38:50
As with ANY aspect of banjo building, it's always best to do a little preliminary testing before committing to any technique or finish.
That's why the FIRST line of my FIRST post was:
"My best advice would be to try it on a scrap of whatever you want to use it on."
Dan Drabek - Posted - 07/31/2015: 16:40:24
quote:
Originally posted by rudy
As with ANY aspect of banjo building, it's always best to do a little preliminary testing before committing to any technique or finish.
That's why the FIRST line of my FIRST post was:
"My best advice would be to try it on a scrap of whatever you want to use it on."
Yes you did Rudy. I just wanted to add my second to the motion, just to make sure everyone paid attention to it.
DD
Beetle_bombshell - Posted - 08/01/2015: 09:09:52
Just a thought, as a natural product is bees wax very variable? melting point? colour? After all honey is extremely variable.
Best regards Richard.
rudy - Posted - 08/01/2015: 09:46:40
quote:
Originally posted by Beetle_bombshellJust a thought, as a natural product is bees wax very variable? melting point? colour? After all honey is extremely variable.
Best regards Richard.
The commercial stuff tends to be pretty uniform and home brew such as I use can be a bit variable. I can get anything from lilly white (newly produced comb) to very dark if it's older wax they are reusing and contains propolis as part of their building process. My wax is a bit darker than the commercial stuff, but I don't have a lot of new comb and I don't re-melt the stuff that's propolized heavily.
In reality it doesn't matter much because the wax isn't going to add a lot of coloration. You could get a preview of what the waxed surface is going to look like by wiping on a bit of alcohol to wet the wood.
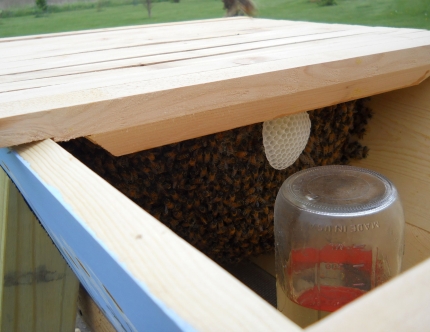
Here's a shot to demonstrate how pure white brand-new comb is as they expand in a hive. If you look close you can see lots of the ladies working on the next bar back.
Edited by - rudy on 08/01/2015 09:50:47
Helix - Posted - 08/04/2015: 17:56:32
Beeswax melts at 147 and discolors at 185, but it is still good as a finish. Cool hives, boo boo,
I have cleaned and bleached a few tons of beeswax from producers, my own hives and other beekeepers when I was producing pure beeswax candles.
Carnauba is a tree wax and melts at 180, used for floors, it's red.
Tru oil gets shiny but doesn't drag like lacquer can.
What Nathane said, beeswax is worth studying, it's sustainable, grows new every year from the abdomens of young bees, that's their first job.
Be aware that in the middle 70's all the domestic beeswax was bought up by electronics manufacturers in the Far East to use on the strings they were using to wrap wiring harnesses in large products like 1" Video tape machines, broadcasting equip and such so the string wouldn't cut into the wiring.
Blue Diamond has a great shop, a hexagon mill and real good product, you can even buy 1 lbs. boxes. white stuff.
If local, stay away from any slum gum in the wax, it's not worth the effort, has possible disease for other bees and such.
Propolis is produced by tree buds and is used to glue things together, collected and applied by novices. Early spring.
Study at what heat beeswax becomes effective. What temp is the best flow.
No one mentioned waterproof.
wizofos - Posted - 08/04/2015: 19:18:28
quote:
Originally posted by HelixStudy at what heat beeswax becomes effective. What temp is the best flow.
No one mentioned waterproof.
I have been playing with this and have not determines the best temp for flow but it goes from semi-solid to liquid pretty fast and I suspect not much over 147f which is the melting point.
As for water proof, I put some on a piece of 4x6 maple flooring to demo to another wood worker. In our discussion about the process the question came up about waterproof so I sprinkled some water on it. The water beaded up quickly and ran off. The one thing is did was discolor the areas that were wet. I am not at home but taking it home next weekend and will re-heat it and see what happens. If re-heating it won't clear up the discoloring then I will see what happens by re-coating it.
The discoloration is white haze.
Hawgfiddle65 - Posted - 08/05/2015: 00:56:32
Hi all
A big wodge of beeswax just arrived in the post 500 grammes .That should last a while .Off to the scraps bucket for some experimentation tonight
Thanks all for your input to this!
Jim
Helix - Posted - 08/05/2015: 16:03:26
A white haze from heat just might be leftover varnish or lacquer. There is a product for that.
rudy - Posted - 08/05/2015: 18:52:49
I was curious about the reported white haze, so I prepared a couple of samples to compare what results I could obtain.
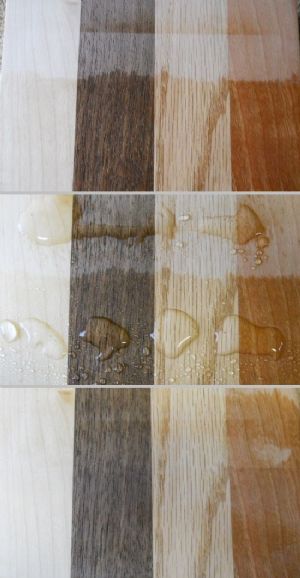
The test panel is composed of 4 wood samples (maple, walnut, oak, cherry); the first series of three photos are done without applying stain.
The second series of three photos is the exact same panel flipped over (side to side, so cherry, oak, walnut, maple left to right) and lightly stained before the wax application.
(The top portion of both the unstained and stained sides was left unwaxed so a visual comparison could be done.)
Each photo montage shows:
UPPER: Wood after waxing, the top edge was left unwaxed so a visual comparison could be made.
MIDDLE: Water squirted on both the unwaxed top portion and waxed lower portion.
LOWER: Water wiped away after 30 seconds.
Unstained sample:
Lightly stained sample:
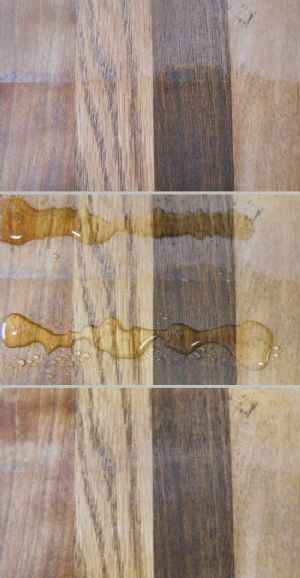
There is a bit of reflection in the photos, but the results to me showed no conclusive evidence of water induced haze. Perhaps if it is left on longer? I'm more interested in possible real-world scenarios, though. I've spilled beer and other assorted things on my banjos over the years and anything that scars a bit in the process I always consider adding to the Velveteen Rabbit effect.
Edited by - rudy on 08/05/2015 18:59:18
David Moore - Posted - 08/06/2015: 05:47:23
I am just finishing the assembly of a tenor with an old Strom neck and a brand new Zachary Hoyt rim. The neck is a rather dark yellowish maple and Zach made the rim of clear maple blocks which I will use a nice yellow maple wood dye to attempt to match or compliment the neck. The long neck I assembled with a Hoyt cherry rim I used wipe on poly. Now this discussion has me planning on using beeswax. I will probably sand down the finish on the neck as it has what looks like varnish then see how the two chunks of wood match. Dye wood as needed and then take a stab at finishing with wax. Fortunately I have lots of tools in my shop and some transfer to woodworking such as good heat guns.
By the way I now and again do 'old school lead body work' on antique car bodies and when cleaning bare metal for lead to adhere one doesn't want to use steel wool due to the sometimes nearly microscopic shavings that shed from the wool as noted in post above. Eventually it will rust no matter what you do so the trick is to use bronze wool instead. Not easy to find sometimes but it is softer than steel wool and might be a better product to use for beeswax.
While I do not have a wood lathe nor good woodworking equipment I can see how banjo building or assembling can become addictive.
I am finishing up my latest "last" car building project and who knows what will end up in the shop to keep me busy, and broke.
wizofos - Posted - 08/06/2015: 05:59:26
The haze I got was on a piece that was bare wood with bees was applied, no varnish or any other finish.
I am still away from home so not able to re-heat the piece and see if that takes the haze I observed away or if a light re-application of wax will fix it.
My interest is how easy it is to 'fix' little dings and some spilled beer. Almost any other finish requires extensive sanding and matching stain and or other finish.
Right now having more fun playing with grandkids and not too worried about haze on wood.
Edited by - wizofos on 08/06/2015 06:01:25
rudy - Posted - 08/06/2015: 07:00:38
quote:
Originally posted by David MooreI am just finishing the assembly of a tenor with an old Strom neck and a brand new Zachary Hoyt rim. The neck is a rather dark yellowish maple and Zach made the rim of clear maple blocks which I will use a nice yellow maple wood dye to attempt to match or compliment the neck. The long neck I assembled with a Hoyt cherry rim I used wipe on poly. Now this discussion has me planning on using beeswax. I will probably sand down the finish on the neck as it has what looks like varnish then see how the two chunks of wood match. Dye wood as needed and then take a stab at finishing with wax. Fortunately I have lots of tools in my shop and some transfer to woodworking such as good heat guns.
By the way I now and again do 'old school lead body work' on antique car bodies and when cleaning bare metal for lead to adhere one doesn't want to use steel wool due to the sometimes nearly microscopic shavings that shed from the wool as noted in post above. Eventually it will rust no matter what you do so the trick is to use bronze wool instead. Not easy to find sometimes but it is softer than steel wool and might be a better product to use for beeswax.
While I do not have a wood lathe nor good woodworking equipment I can see how banjo building or assembling can become addictive.
I am finishing up my latest "last" car building project and who knows what will end up in the shop to keep me busy, and broke.
Hi David,
There are some lathe-less alternatives for rim building, I list a few on my website.
I use 0000 steel wool fairly often and it is true that it takes additional diligence to clean any remnant dust off surfaces it has been used on. I try and hit any steel wooled (or sanded for that matter) surfaces with a clean tack rag before any application of finish.
As noted previously, steel wool is not necessary for the beeswax application method; a clean soft absorbent cloth works fine for removing excess wax when the surface is slightly re-heated.
Any finish one chooses to use must be evaluated for it's value based on the service that it's going to see. Musical instruments are generally not going to be subjected to the more rigorous wear and tear that other more utilitarian furniture is going to be subjected to, and considering that, for banjo use I'd select from three finish options:
1. Penetrating oil
Easy and quick, it can be re-applied at will but looks the "least finished" and offers the least protection from moisture or abrasion.
2. Wax (hard, and heat-applied. Any paste-type wax I'd consider in the same group as a penetrating oil)
More of a finished look than oil, a bit more difficult to apply than oil, but still very easy, a bit better abrasion resistance, good moisture barrier.
3. Minwax wipe-on polyurethane (satin preferred, gloss OK)
More of a "finished look" than wax, more difficult and time consuming than oil or wax, excellent abrasion and moisture resistance, much more difficult to repair.
That's my banjo finish choice list and other options are totally OK, I just don't personally use them due to the amount of time, skill, cost, need for PPE, odor, etc. that is needed to use other finishes. The beeswax is checking off all the boxes for me; Fast, easy, attractive look, moisture resistance, cost, easy reparability.
The one last point that I consider perhaps above all is the feel under hand of the wax finish. This feels like an instrument that has been "speed-necked" with a bit more of a protective finish. All of the topical finishes can feel a bit "sticky" for lack of a better term. The wax finish excels in that area by a huge factor.
Edited by - rudy on 08/06/2015 07:05:12
Jonnycake White - Posted - 08/06/2015: 08:00:50
I was assembling my beeswax-finished banjo at Scout camp last week, including leveling, crowning, and dressing the frets. I forgot to bring my painter's masking tape to protect the fretboard surface from the files etc. but one of the other guys had a roll of Scotch tape so I used that instead. When I removed it, I noticed that the finish was lighter on the neck edges where the tape had been wrapped around between frets. But I just rubbed it with my thumb and the color variation went away.
rubicon - Posted - 08/06/2015: 08:14:44
Can the beeswax finish be applied over an existing true oil finish ?
Edited by - rubicon on 08/06/2015 08:15:38
David Moore - Posted - 08/06/2015: 08:22:18
Thanks for that info Rudy. I carved a pair of Greenland paddles for my daughter and her husband a couple of years ago out of clear western cedar. Interesting carving something like that but I used boiled linseed oil on hers and it remained sticky forever. I recently stripped that finish off and used Minwax wipe on poly and it seemed to be ok but they haven't used it yet since kayaking season is not the middle of summer here. I was wondering about beeswax on cedar.
Regarding the tenor banjo I am assembling. I am certainly going to use beeswax as I like the ease of application and I do like a satin rubbed finish. The speed neck thing also appeals. The long neck I used poly on is nice and smooth but I would not say fast.
I have a metal lathe/vertical mill but it certainly isn't made for woodworking. But you can never have too many pieces of equipment !
Dave
rudy - Posted - 08/06/2015: 11:25:33
quote:
Originally posted by rubiconCan the beeswax finish be applied over an existing true oil finish ?
I would say no, and it most likely wouldn't work even if the Tru-oil was sanded off or chemically removed.
Tru-oil does seal the wood and soaks in just a bit so I don't think it could ever be completely removed from the wood pores enough to permit the wax to permeate the wood surface.
rudy - Posted - 08/06/2015: 11:29:49
quote:
Originally posted by David MooreThanks for that info Rudy. I carved a pair of Greenland paddles for my daughter and her husband a couple of years ago out of clear western cedar. Interesting carving something like that but I used boiled linseed oil on hers and it remained sticky forever. I recently stripped that finish off and used Minwax wipe on poly and it seemed to be ok but they haven't used it yet since kayaking season is not the middle of summer here. I was wondering about beeswax on cedar.
Regarding the tenor banjo I am assembling. I am certainly going to use beeswax as I like the ease of application and I do like a satin rubbed finish. The speed neck thing also appeals. The long neck I used poly on is nice and smooth but I would not say fast.
I have a metal lathe/vertical mill but it certainly isn't made for woodworking. But you can never have too many pieces of equipment !
Dave
Hi David,
I'm not sure about the cedar. It would be interesting if someone would do a test on cedar.
My past experience with cedar and redwood was many years ago and I seem to remember having difficulty with a finish due to the aromatics present in the wood.
David Moore - Posted - 08/06/2015: 17:33:24
Hi Rudy, I don't know about cedar in instrument making as it is so soft. I have never done anything with redwood but in Florida we have quite a bit of cypress and it is such an interesting wood I wonder how hard it is. Certainly is durable. I wonder if someone could carve a neck out of a cypress knee if one was long enough. Perhaps attached to a gourd....hmm
wizofos - Posted - 08/06/2015: 18:42:46
David,
According to this web site below it is pretty soft. Not what I would use for an instrument. The web site below has a lot of info and says Southern Cypress has a Janka hardness of 570, by comparison Sugar Maple is 1450 and Black Walnut is 1010.
Apparently there are several different types of cypress so I am assuming that you are referring to Southern Cypress.
As for cedar, apparently there are some guitar makers that are using Western Red Cedar for sound boards as a replacement for Sitka Spruce. Taylor's web site has a discussion about it .
taylorguitars.com/guitars/acou...red-cedar
Edited by - wizofos on 08/06/2015 18:50:46
rudy - Posted - 08/07/2015: 05:30:22
Cedar-topped guitars are fairly common. It isn't used as a replacement for spruce, but to provide another option in the tonal palette. I had a hand built Lowden with a cedar top and it sounded superb.
Edited by - rudy on 08/07/2015 05:33:04
Hawgfiddle65 - Posted - 08/07/2015: 05:40:33
Hi
I had a play with the beeswax last night.
I'd set my self a little experiment .In an earlier post I'd reported a problem with Truoil raising Fielblings stain. I divided a peice of mahogany in four and stained a pair of areas with Fielblings and one with Liberon ebony spirit dye. The fielblings was really solid black and the spirit stain probably took 3 coats to get a similar degree of ebony black ( would probably need more on a lighter wood) I left the stains to dry 2 days as recommening in one post .I finished one of the pairs with Truoil and one with beeswax .The Truoil still lifted the Fielblings stain but not the alcohol based stain. Both stains were fine under beeswax on lifting at all.
I also finished an area of bare mahogany with beeswax. Rubbed it down with extra fine papers ( down to 1000grit) .I applied the wax as Rudy described . The wood just swallowed it with hardly any residue on the surface. I buffed it with an old t shirt and it gave me the most wonderful smooth antique looking satin finish-you cannot feel any surface pores. The beeswax dressed stains finished just as well .
I am definitely sold on beeswax! The next pot I'm working on is a maple drum shell .Not sure whether to go with Fielblings plus beeswax or stick with Truoil and use the spirit stain .I'm not sure what glue has been used to joint the plies in the drum shell. I'm a bit worried that the heat might compromise the shell . I do like the solidness of the Fieblings black stain .Any advice or reassurace?
Jim
David Moore - Posted - 08/07/2015: 06:31:49
Cool Jim, I can't wait to finish my tenor with beeswax. Just waiting on the hardware so I can drill holes in the pot and such.
David Moore - Posted - 08/11/2015: 06:32:04
I am still waiting for a couple of hardware items to finish the tenor banjo but yesterday I sanded down the neck to remove the old varnish or whatever it was and used beeswax. I bought a stick of beeswax from a local wood craft shop and used a heat gun on low and it was fast and simple. The neck is maple and was a rather yellowish shade of maple and I think some of the yellow came from the varnish. I had finished drilling holes and sanding the rim and when I used the wax on it I was really pleased at how nice it looked. I went over the rim twice adding just a bit more wax the second time to even it out. Then an old T shirt and some elbow grease and the neck and pot look great.
A lot faster than multiple coats of Tru-Oil or wipe on poly and a nice satin look. I don't know how durable it will be over time compared to the other finishes but certainly easy to repair. And a plus was when applying the hot wax a nice pleasant honey odor came out.
Terms of Use | Privacy Policy | Privacy Consent (EU/GDPR Only)
Copyright 2026 Banjo Hangout. All Rights Reserved.


