
DVD-quality lessons (including tabs/sheet music) available for immediate viewing on any device.
Take your playing to the next level with the help of a local or online banjo teacher.
Weekly newsletter includes free lessons, favorite member content, banjo news and more.
Premier Sponsors


|
Please note this is an archived topic, so it is locked and unable to be replied to. You may, however, start a new topic and refer to this topic with a link: http://www.banjohangout.org/archive/288526
Page: 1 2
rudy - Posted - 07/22/2014: 05:24:46
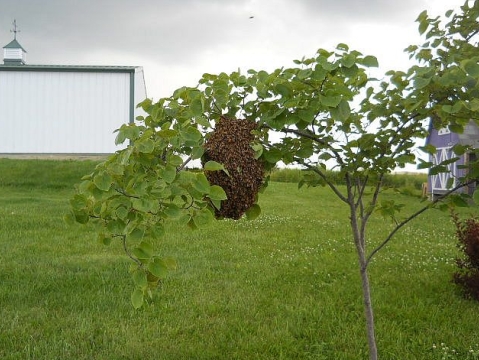
Earlier this year I thought it would be nice to delve into top bar beekeeping. (Don't worry, banjo content coming...) They successfully filled the first hive and about half the girls decided it was time to head for Dodge. I suited up and captured my first swarm, quickly built a second hive, and several weeks later they are buzzing along just fine in their new hive. How does this relate to banjos? Being an unskilled beekeeper, I've had a bit of collateral damage to a little of the honeycomb that the ladies have worked so hard to produce. Their efforts not in vain, we ate the honey and I saved the wax. The normal way honey is harvested from a top bar hive is to crush and strain the comb, so the potential exists for a LOT of wax eventually, so consequently I've been experimenting a bit with beeswax as a wood finish.
I first saw pure beeswax used by woodturners; applied to a finished turning and then liquefied by heat produced by friction from a polishing cloth held against the spinning work. I applied the wax to a few test turnings in cherry and walnut, easily producing a beautiful and tough finish. Encouraged by the initial results, I lathe-mounted a quartersawn oak banjo rim I had just completed, applied beeswax, held the polishing cloth to it, and was a bit startled to watch the wax liquify and soak into the rim surface. The finish was hard, had a very nice feel, and was beautiful. The completed rim was set to the side for a several weeks while my attentions were turned to other projects, but I finally got back to completing the rest of the instrument. The channeled dowel stick and neck were also finished with Beeswax, but they obviously couldn't be done on the lathe! I applied the finish using my heat gun, first warming the wood surfaces and applying the beeswax, which I formed into a large stick shape. I went back over the surfaces, first to warm and liquify the wax, then following with 0000 steel wool to remove any excess wax. All surfaces were done, including the fretboard. After the neck and channeled dowel stick cooled I polished them up with 0000 steel wool. The result? The surfaces are glass-smooth and have a totally wonderful under-hand feel. Another benefit is there no drying time. Once the wax is polished up with the 0000 steel wool the instrument can be assembled and played immediately. Easy, cheap, quick, and great results… I’m liking this. It’s also been a while since I worked with anything that smelled this good while it was being applied!
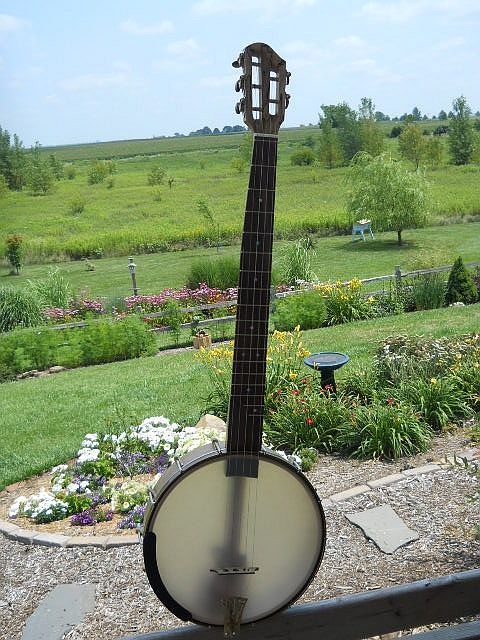
Here's the result, I'm very pleased with how it turned out. The girls are in the top bar hive visible under the willow in the background, oblivious to where their wax went!
A quick video (with only 1 blatantly blown note, I believe...
11" pot
25-1/2" scale
7/11ths bridge positioning
Kellar VSS tech shell with 1/16" quarter sawn oak outer layer
Raw brass shoes and tension band
Raw brass tailpiece, adjustable for lateral position, height, and down force
Spalted maple peg head overlay
Slot head 3+2 design
EVO frets (with zero fret) on Pau Ferro fret board
Stainless steel tunnel design
Grover Deluxe Sta-tite tuners retrofitted with ebony buttons
Remo Renaissance head
Maple/ebony/maple laminated 2.4 gram bridge
This particular banjo was done to experiment a bit with some construction details that I've been working on.
The rim started life as a Kellar drum shell (the VSS maple series is touted by Kellar as having much-improved sound qualities) and has a 1/16" outer lamination of quartersawn oak applied as well as a simple inlaid contrasting wood banding at the outer edge. This is a new type of rim for me, and I’m designing to use without the use of an additional tone ring. The rim's top edge is formed with a lip for the head to rest against, but any type of tone ring can be added later by cutting the top edge and machining to accommodate the desired ring.
The neck is reinforced with my usual 2024-T4 bar, but the bar width has been increased to 3/8". The bar dimensions make the neck much more rigid and will also provide even more opposition to any twisting force presented by more highly figured or grained woods if I choose to use them in the future. This also means I have to add any desired relief when I make the neck, as the force from string tension will NOT flex the neck with the extra thickness of the bar. There is about .015" relief permanently added to the neck in this case.
I also fitted this banjo with a tailpiece bracket that has lateral movement available to center the strings over the neck. I don't need to do this for my banjos, but I am looking for an option that can be retro-fitted to older banjos that have neck heel fit problems. Judging from what I've seen on new factory instruments it might serve them well to adopt this type of bracket to begin with! The tailpiece shown has lateral adjustment, height adjustment, adjustable down force, and a new Art Deco look. I've included a photo of the bottom for anyone who wonders what it takes to be able to easily fret saw 1/8" thick brass for the little string loop fingers. I really need an EDM machine. (Just joking… it’s not difficult to do.)
The raw brass brackets were made from wider ⅜” brass bar stock using a new design that’s easier to produce. The shoes are designed to fit close to the rim so there’s no excess protrusion of the shoe from the rim surface than shoes that I’ve made previously. It’s not a huge difference, but it does add to the comfort level of this standard open back design.
I believe the attached photos should be more-or-less self explanatory.
Thanks for looking!
Edited by - rudy on 07/22/2014 05:40:32
 Head shot |  Peg head |  Scoop |  Channeled Dowel Stick |
 Rear view |  Tailpiece |  Peg head rear |  Shoes and end detail |
 Arm Rest |  End Detail |  Tunnel end in slot |  Fifth fret tunnel |
 Rear of Adjustable Tailpiece |  Marking bridge slots |
mike gregory - Posted - 07/22/2014: 06:02:04
You may have to post EXACTLY where that blown note is.
Since I'm not familiar with the tune, everything seemed to be good.
The workmanship on the banjo is impressive, to say the least.
Congratulations to you and the Bee Girls for a well-done group effort.
RBuddy - Posted - 07/22/2014: 06:07:30
Beautiful banjo as usual Randy. Looks light as a feather too. Did you test the wax finish with a little water or anything? I imagine it would hold up to the rigors of real world play pretty well. Nice combination of woods too.
Brian
rudy - Posted - 07/22/2014: 06:54:10
quote:
Originally posted by mike gregoryYou may have to post EXACTLY where that blown note is.
Since I'm not familiar with the tune, everything seemed to be good.
The workmanship on the banjo is impressive, to say the least.
Congratulations to you and the Bee Girls for a well-done group effort.
:41 seconds has a note that could have been clearer! I try and make up a new tune for each new banjo, so this one wasn't an exception. The tune was also done using note positions pretty much all over the board from lowest to highest to demonstrate how terribly out of tune a banjo is when a straight bridge is used.
Thanks for the kind comments, Mike.
rudy - Posted - 07/22/2014: 07:02:49
quote:
Originally posted by RBuddyBeautiful banjo as usual Randy. Looks light as a feather too. Did you test the wax finish with a little water or anything? I imagine it would hold up to the rigors of real world play pretty well. Nice combination of woods too.
Brian
Thanks, Brian.
I did preliminary tests of the finish when I checked it out on the initial lathe turnings. Water rolls off of it like a duck's back.
The beeswax even did a pretty good job of filling the pores of the ring-porous oak at the end grain areas. I purposefully didn't fill so I could use the finish in a worst-case scenario.
The bizarre thing is this neck has the best feel of any neck I've ever played. The finish is almost like bare polished wood, except water will literally run off of it.
Earls 5 - Posted - 07/22/2014: 07:04:59
Beautiful work, sound, and playing Mr. Randy. Enjoyed the whole sha-bang even with the plain old straight bridge!
Hawgfiddle65 - Posted - 07/22/2014: 08:39:54
Hi Rudy... no buzzing on the drone string .....Thats my bee puns over with!... My wife is considering setting up a hive , a few neighbours are getting into bee keeping..I never considered using the beeswax to finish a banjo.. Great stuff .Jim
Jonnycake White - Posted - 07/22/2014: 08:56:35
Stellar work as usual - you've certainly raised the bar for me! I'll have to get some beeswax and try that sometime.
PeterJ - Posted - 07/22/2014: 09:23:55
Outstanding work, Randy -- I loved the tone (and your playing) and the overall look and feel. The tailpiece is a great idea, and looks cool, too.
More importantly, what have you named the girls? You do call them by name, don't you?
Tim Purcell - Posted - 07/22/2014: 09:41:48
Beautiful banjo, Randy!! Super nice workmanship! ...and the pickin' sounded mighty fine too.
Tim
rudy - Posted - 07/22/2014: 10:19:56
Thanks for the comments, all.
Peter, My grandkids named the new chickens since there are only 8.
They didn't want to attempt coming up with 60,000 names for the bees, even though I pointed out how to tell the boys from the girls once they are back in the box doing what bees do.
Edited by - rudy on 07/22/2014 10:22:15
Nuts - Posted - 07/22/2014: 11:02:00
Oh my! The bees are all a buzzzzz over the new banjo!
Nice bit of work there Randy, they just keep getting better. It has been interesting to see your latest innovations added to each new build.
Keep us posted on the durability/ practicality of your bees wax finish. I have been using floor paste wax (with no Silicon) mixed with a bit of boiled Linseed oil for fingerboards. I like the smell of Linseed oil but like the smell of pure bees wax even better, I might give that a go next time.
rudy - Posted - 07/22/2014: 11:15:36
Hi Paul.
I've never been fond of penetrating oil finishes as they just don't seem to keep that new car feel very long. I think the huge difference in this is the heat application process; you can really feel the difference it makes as opposed to a cold application. It wouldn't't make a difference for a penetrating oil, but it really seems to do the trick for a harder wax.
Dan Drabek - Posted - 07/22/2014: 11:42:36
Rudy, it's always a pleasuure to see and hear another unique and handsome instrument from you hands. The drum shell seems to do a very decent job as the banjo has the voice of a little angel. The hardware is pretty sweet, and looks like it should last forever.
I had an old, classic book on making gunstocks and one of the author's favorite finishes was simply paste wax that was melted and applied to a warmed stock. He kept applying coats until the wood would absorb no more wax, and then polished it. Very similar to your beeswax finish. He claimed it was quick and easy to apply, easy to renew, and protected against moisture better than an oil finish. The only drawback was that once finished with wax, you couldn't change your mind and apply a standard finish.
I think the Renaissance head is a good match for your banjos. It has a rich sound and I like the translucent look.
Another winner.
DD
rudy - Posted - 07/22/2014: 15:30:39
Thanks Dan. It for sure isn't ever going to be able to have varnish or other type of finish applied, so I'm glad I'm satisfied with the finish. The "hot wax" would definitely be super easy to repair or work with in the future if it should ever become necessary.
One of the concepts behind this one is the ability to easily retro-fit a ring if it would ever be desireable, and the tension band has plenty of clearance for hide, too.
aeroweenie - Posted - 07/22/2014: 18:12:52
Randy - great sounding banjo, I am surprised that a keller shell with an additional lamination sounds so good. Regarding the bees wax, at what temperature will the neck get sticky? I assume it must be well above 100 deg F since honeycombs in bee hives have to maintain their integrity during hot summers.
Todd Treadway - Posted - 07/22/2014: 18:28:54
Beautiful banjo, wonderful tone, and great original tune!
I'm curious about the thickness of that shell/rim, and whether bee's wax is different from, say, candle wax (I'm a wax dunce).
Love the end detail pix!
Shawn Hoover - Posted - 07/22/2014: 18:31:42
Wow. On another thread I demanded pictures of the fretboard and headplate polished, and, man, did you deliver. That is one suave 'jo. It wants to jump off the screen and melt into my hands.
The rim band looks good. I'm curious why you went with the band in this case instead of a full cap.
Do you notice any difference in balance compared to instruments with heavier rims and tone rings?
rudy - Posted - 07/22/2014: 19:17:49
quote:
Originally posted by aeroweenieRandy - great sounding banjo, I am surprised that a keller shell with an additional lamination sounds so good. Regarding the bees wax, at what temperature will the neck get sticky? I assume it must be well above 100 deg F since honeycombs in bee hives have to maintain their integrity during hot summers.
I don't think it's going to be a problem because all of the "free wax" is buffed off in the final step of polishing the finish with 0000 steel wool after the wood is cool. It feels as though the wax is totally absorbed into the wood, so even if it achieved a temperature that would normally soften there is no free wax on the surface of the wood.
During my initial testing when I was playing with the heat gun and the finished turnings applied heat didn't seem to soften the finish.
rudy - Posted - 07/22/2014: 19:31:44
quote:
Originally posted by Todd TreadwayBeautiful banjo, wonderful tone, and great original tune!
I'm curious about the thickness of that shell/rim, and whether bee's wax is different from, say, candle wax (I'm a wax dunce).
Love the end detail pix!
Hi Todd.
Bee's wax is supposed to have a higher melting point than standard candle waxes or paraffin. I love the process of using something that these tiny insects can quite rapidly make from natural materials as an instrument finish. I was a bit surprised to watch them make several square inches of fresh comb in a single day.
The shell ends up being 5/16" wall thickness after the outer veneer is applied. It doesn't sound like much, but these shells are really strong. I believe they are 8 ply to start with. Kellar has an entire page on their website explaining the recently developed process that makes the VSS series rims superior to any of their previous all wood rims.
rudy - Posted - 07/22/2014: 20:01:19
quote:
Originally posted by Shawn HooverWow. On another thread I demanded pictures of the fretboard and headplate polished, and, man, did you deliver. That is one suave 'jo. It wants to jump off the screen and melt into my hands.
The rim band looks good. I'm curious why you went with the band in this case instead of a full cap.
Do you notice any difference in balance compared to instruments with heavier rims and tone rings?
Thanks Shawn. It does look and feel great, far in excess of the very short time it takes to "wax on / wax off". It was so pleasant to spend a total of about 30 minutes to do the neck and channeled dowel stick, and then to immediately assemble the banjo without all the normal finish regimen that I'm accustomed to. My preferance is for dark banjo woods, and it was difficult to resist the temptation for staining to at least a light vintage amber.
The band was used to finish off and protect the outer lamination that would be subject to damage at the exposed edge. It is essentially binding, but very simple in implementation. I chose to not use a rim cap for several reasons. Since the Kellar rim layers are tight and attractive I chose to leave them exposed as a decorative element rather than covering the layers up. Each layer alternates between a light and a bit darker layer, so it ends up actually being attractive. I beveled the rear edge in slightly to eliminate the illusion of flatness with a squared off rear edge. I detest plastic banding, but love wood when it is discretely used. I believe I'll increase the binding height a bit on my next rims to feature it even more. I really like the look, as well as the amount of protection it affords a laminated rim. Another reason I did'nt cap was this one was really all about building as inexpensively (and quickly) as possible. Many of the detail choices were done with economy in mind, another reason for no tone ring design.
I don't notice much of a balance difference, part of that might be due to the slightly heavier shoe made from 3/8" brass bar instead of 1/4" bar. That's a 50% increase in shoe weight, I believe. The total lack of a tone ring definitely reduces pot weight, and it should theoretically be a bit neck heavy. In reality I'm not noticing any difference.
rudy - Posted - 07/22/2014: 20:07:27
quote:
Originally posted by BNJOMAKRJust beautiful, Rudy... !

Thank you much, Marvin.
The "two thumbs up" made me smile, as it brings back memories of Roger Ebert. Once in a while my wife and I would see Roger and his wife Chas in Steak and Shake when they would be in town for the Ebert film festival. He's from our adopted home town here and was well-loved by many.
OldInTheNewWay - Posted - 07/23/2014: 00:28:33
Rudy,
Love the banjo!!
As a owner of an oak neck banjo with a spalted maple bridge, this banjo hits close to home for me.
I really dig the whole idea of this build; affordable, easy to make yourself, unique methods and woods.
I'm always excited about your posts.
Keep 'em coming.
-Garrett
Tim Zowada - Posted - 07/23/2014: 04:08:39
Beautiful banjo!
I learned a similar finishing method from knife maker Gene Baskett many years ago. He mentioned it was a common finishing technique on Kentucky rifles.
In finishing my custom knife handles, I mix beeswax with lemon oil to a consistency of stiff butter. The finish is applied with a heat gun and polished with oooo steel wool, just is Rudy did. It makes a great and durable finish. I think I'll give it a try without the lemon oil, and see how it goes.
Shawn Hoover - Posted - 07/23/2014: 04:34:59
quote:
Originally posted by rudy
Thanks Shawn. It does look and feel great, far in excess of the very short time it takes to "wax on / wax off". It was so pleasant to spend a total of about 30 minutes to do the neck and channeled dowel stick, and then to immediately assemble the banjo without all the normal finish regimen that I'm accustomed to. My preferance is for dark banjo woods, and it was difficult to resist the temptation for staining to at least a light vintage amber.
Way to stay on the wagon. If I wanted a little color I'd have fallen to the temptation to slap on a coat of boiled linseed oil or try a chemical stain technique, but it's a very slippery slope (even before it's waxed).
It looks and sounds like the desired design elements came together just fine. Well done all around.
Dave1climber - Posted - 07/23/2014: 06:27:57
As others have said, a beautiful banjo with wonderful sound. Elegant simplicity.
One question. how much bees wax did it take to do the neck and rim?
Dave
Davidprat - Posted - 07/23/2014: 06:31:58
Now I have to explain to my Father in Law why I want the bee wax from his bees, He already think I'm crazy to make banjos...
rudy - Posted - 07/23/2014: 06:42:28
quote:
Originally posted by Tim ZowadaBeautiful banjo!
I learned a similar finishing method from knife maker Gene Baskett many years ago. He mentioned it was a common finishing technique on Kentucky rifles.
In finishing my custom knife handles, I mix beeswax with lemon oil to a consistency of stiff butter. The finish is applied with a heat gun and polished with oooo steel wool, just is Rudy did. It makes a great and durable finish. I think I'll give it a try without the lemon oil, and see how it goes.
Thanks for the info Tim. It's good to hear that there are others using similar finishing techniques.
I used a bit of intuition after doing the first applications on lathe turnings to replicate what happens in the lathe application process. The heat gun seemed an ideal solution to warm the wood enough to allow the liquefied wax to penetrate and soak in without doing any damage in the process.
rudy - Posted - 07/23/2014: 06:58:05
quote:
Originally posted by Dave1climberAs others have said, a beautiful banjo with wonderful sound. Elegant simplicity.
One question. how much bees wax did it take to do the neck and rim?
Dave
Hi Dave.
I rolled my wax into a crude cylinder shape so I could apply it easily. I warmed the wood just enough to soften the wax to the point that it could be rubbed onto the surface, using the wax cylinder like a giant marker tip. It partially soaked in during this initial application. I then followed the initial application by using the heat gun to completely liquefy the wax, rubbing off most of the excess wax with 0000 steel wool. This part of the process is great, as you can watch the wax penetrate as the wood surface literally transforms itself. Buffing any residual wax off after the wood completely cools finishes up the process.
I'd estimate that the rim, neck, and channeled dowel stick used around 2 cubic inches of wax, with a lot of that removed during the application process.
Dave1climber - Posted - 07/23/2014: 07:50:11
quote:
Originally posted by rudyquote:
Originally posted by Dave1climberAs others have said, a beautiful banjo with wonderful sound. Elegant simplicity.
One question. how much bees wax did it take to do the neck and rim?
Dave
Hi Dave.
I rolled my wax into a crude cylinder shape so I could apply it easily. I warmed the wood just enough to soften the wax to the point that it could be rubbed onto the surface, using the wax cylinder like a giant marker tip. It partially soaked in during this initial application. I then followed the initial application by using the heat gun to completely liquefy the wax, rubbing off most of the excess wax with 0000 steel wool. This part of the process is great, as you can watch the wax penetrate as the wood surface literally transforms itself. Buffing any residual wax off after the wood completely cools finishes up the process.
I'd estimate that the rim, neck, and channeled dowel stick used around 2 cubic inches of wax, with a lot of that removed during the application process.
Rudy
Thanks for the answer to the original question, and the detailed description of the application. When you mention heat gun, I would think that you are not referring to a hair dryer?
Dave
rudy - Posted - 07/23/2014: 08:05:46
Hi Dave, Heat gun as what is marketed for stripping paint. It gets much hotter than a hair drier but much less hot and more easily controlled than a propane-type torch.
Dave1climber - Posted - 07/23/2014: 12:02:33
quote:
Originally posted by rudyHi Dave, Heat gun as what is marketed for stripping paint. It gets much hotter than a hair drier but much less hot and more easily controlled than a propane-type torch.
Rudy
Thanks for the reply.
Dave
ken61 - Posted - 07/23/2014: 12:12:34
Rudy
Turners have used beeswax as a finish ,as you stated, for a long time.
Try mixing beeswax with REAL turpentine, let it set for awhile until it is the consistency of vaseline. Use this as a finish. The turpentine smess goes away.
Also melt beeswax with carnuba wax to make a friction finish--you can add a pinch of diatomaceous earth from the swimming pool filter to get a product very much like HUT which pen turners use as a finish.
Nice banjo.
ken
GMB - Posted - 07/23/2014: 12:50:19
GMB - Posted - 07/23/2014: 12:53:18
Rudy, I've always liked reading your posts and admire the generosity of how you share information. But this is far and away my favorite! Great banjo, great song, great playing! Made my day! Cheers, Jerry
rudy - Posted - 07/23/2014: 14:48:27
quote:
Originally posted by ken61Rudy
Turners have used beeswax as a finish ,as you stated, for a long time.
Try mixing beeswax with REAL turpentine, let it set for awhile until it is the consistency of vaseline. Use this as a finish. The turpentine smess goes away.
Also melt beeswax with carnuba wax to make a friction finish--you can add a pinch of diatomaceous earth from the swimming pool filter to get a product very much like HUT which pen turners use as a finish.
Nice banjo.
ken
Hi Ken, thanks much for input on the finish from a real-world turner. I watched a bunch of turning videos on Youtube while checking out the idea of heated permiating wax finishes.
I'm not sure other than ease of application what the benefit would be of the turpentine mix. I really hate the smell, too. Even if it subsides eventually.
I wasn't aware that turners use diatomaceous earth, and had read in the past that it can be very bad for your lungs. Wikipedia has a nice overview of the material and explains the two forms of the product, amorphous silica (relatively harmless) and it's close cousin, crystalline silica, which is the bad stuff. According to the Wiki article the swimming pool filter variety undergoes a process that changes it from the harmless to the hazardous variety. Just wanted to pass that on FYI. Here's a quote from the Wiki article:
Diatomite produced for pool filters is treated with high heat (calcination) and a fluxing agent (soda ash), causing the formerly harmless amorphous silicon dioxide to assume its crystalline form.
rudy - Posted - 07/23/2014: 15:09:31
quote:
Originally posted by GMBRudy, I've always liked reading your posts and admire the generosity of how you share information. But this is far and away my favorite! Great banjo, great song, great playing! Made my day! Cheers, Jerry
Thanks, Jerry. You made MY day!
I don't consider myself a great player, and have felt generally inadequate in the past for never really "getting" the claw hammer stroke. I came to accept the way I play as being a bit on the unusual side, but it's just the way I play, whatever it is.
If you like the playing style I'm going to be posting my very first "Tune Of The Week" over in the "Playing Advice, Claw hammer and Old Time Styles" section of the forum on August 22, 2014. Although I end up composing a lot of my own tunes, I'll be featuring a tune that is grounded in history, but most definitely outside of the usual fare. One of my personal favorites; it's a tune that has a great back story and SHOULD be a popular old time standard.
I'm going to put my own spin on it, with a demo version of the tune, a banjo only version to demonstrate the playing style for those interested in learning more about it, AND a back-up tracks version without banjo so you can learn the tune and play along with twin guitar and bass accompaniment.
It will be posted as TOTW 08-22-2014 (name). Can't spoil the fun by posting the name yet!
manomusic - Posted - 07/23/2014: 19:48:10
Hi Rudy,
great looking and sounding banjo. I really like this post for the obvious reasons, beeswax, great natural resource (I have a beekeeping neighbor) and easy to apply as you have stated. The drum shells are an idea I have toyed with for a while since seeing Jason Mogi using them.
Just a couple of questions, thoughts that yourself and others might be able to answer. How long will a beeswax finish last before having to be reapplied and would this be a task that most players would be willing to tackle? Also, the drum shells are approx 1/4'' in thickness. Having handled them in person, do you think they will last and keep their integrity over time? Please don't think I am being critical, I am seriously considering going this route myself but have these apprehensions.
All the best,
Neil
rudy - Posted - 07/24/2014: 04:42:43
Hi Neil,
As always, thanks for the nice comments.
My gut suspicions are that the permeated wax finish will be more or less permanent, not requiring re-application. My main complaint with penetrating oil finishes is they always seem to dry out and loose that initial beauty and feel. My limited experience with hard waxes applied in the usual fashion is that they produce a topical application that is subject to eventually wearing off with use. That was my reasoning behind elevating the wood temperature enough to get the wax to "soak in", and it certainly feels like exactly that; no residual wax on the wood's surface and superior look and feel under the hand. A few years of service will hopefully bear this out. I'm not fond of any instrument finish that requires the player to maintain it, so hopefully that won't be the case here.
As for the shells, I'm positive there won't be any problem with the integrity of the laminations. Keller has been making shells for over 50 years, so they have a very good track record. The VSS (vibrating sound source) technology is a relatively new concept, and Keller claims that improves the resonance of their rims by 50%. (There's a link to the explanatory pdf on their website.)
Multi-ply laminates have a long history of use in banjo rims, as many old Vegas will bear testimony to. I believe the thin layers can result in a superior rim because they don't have the static tension that a rim has that uses only a few plies. I'm a big fan of stress-free rims, so I believe the thin plies can result in a better product if they are done correctly. There's a lot of resistance to multi-ply rims due to the surface area of the glued layers, but I've never seen any empirical evidence that bears that out. Again, those 9 ply Vega rims certainly didn't make bad sounding banjos.
Keller is now advertising on their website that they have begun making rims with 40% thicker maple plies for even better sound. I believe the rims will be available in different ply configurations for thicker walls, but I'm not sure what they are making.
The basic Keller shell is very strong, as it comes from Keller it requires a lot of force to detect any flex in a 2-3/4" rim height, even before adding a figured wood veneer. Once it's assembled the pot has a very solid feel to it. The economics are attractive, for U.S. customers it works out to around $15 for a rim.
manomusic - Posted - 07/24/2014: 05:01:38
Thanks for the detailed answer Rudy,
I had a quote today from the Australian Kellar supplier and it will probably work out at approx $30 per rim which is still excellent value so I'm going to go with your advice and give it a shot. I'm thinking about ebonizing some of these with cider vinegar and iron filing mixture. Do you think the beeswax would still soak in well after this treatment?
Aradobanjo - Posted - 07/24/2014: 05:49:18
Hello Rudy,
Very nice work and good presentation on the building. The video is the best part. I enjoy confirmation that the words given demonstrate reality. Since the wax is homegrown, what methods do you employ to purify/refine the collected wax? Wax should be clean.
rudy - Posted - 07/24/2014: 06:20:06
quote:
Originally posted by manomusicThanks for the detailed answer Rudy,
I had a quote today from the Australian Kellar supplier and it will probably work out at approx $30 per rim which is still excellent value so I'm going to go with your advice and give it a shot. I'm thinking about ebonizing some of these with cider vinegar and iron filing mixture. Do you think the beeswax would still soak in well after this treatment?
The enobizing process would not effect the wax treatment. If you haven't done ebonizing in the past be aware that maple has very little tanin content, essential to the process. Most of what I've read relates that ebonizing maple using that method has pretty marginal results.
rudy - Posted - 07/24/2014: 07:09:44
quote:
Originally posted by AradobanjoHello Rudy,
Very nice work and good presentation on the building. The video is the best part. I enjoy confirmation that the words given demonstrate reality. Since the wax is homegrown, what methods do you employ to purify/refine the collected wax? Wax should be clean.
Thanks.
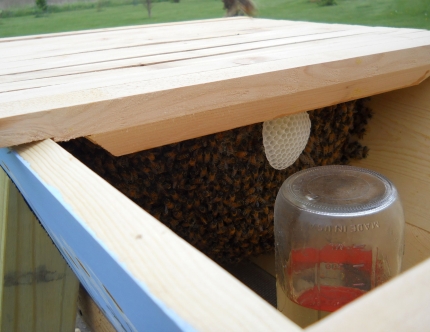
My homegrown supply is from new comb that I inadvertantly damaged while working the hive, small fieces of new burr comb that have to be cut away dufing hive inspection, and some honey-filled comb that was "harvested" due to my ham-handed beekeeping. Other than squeezing out the honey no processing is required, as it is ultra-pure as brand new comb. Our local apiary also has pure 1 ounce wax blocks at a couple bucks if I don't want to crack the whip on the ladies! Here's a shot of new comb, it doesn't get any purer than that!
Hawgfiddle65 - Posted - 07/24/2014: 08:38:55
Hi... Have noticed that beeswax bars comes invarious shades for various woods .I would guess they add some sort of colourant. ( There would be quite a range of colours of natural wax too depending on forage plants) Would there be any staining applications here. maybe some of the woodturners can advise?...Jim
rudy - Posted - 07/24/2014: 09:01:06
quote:
Originally posted by Hawgfiddle65
Hi... Have noticed that beeswax bars comes invarious shades for various woods .I would guess they add some sort of colourant. ( There would be quite a range of colours of natural wax too depending on forage plants) Would there be any staining applications here. maybe some of the woodturners can advise?...Jim
Hi Jim,
Pure beeswax has no added color. My wax was very light in color, but that's because it was more or less virgin wax. Beeswax can be darker after it is refined from older hive because older established hive is naturally darker as a result of the bees doing their bee thing. Unprocessed hive contains propolis (slag: bee glue, it's made from tree resins, it's what the bees use to seal and bond the hive), bits of left-over pollen, various bee parts, celulose that has been incorporated into the hive cells, etc. All of those things contribute to the darker color of the purified wax, as well as any heat added to process the wax will also darken it. The pollen and nectar that the bees harvest aren't ingredients of the processed wax.
Page: 1 2
Terms of Use | Privacy Policy | Privacy Consent (EU/GDPR Only)
Copyright 2026 Banjo Hangout. All Rights Reserved.


