
DVD-quality lessons (including tabs/sheet music) available for immediate viewing on any device.
Take your playing to the next level with the help of a local or online banjo teacher.
Weekly newsletter includes free lessons, favorite member content, banjo news and more.
Premier Sponsors


|
Please note this is an archived topic, so it is locked and unable to be replied to. You may, however, start a new topic and refer to this topic with a link: http://www.banjohangout.org/archive/283245
Mad Jack Gallows - Posted - 04/14/2014: 17:21:55
I believe its called a scarf joint, the angle cut at the top of the neck to put the headstock on at a certain angle. I have a very nice hunk of wood I'm using for the neck on a little camping banjo I'm building using a tunable hand drum as the pot. The piece I have is from an old oak bed frame, is about 8 in longer than a banjo fretboard, about an inch thick, and the back side is shaped like a trapezoid, only needing a little rounding on the back to make do as a decently playable neck. Is there a certain angle the scarf joint should be cut at for the pegheag? Or any other ideas on how to do the peghead? I have enough length, but don't know how I'd get the angle there without the scarf joint.
COBOB - Posted - 04/14/2014: 17:43:39
The scarf joint seems to be the most common option for us without extreme equipment. A fingerjoint is nice but who has the equipment for that? The scarf joint is commonly between 13 and 15 degrees.
swamplunker - Posted - 04/14/2014: 19:55:53
If you can clamp the two pieces in place and drill perpendicular to the glue line from the side that will covered by the fingerboard (without going through the bottom of the neck) and put a couple short pieces of dowel in on either side of the truss rod, you'll prevent the whole thing from slipping around when you glue it up. This will be a strong joint if done right.
Davidprat - Posted - 04/15/2014: 00:04:40
I make all my instruments with a scarf joint, same way the classic guitars are made, the angle is around 12 .
Hawgfiddle65 - Posted - 04/15/2014: 04:58:47
Hi....Working on 3 scarf necks at the moment..... never done this before... Peghead angle 15 degrees .
Jim
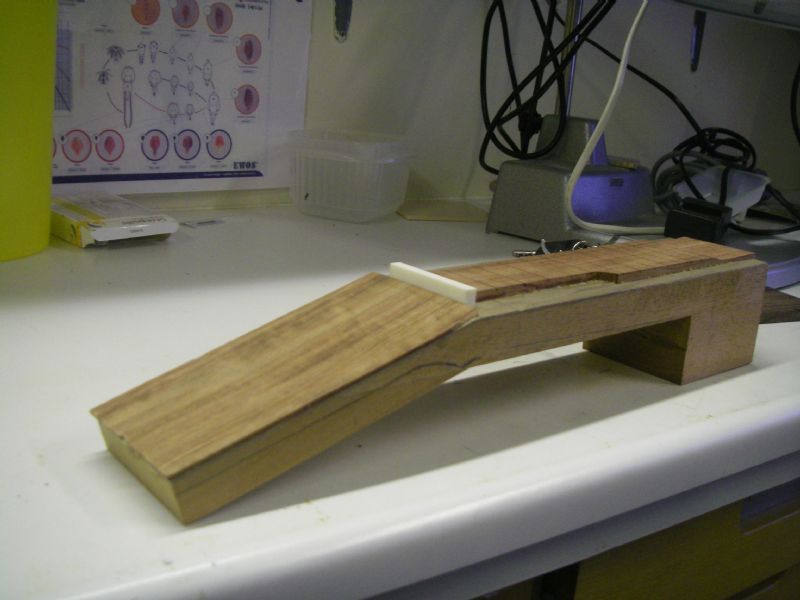 piccolo neck blank |
rudy - Posted - 04/15/2014: 05:14:44
quote:
Originally posted by swamplunkerIf you can clamp the two pieces in place and drill perpendicular to the glue line from the side that will covered by the fingerboard (without going through the bottom of the neck) and put a couple short pieces of dowel in on either side of the truss rod, you'll prevent the whole thing from slipping around when you glue it up. This will be a strong joint if done right.
Most demos of scarf joint gluing I've seen have been done by clamping the neck blank ends down to the bench before the joint is clamped to keep it from slipping.
mike gregory - Posted - 04/15/2014: 06:01:03
Some time back, a BHO member who does a lot of woodworking posted that he sprinkles just a bit of salt on the glued surfaces, prior to clamping.
It gives enough grit to keep things from sliding.
Myself, I drill a couple of finishing nails in, outside the margins of what will be the lines to saw the profile.
When the glue is dry, I heat up the nails and pull them out.
The nail holes are in the pits that get sawed off (sawn off??) and none of my scarf necks have been reported to me as having come apart, 1971 to present.
rudy - Posted - 04/15/2014: 06:16:11
quote:
Originally posted by mike gregorySome time back, a BHO member who does a lot of woodworking posted that he sprinkles just a bit of salt on the glued surfaces, prior to clamping.
It gives enough grit to keep things from sliding.
Myself, I drill a couple of finishing nails in, outside the margins of what will be the lines to saw the profile.
When the glue is dry, I heat up the nails and pull them out.
The nail holes are in the pits that get sawed off (sawn off??) and none of my scarf necks have been reported to me as having come apart, 1971 to present.
Who was that masked man?
I often use the same finish nail trick for peg head overlays. I drill two small holes directly at the spots where the tuners will be, so the holes are "disappeared" when the tuner holes are drilled. I do your version any place where there will be salvage areas, such as figured wood overlays on electric guitar tops.
Hawgfiddle65 - Posted - 04/15/2014: 07:11:18
Hi... As Rudy describes here is the scarf joint gluing up ,with the neck clamped to the workbench to prevent slippage...surprisingly easy!!Cheers Jim
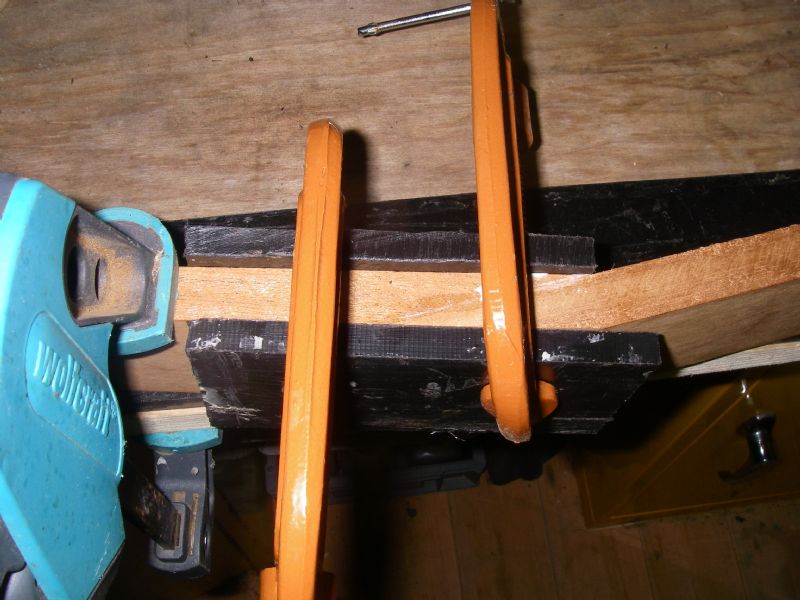 |
Mad Jack Gallows - Posted - 04/15/2014: 08:27:08
Thanks a lot foreveryone's advice and input. This little project isn't going to be anything beautifully fit n finished but of course I still want to make sure its done correctly and turns out to play and operate correctly. Its been a while since I built my first rim and have never built a neck before. All I can say is I definitely will miss having my mitre saw more than ever, along with alot of my other tools I no longer have that would definitely come in handy for this project. If done carefully and slowly will a handsaw or jig saw work ok? I know its definitely not the ideal tool to use but right now I'm pretty limited. I'm not tooworried about the heel, I've had some expierience recutting heels but never messed with building a peghead for a neck.
rudy - Posted - 04/15/2014: 09:12:01
quote:
Originally posted by Mad Jack Gallows
Thanks a lot foreveryone's advice and input. This little project isn't going to be anything beautifully fit n finished but of course I still want to make sure its done correctly and turns out to play and operate correctly. Its been a while since I built my first rim and have never built a neck before. All I can say is I definitely will miss having my mitre saw more than ever, along with alot of my other tools I no longer have that would definitely come in handy for this project. If done carefully and slowly will a handsaw or jig saw work ok? I know its definitely not the ideal tool to use but right now I'm pretty limited. I'm not tooworried about the heel, I've had some expierience recutting heels but never messed with building a peghead for a neck.
Was is essential is to create the joint with a precision fit. If it doesn't fit precisely you'll most likely experience a failure under tension. A really good fitting scarf joint is difficult to produce with even good power tools, so good luck on your joint. It's one of the reasons that many avoid the long scarf joint.
Jonnycake White - Posted - 04/15/2014: 09:55:05
Miracles can be done cheaply with some sandpaper glued to a flat board and appropriate fixtures or jigs to hold the pieces at the correct angle while sanding them. It takes elbow grease but it definitely can be done.
You also might want to look at this discussion on the split V-joint I posted a while back: banjohangout.org/topic/280571
Although I used a power disc sander to true up the scarfs, it could be done with a flat sanding board. The joint surfaces are quite a bit smaller than those for a horizontal scarf joint so they are easier to cut and true up by sanding.
BTW no miter saw I've ever seen can reach the sharp angles required for a scarf joint, though the back saw commonly used with miter boxes is not a bad tool to start with for the rough cuts.
Edited by - Jonnycake White on 04/15/2014 10:02:20
Dan Drabek - Posted - 04/15/2014: 12:13:16
It's not hard if you take your time. I've made several with hand tools that came out perfect. You need a good try square, a few clamps, a decent hand saw (a back saw is best, but any crosscut saw will work) and a decent plane. I usually use a smoothing plane, but a block plane will work just as well.
The best guide I've seen on cutting the scarf is in the book "classic guitar construction" by Irving sloane. It was how I learned to do it. Your library probably has a copy, but if not you can usually find one on Amazon used for a few bucks. Follow the instructions carefully, and you should have no problem. Make sure your plane blade is razor sharp. Clamping the two pieces together and planing them as a unit, while checking the squareness of the ends will give you a perfect joint if you work carefully. You don't need to use sandpaper with this method.
DD
swamplunker - Posted - 04/16/2014: 12:41:09
However you want to do a scarf joint, the main thing is Clamp it, Jed, Clampett!
rudy - Posted - 04/16/2014: 13:23:20
quote:
Originally posted by swamplunkerHowever you want to do a scarf joint, the main thing is Clamp it, Jed, Clampett!
If the fit is good a strong glue joint can be produced by simply rubbing the joint together and holding until the tack sets.
I'm not saying that clamping is not necessary, I'm saying that minimal clamping of a well-fit joint is going to trump a poor joint that needs lots of force to close it. Strong glue bond is really about uniformity of the joint surfaces. Uneven surfaces will result in some portions being glue-starved and other sections with a thick layer of glue that won't hold up under pressure.
Terms of Use | Privacy Policy | Privacy Consent (EU/GDPR Only)
Copyright 2026 Banjo Hangout. All Rights Reserved.


