
DVD-quality lessons (including tabs/sheet music) available for immediate viewing on any device.
Take your playing to the next level with the help of a local or online banjo teacher.
Weekly newsletter includes free lessons, favorite member content, banjo news and more.
Premier Sponsors


|
Please note this is an archived topic, so it is locked and unable to be replied to. You may, however, start a new topic and refer to this topic with a link: http://www.banjohangout.org/archive/258747
Richard Brown - Posted - 03/17/2013: 16:28:48
I promised a while ago that I would post some pictures of my heel sanding jig which I made a few years ago. I still make the initial cuts on the table saw as I have shown before because it also cuts for the tension hoop. I use this jig to refine the cut for a near perfect fit on 8", 10" and 11" rims, any radius could be accomplished by the addition of more holes. The three size rims are indexed by the three 1/4" holes and pivot on a 1/4" brass pin, the distance is set from the center of the pin to the outside of the sanding drum.
The banjo neck in the pictures is one I am working on now, it has an 8" rim and 17" scale length.
Richard Brown brownbanjos.com


Todd Treadway - Posted - 03/17/2013: 20:13:04
Very smart solution! How do you get it to cut the tension hoop notch?
Ken LeVan - Posted - 03/18/2013: 05:55:58
Very nice!
Do you make the tension hoop setback with the tablesaw, and then chisel it concave?
Ken
Richard Brown - Posted - 03/18/2013: 08:38:21
Randy, Glad you like it! This set up was inspired by the fixture you made, I just made it more versatile to accommodate other rim sizes.
Thanks Dan, you do some beautiful work!
Richard Brown - Posted - 03/18/2013: 09:31:08
Todd and Ken,
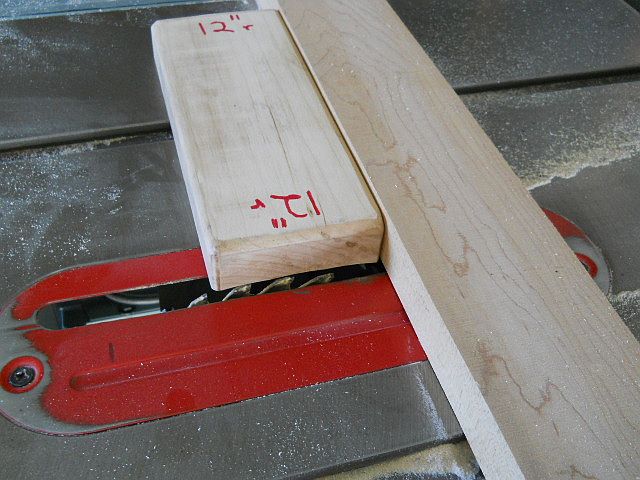
The cut to allow for the tension hoop is done on the table saw by passing the neck standing on end across the blade sideways against an adjustable fence, the same as the initial heel cut but stopped by a block positioned for the desired depth of cut. Both cuts must be accomplished by making several light passes as a saw blade is not designed to cut from the side. Also keep in mind the axis of the blade as it rises dose not maintain the same center, the fence must be adjusted to assure that both cuts will be centered on the heel at the final depth of cut.
I have tried to explain this operation quite a few times in the past but it seems as though everyone has a hard time wrapping their heads around the concept. It is quite simple and does a nice neat job once you understand the few mechanics involved. Maybe I'll do a video some day if I get the time?
The second picture shows the neck being held by a sled which I no longer use, now I just hold the neck by hand and pass it along the fence.


Todd Treadway - Posted - 03/18/2013: 09:43:29
One more question: Do you cut the tension hoop notch before or after the heel radius? Thanks!
Richard Brown - Posted - 03/18/2013: 09:47:50
quote:
Originally posted by Todd Treadway
One more question: Do you cut the tension hoop notch before or after the heel radius? Thanks!
After.
McUtsi - Posted - 03/18/2013: 10:49:39
Thanks for the pix ; nice work,nice jigs ; I use a two-step method too;
jig w" 11" drum followed by table saw notching.McUtsi
rudy - Posted - 03/18/2013: 11:23:40
quote:
Originally posted by Richard Brown
The cut to allow for the tension hoop is done on the table saw by passing the neck standing on end across the blade sideways against an adjustable fence, the same as the initial heel cut but stopped by a block positioned for the desired depth of cut. Both cuts must be accomplished by making several light passes as a saw blade is not designed to cut from the side. Also keep in mind the axis of the blade as it rises dose not maintain the same center, the fence must be adjusted to assure that both cuts will be centered on the heel at the final depth of cut.
Richard, Sometimes unorthodox methods are just fine to press a machine into service to create something in a way that was not originally intended. If I need radius blocks to profile fret boards I create them by following a pattern created on the end of a hardwood block. A quick pass with a curved cabinet scraper removes any small raised portions of the desired shape.
Richard Brown - Posted - 03/18/2013: 11:38:53
quote:
Originally posted by rudy
quote:
Originally posted by Richard Brown
The cut to allow for the tension hoop is done on the table saw by passing the neck standing on end across the blade sideways against an adjustable fence, the same as the initial heel cut but stopped by a block positioned for the desired depth of cut. Both cuts must be accomplished by making several light passes as a saw blade is not designed to cut from the side. Also keep in mind the axis of the blade as it rises dose not maintain the same center, the fence must be adjusted to assure that both cuts will be centered on the heel at the final depth of cut.
Richard, Sometimes unorthodox methods are just fine to press a machine into service to create something in a way that was not originally intended. If I need radius blocks to profile fret boards I create them by following a pattern created on the end of a hardwood block. A quick pass with a curved cabinet scraper removes any small raised portions of the desired shape.
Randy, Yes that's the same idea, I used to do a lot of restoration work on antiques and often reproduced moldings using a table saw. A cove can be cut by setting a fence at an angle to the blade, you could do that and accomplish any radius you like with a little tweaking, the cut is also somewhat easier as you are not only cutting from the side of the blade.
wetcoast - Posted - 03/18/2013: 14:02:11
Another question Richard and I'm sorry if the answer is obvious, do you use an 8" blade on the table saw to cut the radius to match the 8" rim size?
Thank you,
Mike
Richard Brown - Posted - 03/18/2013: 14:12:13
Mike, Yes I do use an 8" blade for 8" rims and use a 10" blade for both 10" and 11" rims, I also build a 7 1/4" round bodied wooden ukulele for which I use a 7 1/4" blade.
Ken LeVan - Posted - 03/18/2013: 14:41:05
Richard, Thanks!
I understand it now, and it makes a lot of sense - it's like the way you can cut a cove molding on a table saw by running the stock at a diagonal, except you are running it straight on, and the 10" saw blade cut gives you a nice relief - very clever!.
I like the way you can do the heel cut and tension hoop cut independently from one another. I can't do that with my system.
I use a more complicated sanding jig with 2 diameters, one which cuts the heel, the other which cuts the tension-hoop relief. It's made from stacked plywood with sandpaper glued to it, and they are linked together:


This makes a nice cut, but it's specific to my pots, and works on Vega pots, too - I can't really disassociate the rim from the tension hoop:

Ken
Richard Brown - Posted - 03/18/2013: 15:04:54
This is a very simple jig which is used to adjust the fit of the neck to the tension hoop. Normally this is done as part of the final assembly after the head and tension hoop have been have been attached to the finished rim in their proper location. Tension hoops are usually somewhat out of round and I do this adjustment to get even spacing ( about the thickness of a piece of paper) between the neck and tension hoop. The profile is scribed to the fingerboard using an old credit card as a spacer and a white pencil.


the neck is clamped to the underside of the jig and sanded to the line at a slow speed on the drill press. usually it takes several attempts of sanding, marking and sanding again to get it perfect,


The heel cap can be sanded by clamping the neck to the top of the jig with the heel facing the other way, though I now do this with the heel sanding jig shown at the beginning of this topic.
rudy - Posted - 03/18/2013: 17:25:25
Nice jig Richard. I see you also do as I often do and write myself instructional notes on the jig in question. I hate not using a particular specialty jig for a long time and then looking at it with a blank stare and asking myself "What in the h*** did I use this for?"
Yes, I started doing that as a direct result of pulling out a jig, knowing it was IMPORTANT, and never being able to figure out what it was used for.
Edited by - rudy on 03/18/2013 17:28:05
rudy - Posted - 03/18/2013: 17:44:52
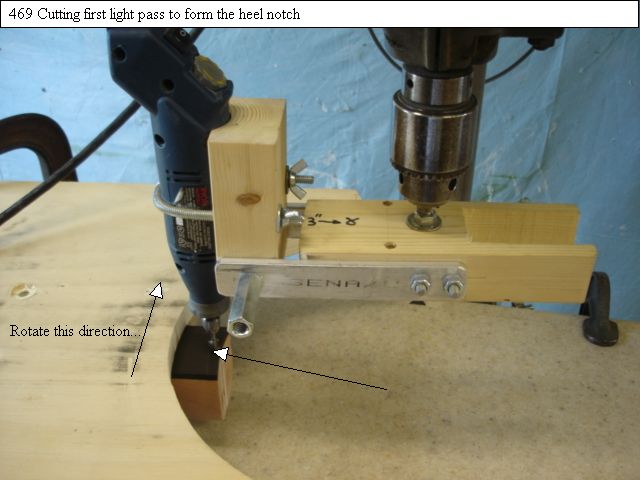
I do tension band notches by marking the tension band clearance in the same way, then matching the desired cut to a carbide tipped router bit in a rotary hobby tool jig as shown. I take a light initial cut then drop the cutter down to make successive cuts 1/16" for each pass. It's quick and accurate. I do like the totally visual approach of your jig, I'm just not sure I could be steady enough to not wander off the desired result. (Yes, the first set up step is draping the drill press plug over the end of the jig...)
blindsniper - Posted - 03/18/2013: 20:23:17
quote:
Originally posted by Richard Brown
.......I have tried to explain this operation quite a few times in the past but it seems as though everyone has a hard time wrapping their heads around the concept. It is quite simple and does a nice neat job once you understand the few mechanics involved. Maybe I'll do a video some day if I get the time?....
I am one of those who find it difficult to visualise the working of the jig. A video will really help.
Richard Brown - Posted - 03/20/2013: 15:35:52
Here are a few simple tools I made some time ago for final fitting of the tension hoop to the neck. Strips are cut from a sanding belt, inserted into the slot (cut on the band saw) and held at the other end by the thumb in the depression on the handle.
I have three sizes for 8" 10" and 11" rims.


Terms of Use | Privacy Policy | Privacy Consent (EU/GDPR Only)
Copyright 2026 Banjo Hangout. All Rights Reserved.


