
DVD-quality lessons (including tabs/sheet music) available for immediate viewing on any device.
Take your playing to the next level with the help of a local or online banjo teacher.
Weekly newsletter includes free lessons, favorite member content, banjo news and more.
Premier Sponsors


|
Please note this is an archived topic, so it is locked and unable to be replied to. You may, however, start a new topic and refer to this topic with a link: http://www.banjohangout.org/archive/163855/10
Page: 1 2 3 4 5 6 7 8 9 10 11 12 13 14 15
Delfield - Posted - 02/19/2010: 11:15:23
Okay, if no one else is going to ask...
What's with the leopard skin bowling ball? I think I understand what's going on, but can you fill in the details on that clever (and exotic) vise stand?
Thanks for the great (almost 3-month-long) ride!
Jeff
dubtom - Posted - 02/19/2010: 17:31:12
You haven't been paying attention Delfield, it 's on page ..eh.. about a month or so back.
DanKnowles - Posted - 02/19/2010: 17:33:19
Glenn,
Don't worry with bringing your own mirror, I have some to rent!
Ben,
I kinda know what I'd have to have for this banjo... but let me tell you a little true tale.
A couple of years ago I met David Emery in Selmer, Tennessee, to deliver Sherry Lynn (the First Ebony Banjo) to him. We sat out on a bench in the courthouse square and played banjos, talked and had a great time. When it came time for us to leave and each head home. I carried Sherry Lynn to his car, handed her to him. Honestly I felt like a father giving away his daughter at a wedding. It took all my will power to not reach out and say, "You can't take her!" Which is a funny thing concidering how I build instruments for a living. I'm not sure how I'd be with this one.
Jeff,
A while back I was talking with my good friend and master engraver William Moore and over the phone we designed this poor mans engraving vice. Since it was built I have found it a valuable tool in my shop. So valuable that I now use it more often than any of my other vices (or vises as the case may be).
This is how I got that much to sexy ball. I went down to our local thrift store hunting for a bowling ball. I wanted the heaviest one I could find. They had three. Two black ones and this cool one. As luck would have it the leopard had the most weight.
Basically I screwed a small machinists vice to the ball. The ball rides in a scrap rim (a friend of mine from Gibson gave me) which is lined with leather which came from a used leather jacket which came from the same thrift shop. It works like a charm. I can move whatever I'm working on to any angle and the leather has enough drag to hold it in place.
jbalch - Posted - 02/19/2010: 18:02:34
Dan:
Having played David's ebony banjo many times...I fully understand your reticence at letting her go.
My hope (and expectation) is that Othello will be her suitable rival...
Best wishes.
DanKnowles - Posted - 02/19/2010: 19:12:06
John,
Mine too!
FRETTING
Today I fretted Othello. As I was installing the frets, I thought that this subject could be of great use to many of you good folks. So I took a lot of photos of this process. I'll try to describe it in detail so it could be helpful to anyone doing fretting or re-fretting. With that in mind, I'll write this in several posts and post them over several days. The only thing I will not discuss is the removal of frets as would be done in a re-fret. Perhaps in some other post/ forum at a later date, I could deal with this.
Post 1 Preparation
The neck is placed on the bench and given a close inspection. I check to see that all of the binding is tightly glued and that everything that needs to be filled, has been.
Often times glue and other gunk has gotten into the fret slots. This must be removed or the frets will not seat. So I heat a flat knife, which I made from an old clock spring, in the flame of a propane torch. This is carefully inserted into the fret slot burning away the glue. And boy does the glue stink as it burns! This takes a bit of practice to get the temperature of the knife just right. One can burn through plastic bindings in a heartbeat. Wood bindings are a bit harder to ruin, still they can be damaged just the same.
Heating the knife.
Burning the slot clean.
After the slot is burned out, I use a knife to free the burnt glue and then vacuum the slots.
One of the very important techniques in fretting is radiousing the fret wire. This can be done in a couple of ways.
A set of pliers with a cut out for the tang (on one jaw) and another cutout for the fret crown (on the other jaw) may be used to manually bend the fret wire. Another way is the one I usually use. I place the fret wire in my handy dandy Stu-Mac fret roller and quickly have radiused fret wire.
Here are most of my fretting tools. Fret crowning files, fingerboard guards, mandrills, fret nippers, fret pliers (in the lower right, the one I described earlier), a slot cleaning saw, tang nipper and a ball peen hammer.

Next the fretboard is sanded to 2000... well in this case really it's just buffed. It's been sanded so much it really only needed this polishing. 2000 grit really makes it glow!
Because the juncture of the tang and the crown is slightly rounded, the top of the fret slots must be opened slightly or the wire will not seat fully. A small jewelers three cornered file is carefully used. The cut must stop at the edge of the binding or a cut will show under the fret crown.

Installing the fret wire tomorrow
Just a heads up, In the next few days I will be listing in the classifieds this Boettcher 1856/ Knowles Minstrel banjo.
DEmery - Posted - 02/19/2010: 19:50:58
Dan, I recall that day at the court house in McNairy County, Tennessee. That was the end of an interesting project. For those that have not worked through a Dan Knowles banjo project - they should do it simply for the experience. I have other privately built pieces but have experenced no one that will work a project as creatively to the end. As you know, we started out with a concept designed around the idea of a desired tone. Visually it went through two building ideas before we worked into the idea of an ebony neck attached to a maple pot. By the time we moved to the thought of a block ebony rim...John Balch floated the idea of an ebony rim on BHO. There was a strong response but no one felt it would produce anything other than a harsh tone due to density. One BHO member posted a "white paper" about a proto-type drum shell of ebony and its responsive qualities. Not knowing the end result, we agreed to go all ebony but you had to source seasoned ebony. Getting enough black gabon is tough but you finally found it. The result was unexpected but came only after a project that went longer and through more twists/turns than either of us planned. In short I understand your reluctance to let her go. You lived with that project so long...it was like family in the end. Readers should visit your website to view the link that took us through about 2 1/2 years of discussion, gathering materials, allowing ebony to cure, hand machined shoes, and more. David
Edited by - DEmery on 02/19/2010 19:53:18
 |  Ebony Banjo |  Ebony Banjo - Sherry Lynne | 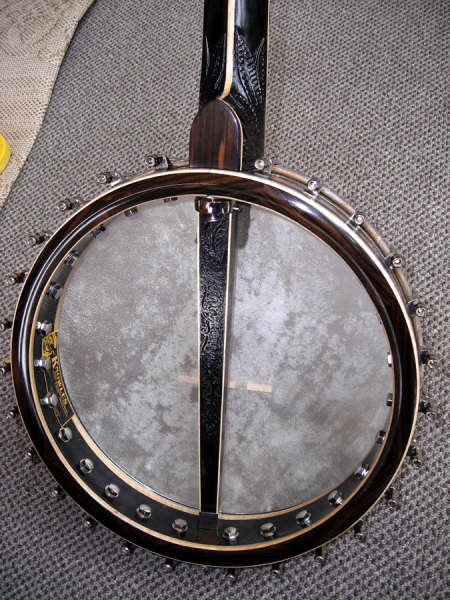 Pot of Ebony Banjo |
 |  |
jbalch - Posted - 02/20/2010: 07:27:53
Very Cool Dan!...when was this one built? Did you distress the finish?
DanKnowles - Posted - 02/20/2010: 16:41:33
David,
Thank you. That was a special time wasn't it? Although there is Sherry Lynn to show for it, far more special to me is the friendship which grew and blossomed from it.
John,
Yah that's a cool one. Marked 1856 it was built in 2004 from pre-aged wood finished in spirit varnish, gold pin striped, signed by A. Lincoln and then introduced to the effects of aging 148 years in about 3 months. I guess you could call that distressing... it'd certainly be distressing if it happened to me.
DanKnowles - Posted - 02/20/2010: 17:52:46
PRESETTING FRETS
#2
Here we go again.
After the fretboard has been sanded, fret slot tops open and the fret slots thoroughly cleaned and vacuumed out, we begin to fit the fret wire. First the end of the fretwire is trimmed flush. This is done with a set of flush ground end nippers.
Here the first piece has the tang (the part that goes into the fingerboard) cut.
Here the wire is placed with the tang butting against the binding and the wire is cut to length by holding the nipper against the outside of the opposite binding.
The cut fret is taken from the fingerboard and the other end of the tang is cut.
Here three fets have been set but not yet driven in.
Fret #5 is cut to length.
The fret wire is lightly taped with the ball peen hammer at each end. This is done in peperation for seating with the fret press. All of the frets are treated in this manner.
Here all the wire from one stick has been pre set in the fingerboard. It takes two sticks to complete this job.
Tomorrow the rest of the frets are installed, pressed and edge filed.
Here is another photo of the Boettcher
dbrooks - Posted - 02/21/2010: 07:32:58
A couple of years ago, when Dan was helping get my 1890s Bay State in playable condition by resetting the neck among other things, he showed me one of his "pre-aged" minstrel banjos. It won't surprise anyone on this thread that it was visually stunning and a joy to play. I thought I had an 1860s banjo in my hands. After my tentative efforts, Dan played a couple of tunes that showed off the true qualities of this instrument.
I also got to see Dan's "Pharoah" banjo at that time. Hopefully, I will get to see and hear Othello some day.
Edit: I just saw Dan's post in the Buy & Sell forum for the minstrel banjo and believe that this was the same banjo I saw and described above. Wonderful work.
David
Edited by - dbrooks on 02/21/2010 07:36:38
DanKnowles - Posted - 02/21/2010: 20:01:06
David,
Thanks for your kind comments. It was nice picking with you that day. Yep it was the same banjo.
I'll try to finish Othello up so I can get you to spend your opinion on it, next time I'm in Louisville.
Will1717 - Posted - 02/21/2010: 23:33:18
Dan:
I noticed that you arch your frets prior to hammering them in place. I've never tried this approach but am thinking that it may be easier to support the fret in the slot prior to pressing them in place. Is there any particular reason that you pre-curve the frets considering that it's a flat fingerboard, or this fingerboard arced?
You may find this interesting but I now cut all my fretboards on my cnc router. I first cut the shape of the board, the frailing scoop and the the inlays. Next I switch over to a 0.025 carbide cutter and slot the frets. When cutting the fret slots I leave approx. 1/16" of ebony at each edge of the board. When I install the frets I cut back the tang at each end of the fret wire and then press the fret in place. When the fret wire gets it's final dressing it looks like the fingerboard is bound with ebony, as the fret tans are completely hidden. To my surprise the carbide cutters will cut approx 10 boards before their finished. I have to say I don't know why I didn't go this direction years ago.
I'm presently out on the west coast but was speaking to Al Box over the week-end. He was telling me that he'll switch over the mill on Monday and get your tension hoop completed. We'll let you know when its shipped.
Bill Rickard


DanKnowles - Posted - 02/22/2010: 17:12:53
Bill
I always bend the wire and have for years. Don McCarty was the fella who gave me what little simi-formal training that I received taught me to do that. The idea is that the curve in the wire keeps the fret ends down. Keeps them from springing up under hammer blows.
This is a curved fingerboard but I always curve them even on flat boards.
I bet the only reason you didn't make those fancy boards before is that you didn't have a CNC handy! I'm looking forward to that new tension hoop arriving, I just took a master engraving lesson from William Moore and I'm ready to go!
Bill thanks for all your wondeful work,
Dan Knowles
DanKnowles - Posted - 02/22/2010: 18:14:28
SETTING THE FRETS
The frets were cut and placed from the body end towards the peghead, here we have reached the 5th. fret. This is another place I like to spend some exta attention. Most major makers just slap the 5th. string nut behind fret 5. Usually it is up in the air where the string deas not touch the fret. This causes this string to be out of tune either capoed or fretted. I have always wondered why with all the care placed elsewhere in these instruments a little time was not spent doing this correctly. I guess the answer is there...time.
Anyway, I usually cut the fretwire short to allow for the nut. The end of the fret is filed and polished, then placed ready for setting.
In years past I always set frets with a hammer. Then I got this press and life improved. Frets go down much cleaner and don't require as much later milling. Also it's much easier on my wrist, all that hammering, ya know. Here I'm pressing a fret home.
And another one...
Here, backing the fretwire with this metal block I hammer in the upper frets. These don't fit under the press.
Next I clip off the fret overhang with my nippers.
Then file the ends into basic shape with this fret beveling block & file.

DEmery - Posted - 02/23/2010: 18:36:43
Watching for the next installment Dan. Frett work looks great and I assume you aren't too far from getting some varnish on the neck..? It should really treat the detail carved to pop. Look forward to seeing it. David
maryzcox - Posted - 02/23/2010: 19:05:17
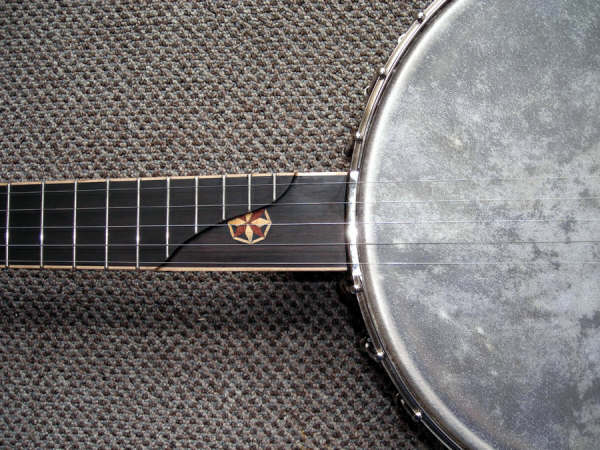
Boy--so am I--that neck inlay is just stunning.
Best wishes,
Mary Z. Cox
maryzcox.com
Bagpussfrog - Posted - 02/24/2010: 01:11:20
Dan, as I haven't said it in a while, I'm amazed by your continued commitment to showing us how this beauty works out, and as predicted she (or he, I guess) is looking great!, just lovely to see such fine craftsmanship and attention to detail. you are a true master (I will point out that I'm not in the habit of bandying suuch praise about, ususally)
I know it's essentially priceless, but I wonder Dan, if you were to make this banjo as a commercial venture, how much would you charge for it? (ballpark figure, if you can) I'm so impressed by your work, I may be in line to commission something (probably much less elaborate and generally gorgeous as this baby is!) when I'm ready for a new 'jo!
Best
Shaun
DanKnowles - Posted - 02/24/2010: 17:13:21
David,
Well today you get your wish, or at least the beginning of it!
Mary
Thank you for your kind words.
Shaun,
Thank you so much for your kind words. I'm not sure what I'd charge for this one, proably around $9,500. My average build is is around $2500 though.
DanKnowles - Posted - 02/24/2010: 17:49:43
BEGINNING TO POLISH
Before I dig into the finishing I'd like to show you how I "inlay" some ebony on the leaves which overlap the maple on the heel. I want them to be black like the rest of the leaves. First I did a bit of filing in the background. I'm trying to make these areas very smooth.
Mixing a bit of polish with black shoe/ leather dye I paint/stain the maple part of the leaves. I apply it at first only to the maple part of these leaves. After an hour or so, I paint off into the leaf.
Now we start French polishing or spirit varnishing the neck. Spirit varnish is an archaic term for a technique called French Polishing that has in recent days (the last ten years or so) become popular. I guess spirit varnishing just sound more sexy… who knows. Any way in an earlier post I described the finishing material that Ill use on the Othello. It is primarily shellac and alcohol with the addition of copal, sandarac, and benzoine (which in old finishing manuals was called Benjamin). After having set for about a week all of the ingredients have dissolved into the alcohol. Here I'm poring it off into the applicator bottle.
For my applicator I use a piece of fine linen about one foot squire, twice folded. Here I’m using a chunk of a old dress shirt. Into this I place a wad of raw cotton. Cotton is grown near here so in the fall of the year it is quite easy to find it on the side of the road and it’s free, just for the picking up of it up off the ground. I take the squeeze bottle and wet the cotton with finish.
Then I tamp it against my palm to distribute the finish.
Then using rounded swooping motions, I apply the finish to the surface. Each swoop overlaps just a bit. I always keep the pad/ applicator moving for If I stop the finish will lift.
Here is the neck after about a couple of hours of polishing. There are untold hours of rubbing left to go.
Another shot of the heel.
DEmery - Posted - 02/25/2010: 04:37:19
Dan, this is a great touch. I took note that the carving crossed the maple but had not thought using color to give the illusion ebony actually lays over the maple. The varnish should blend the tbony and painted texture...right? When you get a good amount of polish applied to the face plate of your headstock...shoot a good close up. The inlay detail should gain some nice depth. David
frihauf - Posted - 02/25/2010: 09:42:17
$9500? You have to be kidding. At $9500 you would be giving it away. I would have thought at least twice that, if not more. I better start saving my pennies.
As always, thanks for sharing.
Ben
quote:
Originally posted by DanKnowles
David,
Well today you get your wish, or at least the beginning of it!
Mary
Thank you for your kind words.
Shaun,
Thank you so much for your kind words. I'm not sure what I'd charge for this one, proably around $9,500. My average build is is around $2500 though.
DanKnowles - Posted - 02/25/2010: 18:36:40
David and Don,
Glad you like the leaves, those maplened/ painted them out! and rosewood lines crossing my leaves really bugged me... so I stained/ painted them out!
Ben,
Thanks for the compliment. I just like to be fair with anyone I deal with. By the way there is one of my banjos for sale in the classifieds right now.
banjohangout.org/classified/13758
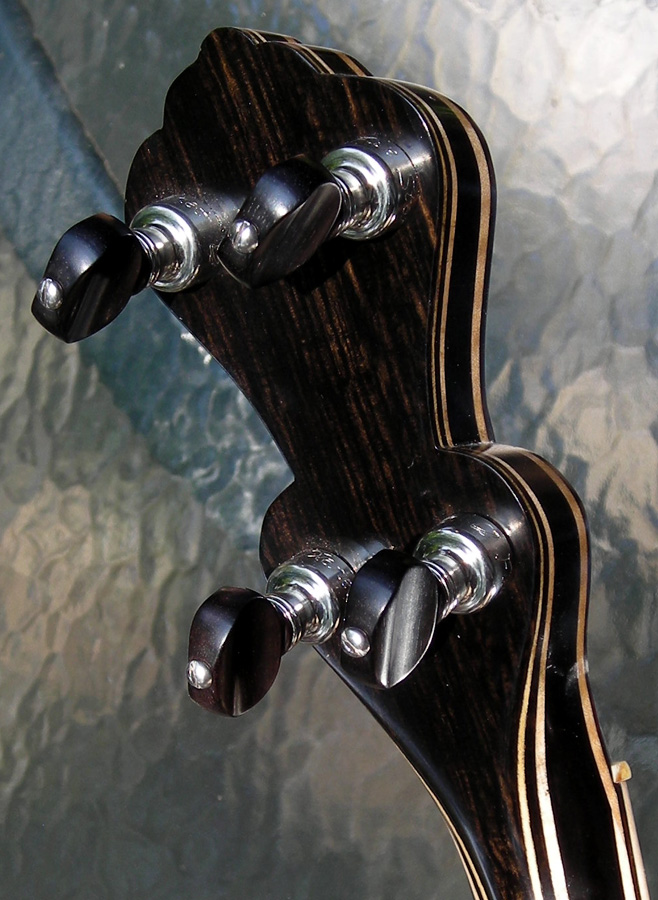
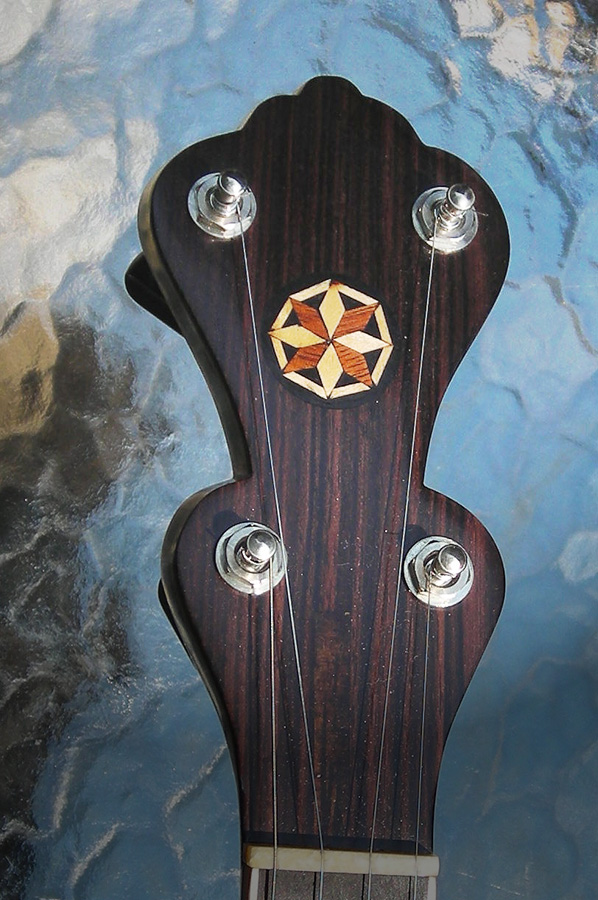
Here is a photo of the peghead.
Edited by - DanKnowles on 02/25/2010 19:37:48
DanKnowles - Posted - 02/25/2010: 18:55:19
RUBBING & RUBBING & RUBBING
I hope y'all like pictures, cause today is picture day... Ok stand still and say Cheese...
Not really, today was spent polishing and a little bit of sanding.
French Polishing creates what is called 'whips', or little ridges which form from the uneven polish buildup. This has to be sanded flat. Here that is 'zactly what I am doing. Sanding.

Then it's polish time. Here I'm working on the peghead.
Here using a small brush (5/0) I paint polish into all the grooves and background areas of the carving.
Now I'm whoopin' it up on the neck shaft.

Here some shine is growing. If you look closely you can see whips near the peghead edge.
And the heel carving. There are whips near the leaves.
And the neck caving.
More polishing tomorrow.
jbalch - Posted - 02/26/2010: 06:36:45
Dan:
Your French polish finishes look great for sure.
But the way they feel in you hand is what I really like about them.
bordertownbrown - Posted - 02/26/2010: 07:15:13
Dan, Looking great! I'm anxious to see how you do the fifth string nut or pip, this is something I've been thinking about and have come up with several ideas but why reinvent the wheel.
Richard
DanKnowles - Posted - 02/26/2010: 17:35:55
John
Thank you. French polish is my personal favorite feeling finish. Especially during the sticky summer months unlike lacquer it just gets slicker.
Richard,
It'll be a bit before I install the 5th. string nut but tomorrow I'll try to shoot some photos of the two differeny ways I deal with it.
By the way on March 6 I'm planning on going to Cedars of Lebanon State park here in Tennessee for the Breaking Up Winter Old Time music festival, I will try to bag up Othello and bring her with me.
DanKnowles - Posted - 02/26/2010: 18:21:49
MORE POLISH
Well folks, today was ...well... more rubbing...there was a bit of brush work too.
First thing in the morning I went after it with some 800 grit sandpapper. The shellac really loads the paper quickly (used dry) but I've found that rubbing it on my apron every so often makes it last a lot longer. Here I'm sanding the peghead.
I like to use transparent finish washes to dash in some extra color. This is always a hint, almost like a memory of color.
Here I dashing in some color on the edge of the peghead.
Here using a somewhat larger brush I'm adding finish to the background of the carving.
Here I'm sanding some of those background areas.
The tuner holes have been drilled and reamed to fit Pegheads tuners, here I'm opening up and beveling the tops of the tuner holes. I like rounded transitions, it makes it easre for the instrument to hold finish cleanly.
DEmery - Posted - 02/26/2010: 19:23:29
Beautiful Dan. I have enjoyed the profile of Sherry Lynne and your finish makes an equal impact when playing. You have taken this one over the top artistically and it is a pleasure to watch it come together. Look forward to seeing it anchored to a pot and ready to play soon. David
jbalch - Posted - 02/26/2010: 19:23:40
Dan:
Give me a call when you come to Breakin' Up Winter. I hope to be there for a while myself. Are you coming on Friday? or Saturday?
JB
DanKnowles - Posted - 02/26/2010: 19:48:51
David,
Me too! I'm just about ready to hear this ones voice... still I have a while to wait yet.
John,
I'll just be there on Saturday. Othello won't be together yet, but I'll bring her if the finish doesn't feel to tender. I'll call you.
trapdoor2 - Posted - 02/27/2010: 06:48:26
Now that will be a treat. I'll keep my fingers crossed that Othello makes it to BUW. I'll be driving up Sat morning early. Got a Kitchen Pass from she-who-runs-things and everything. 
Quickstep192 - Posted - 02/27/2010: 09:02:36
Dan,
I noticed your reference to shellac clogging the real fine grit sandpaper. Ever tried naphtha as a lubricant? I've been using it on furniture I finish with shellac for a while now with good results. Doesn't seem to dissolve the shellac, cleans up relativley easily and evaporates quickly and doesn't seem to leave any residue.
Edited by - Quickstep192 on 02/27/2010 09:03:31
rot-n-dobe - Posted - 02/27/2010: 12:38:43
there is also such a thing as a "sanding eraser", dont know how it works on sand paper but it works great on belt sanders, etc.
DanKnowles - Posted - 02/27/2010: 17:06:05
Marc,
It'll be good to see you there. Othello will proably be there too, at least the neck.
Quickstep,
I use naptha for cleaning although I truly despise the smell.
Rot-n-dobe
I use a eraser on all of my sanding papers, belts and such. Works good but my apron works great!
DanKnowles - Posted - 02/27/2010: 18:13:00
POLISHIN' & NUTS but no squirrelz
Starting sanding... sanding & more sanding.
Here I polish the peghead. I like this photo because it really gives a feeling of the motion of polishing.
The peghead after this polishing.
Polishing the heel...

NUTZ or how a fifth gained passage
Yesterday Richard Brown said something he was how I was going to deal with the 5th. string nut. Well it may be a while before I do anything with Othello's 5th. string nut, so I decided to present this, perhaps to help a little bit.
A nut is just an extension of the frets, some luthiers use zero frets on their instruments. Most major makers use a plastic 5th string nut which sets just behind fret 5. These are usually tall enough that the string is above the fifth fret. The string is stopped not on the fret but behind it, this causes the 5th. string to be out of tune when fretted or capoed. This can be corrected in three ways. First the nut slot is lowered enough that the string rides on the fret. Second, a HO railroad spike may be placed (like a capo spike) behind the 5th. fret causing the string to ride on the fret. Thirdly, the capo nut can be placed in line with the fret and cut to correct height.
Here is my Pharoah banjo's 5th. nut.
This is how it is made.
A piece of bone or ivory is turned in the lathe to around 1/8" 
A mating hole is drilled in line with the 5th fret. Then the nut is shaped and slotted to approximately the height of the fifth fret. The front of the nut is milled back parallel to the crown of the 5th. fret.

bordertownbrown - Posted - 02/28/2010: 13:27:29
Dan, Thanks for posting those pictures of the fifth string nut, your finish is looking mighty fine!
Richard
rot-n-dobe - Posted - 02/28/2010: 14:15:54
dan, i noticed that in your description of the 5th you cut the slot so the string is the same height as the 5th fret. a friend has a bart reiter banjo and the peg is slotted so the strings are even. can you explain why this is? is there a musical reason why they are different or is it just aesthetics? i want to do things the best way possible, i have been putting the peg behind the fret (wont be doing that any more), but now the height concerns me. hopibg you can clear this up for me.
thanks, steve
DanKnowles - Posted - 02/28/2010: 17:10:26
Richard,
Thanks, your stuff is looking good too! Glad I could do it, I hope it helps.
rot-n-dobe
You will need to ask Bart why he does his nut this way. But I would suspect it is done this way so that all of the strings will be on the same relative plain. The problem as I see it is that the sting length (on the 5th. string) must be adjusted to allow for the deflection and streaching of the string. In other words the capo will probably cause tuning problems for the 5th. string. I hope this makes since.
DanKnowles - Posted - 02/28/2010: 18:02:56
SUNDAY SPECIAL EDITION
Tonight a couple of special fun things that have been in my shop. The first is a repair/ restoration and the second one is a banjo that I built several years ago.
9 Stringer
Here we go this is a very cool 9 string oddity which was bought by my client from Bernunzio's. The original instrument could possibly have started life as a Vihuela de mano ca. 1800. Some time, perhaps 1900 the top was removed and English style banjo hardware was installed. The neck had been cut apart and cobbled together. The peghead and fingerboard was probably not from the original instrument. The neck, such as it was, was severely bent and the fingerboard was not in usable shape. 
The head could not be tightened due to the waist, which when tensioned pulled away from the head.
For this instrument I made a new rim, fingerboard (inlayed per original), rebuilt and reinforced the neck with carbon graphite, reinforced the body so it would not spread, made a new tension hoop, stretched a new head, strung it and set it up.
As a side not this instrument had the most interesting ancient case I have ever seen.

FAN FRETS
Here is a banjo I built perhaps 5 years ago. It is owned by Woodturner/ Denton Jordan. The banjo has several features of interest. First an foremost are the fanned frets. The fanned frets are based on the idea that shorter scales are sweater but have weaker bass and longer scales have stronger bass but harsher trebles. Here two scales are combined to gain the best of both worlds. The bass scale is 26 3/8" and the treble is 25". The banjo does indeed have sweet treble and strong warm bass. The thing that was surprising is that with a uncompensated bridge this instrument plays in perfect tuning...everywhere. I've built several guitars with this same type of design and they also play in tune, perfectly. I does take some getting used to the fanning of the frets, although less so on the banjo than on the guitar. Barring the 6 strings can sometimes feel a bit odd.

This banjo has a Bubinga (African rosewood) neck with maple and zircote back straps. The rim is maple and has an indregal tone ring. The 5th. string is tunneled and this inlay pattern is similar to the one on Abigale Washburn's minstrel which I built.

Lastly here is the Special Sunday Edition's photo of Othello's peghead.
DEmery - Posted - 02/28/2010: 18:22:58
Dan I recall you telling me about the fanned fretts on some of your pieces. I see it...hear you explain it - but cannot understand how it works. Dont try to explain it to me. I am a faith based banjo player and accept some things simply because of the reliable source. The headstock of your ebony banjo is more than I could have imagined but that has been my experience through most projects. The final results are always ahead of my vision art wise. Thanks for the deposit this evening. I will look for another withdrawal tomorrow evening. David E.
DanKnowles - Posted - 03/01/2010: 18:33:40
MORE POLISH
I almost hate to post photos of more polishing...but...
In truth this is a slow process, hours and hours of sanding and rubbing finish on. And such small amounts of finish. It is undestandable why most of us have gone to spraying.
Well first it's sanding with 800 grit.

And then polishing, building those minute amounts of finish. I ealize that in the photos it looks as though it's fully shined, but there has to be enough finish rub out in the end and it won't be there for several days.

Woodturner - Posted - 03/01/2010: 22:51:04
Yep...that banjo with the fanned frets is my pride and joy. I have a few bad pictures of it posted in my profile currently. I'll take some better and more detailed photos of this beauty and post them in my profile. I'll make another entry on this post after I've updated my pictures. Dan is simply amazing and I feel lucky to own it.
DanKnowles - Posted - 03/03/2010: 17:31:55
Denton,
I sure am glad you are enjoying her. I did enjoy building that one.
DanKnowles - Posted - 03/03/2010: 18:10:31
Folks
I have spent the last two days teaching and repairing and haven't had enough time to do anything but take a swipe or two of French polish on Othello. I doesn't hurt to allow the finish to sit and really get hard though. That's just what it's doing.
Tonight I have uploaded, for y'all to listen to a couple of MP3's from my new Old Time Country Music Opera called 1934. The first features our girl singer Holly it's titled Ain't No Dirt In New York City banjohangout.org/myhangout/mus...id=44416#. The next features all of the Almost Brothers and Grandpa Bobby Bob Almost's grandkids...it's called the Ohio River Chuckle.
I hope you enjoy them. Look back tomorrow and Othello will progress!
DEmery - Posted - 03/04/2010: 18:23:54
Well Dan...you must have taken another day off doing stuff that pays the bills. David E.
DanKnowles - Posted - 03/04/2010: 18:59:27
RIM CARVING
I've been thinking about this for quite some time. How to approach decorating the rim. Earlier I thought about using little bits of inlay between the bracket shoes. Then a bit more. Then completely ornate! Steam boats, fishermen, farmers on the banks, Longshore men working, Judges with juries impaneled, eagles, blue heron, catfish, wrecked steamboats. pirates, Huck & Tom, preachers preachin', politicians in D.C. tellin' the truth (that was goin' too far), hawks flying, foxes hunting , cows grazing... too Much!
So then I thought, most of the inlay is on the face of the neck and all of the fancy carving is on the back... carve the thing! So that's what I decided to do.
So far I'm thinking of a simple vine and leaf pattern, but y'all know me, that could change.
So today I started carving the rim and here is how it went.
First I sanded the whole rim, inside and out 120-400. I really like these photos, they make me look like I'm really moving!

Then I measured to where the center of the bracket shoes will be and marked that with a white pencil. Then I marked the basic vine shape in the space between the bracket shoes and the purfling.
Here the rim is loaded onto my rim drilling jig, this makes a handy vice for carving.
Then I started carving.

jbalch - Posted - 03/04/2010: 19:15:13
Now...this part is exciting. It will keep you on the edge of your seat for sure.
Terms of Use | Privacy Policy | Privacy Consent (EU/GDPR Only)
Copyright 2026 Banjo Hangout. All Rights Reserved.


